This tutorial will show you different ways to change the owner of a file, folder, drive, or registry key in Windows 10 and Windows 11.
You can set permissions for registry keys, and files and folders on NTFS and ReFS volumes. These permission allow or deny access to the files, folders, drives, and registry keys.
The owner controls how permissions are set on the object (ex: file, folder, drive, or registry key) and to whom (ex: user or group) permissions are granted.
An owner is assigned to an object when that object is created. By default, the owner is the creator of the object. No matter what permissions are set on an object, the owner of the object can always change the permissions.
References:

Access Control Overview
Managing Object Ownership
Take Ownership of a File or Folder
You must be signed in as an administrator, current owner, or have "full control" permissions to change the owner of a file, folder, drive, or registry key.
Do not change the owner of the Windows drive to avoid breaking Windows.
- Option One: Change Owner of File, Folder, or Drive using Context Menu
- Option Two: Change Owner of File, Folder, Drive, or Registry Key in Advanced Security Settings
- Option Three: Change Owner of File, Folder, or Drive using takeown Command
- Option Four: Change Owner of File, Folder, or Drive using icacls Command
- Option Five: Change Owner of File, Folder, or Drive using Set-Acl PowerShell Command
- Option Six: Change Owner of Registry Key using Set-Acl PowerShell Command
1 Add the Change Owner context menu if you haven't already. (see screenshots below)
You will need to click/tap on Show more options first by default, then click/tap on Change Owner.

Add Change Owner to Context Menu in Windows 11
 www.elevenforum.com
1 Perform an appropriate action below: (see screenshots below)
- In File Explorer (Win+E), right click on the file or folder you want to change the owner of, and click/tap on Properties.
- In Registry Editor (regedit.exe), right click on a registry key you want to change the owner of, and click/tap on Permissions.
2 Click/tap on the Security tab, and click/tap on the Advanced button. (see screenshots below)
If you see "You must have Read permissions to view the properties of this object", then you will need to change the owner to your account at step 5.
3 Click/tap on the Change Owner link. (see screenshots below)
You will see "Unable to display current owner" when you see "You must have Read permissions to view the properties of this object" in step 2.
4 Perform an action you want below: (see screenshot below)
- If you want to select a specific user or group as the owner, click/tap on the Advanced button.
- If you want to set Administrators as the owner, type Administrators in the "Enter the object name to select" box, click/tap on Check Names, and skip to step 6.
- If you want to set TrustedInstaller as the owner, type NT SERVICE\TrustedInstaller in the "Enter the object name to select" box, click/tap on Check Names, and skip to step 6.
5 Perform the steps below to select a user or group as the owner of this object: (see screenshots below)
- Click/tap on the Find Now button.
- Under "Search results" select a user or group in the 'Name" column you want as the owner.
- Click/tap on OK.
6 Click/tap on OK. (see screenshot below)
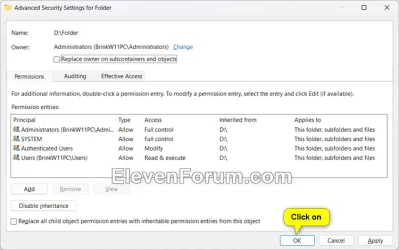
7 If this object is a folder, drive, or registry key, then check or uncheck Replace owner on subcontainers and objects for what you want. (see screenshot below)
If you check Replace owner on subcontainers and objects, it will also change the owner of all subkeys, or subfiles and subfolders in this object.
8 Click/tap on Yes to confirm if prompted. (see screenshot below)
9 Click/tap on OK. (see screenshot below)
takeown
1 Open Terminal (Admin), and select either Windows PowerShell or Command Prompt.
2 Type the command below you want to use into Terminal, and press Enter. (see screenshot below)
takeown /f "<full path of file with extension>"takeown /f "<full path of file with extension>" /atakeown /f "<full path of folder or drive>"takeown /f "<full path of folder or drive>" /atakeown /f "<full path of folder or drive>" /r /d ytakeown /f "<full path of folder or drive>" /a /r /d ySubstitute <full path of file with extension> in the commands above with the actual full path of the file with extension you want to change the owner of.
Substitute <full path of folder or drive> in the commands above with the actual full path of the folder or drive you want to change the owner of.
For example:
File: takeown /f "D:\Folder\File.txt"
Folder only: takeown /f "D:\Folder"
Folder and subfolders and files: takeown /f "D:\Folder" /r /d y
Drive only: takeown /f "D:"
Drive and subfolders and files: takeown /f "D:" /r /d y
icacls
1 Open Terminal (Admin), and select either Windows PowerShell or Command Prompt.
2 Type the command below you want to use into Terminal, and press Enter. (see screenshot below)
icacls "<full path of file with extension>" /setowner "<user or group>" /t /cicacls "<full path of file with extension>" /setowner "Administrators" /t /cicacls "<full path of file with extension>" /setowner "NT SERVICE\TrustedInstaller" /t /cicacls "<full path of folder or drive>" /setowner "<user or group>" /cicacls "<full path of folder or drive>" /setowner "Administrators" /cicacls "<full path of folder or drive>" /setowner "NT SERVICE\TrustedInstaller" /cicacls "<full path of folder or drive>" /setowner "<user or group>" /t /cicacls "<full path of folder or drive>" /setowner "Administrators" /t /cicacls "<full path of folder or drive>" /setowner "NT SERVICE\TrustedInstaller" /t /cSubstitute <full path of file with extension> in the commands above with the actual full path of the file with extension you want to change the owner of.
Substitute <full path of folder or drive> in the commands above with the actual full path of the folder or drive you want to change the owner of.
Substitute <user or group> in the commands above with the name of the user account (ex: "Brink") or group (ex: "Administrators") you want as the owner.
For example:
File: icacls "D:\Folder\File.txt" /setowner "Administrators" /t /c
Folder only: icacls "D:\Folder" /setowner "Administrators" /c
Folder and subfolders and files: icacls "D:\Folder" /setowner "Administrators" /t /c
Drive only: icacls "D:" /setowner "Administrators" /c
Drive and subfolders and files: icacls "D:" /setowner "Administrators" /c

Set-Acl (Microsoft.PowerShell.Security) - PowerShell
1 Open Terminal (Admin), and select Windows PowerShell.
2 Type the command below you want to use into Terminal, and press Enter. (see screenshot below)
Set-Acl -Path "<full path of file with extension>" -AclObject (Get-Acl "<full path of file with extension>" | ForEach-Object { $_.SetOwner([System.Security.Principal.NTAccount]" "<user or group>"); $_ })Set-Acl -Path "<full path of file with extension>" -AclObject (Get-Acl "<full path of file with extension>" | ForEach-Object { $_.SetOwner([System.Security.Principal.NTAccount]" "Administrators"); $_ })Set-Acl -Path "<full path of file with extension>" -AclObject (Get-Acl "<full path of file with extension>" | ForEach-Object { $_.SetOwner([System.Security.Principal.NTAccount]" "NT SERVICE\TrustedInstaller"); $_ })Set-Acl -Path "<full path of folder or drive>" -AclObject (Get-Acl "<full path of folder or drive>" | ForEach-Object { $_.SetOwner([System.Security.Principal.NTAccount]" "<user or group>"); $_ })Set-Acl -Path "<full path of folder or drive>" -AclObject (Get-Acl "<full path of folder or drive>" | ForEach-Object { $_.SetOwner([System.Security.Principal.NTAccount]" "Administrators"); $_ })Set-Acl -Path "<full path of folder or drive>" -AclObject (Get-Acl "<full path of folder or drive>" | ForEach-Object { $_.SetOwner([System.Security.Principal.NTAccount]" "NT SERVICE\TrustedInstaller"); $_ })Substitute <full path of file with extension> in the commands above with the actual full path of the file with extension you want to change the owner of.
Substitute <full path of folder or drive> in the commands above with the actual full path of the folder or drive you want to change the owner of.
Substitute <user or group> in the commands above with the name of the user account (ex: "Brink") or group (ex: "Administrators") you want as the owner.
For example:
File: Set-Acl -Path "D:\Folder\File.txt" -AclObject (Get-Acl "D:\Folder\File.txt" | ForEach-Object { $_.SetOwner([System.Security.Principal.NTAccount]" "Administrators"); $_ })
Folder only: Set-Acl -Path "D:\Folder" -AclObject (Get-Acl "D:\Folder" | ForEach-Object { $_.SetOwner([System.Security.Principal.NTAccount]" "Administrators"); $_ })
Drive only: Set-Acl -Path D:" -AclObject (Get-Acl "D:" | ForEach-Object { $_.SetOwner([System.Security.Principal.NTAccount]" "Administrators"); $_ })
Set-Acl (Microsoft.PowerShell.Security) - PowerShell
1 Open Terminal (Admin), and select Windows PowerShell.
2 Type the command below you want to use into Terminal, and press Enter. (see screenshot below)
$acl = Get-Acl "<branch>:\<key path>"; $acl.SetOwner([System.Security.Principal.NTAccount]"<user or group>"); Set-Acl "<branch>:\<key path>" $acl$acl = Get-Acl "<branch>:\<key path>"; $acl.SetOwner([System.Security.Principal.NTAccount]"Administrators"); Set-Acl "<branch>:\<key path>" $acl$acl = Get-Acl "<branch>:\<key path>"; $acl.SetOwner([System.Security.Principal.NTAccount]"NT SERVICE\TrustedInstaller"); Set-Acl "<branch>:\<key path>" $aclSubstitute <branch> in the commands above with the actual HKCR (HKEY_CLASSES_ROOT), HKCU (HKEY_CURRENT_USER), HKLM (HKEY_LOCAL_MACHINE), HKU (HKEY_USERS), or HKCC (HKEY_CURRENT_CONFIG) branch the key is in.
Substitute <key path> in the commands above with the rest of the path of the registry key.
Substitute <user or group> in the command above with the name of the user account (ex: "Brink") or group (ex: "Administrators") you want as the owner.
For example:
$acl = Get-Acl "HKCU:\Control Panel\ExampleKey"; $acl.SetOwner([System.Security.Principal.NTAccount]"Administrators"); Set-Acl "HKCU:\Control Panel\ExampleKey" $acl
That's it,
Shawn Brink
- Add or Remove Security tab on Properties Page in Windows 11
- Add Change Owner to Context Menu in Windows 11
- Add Take Ownership to Context Menu in Windows 11
- Add or Remove "Advanced security" Context Menu in Windows 11
- Change Permissions of File, Folder, Drive, or Registry Key in Windows 11
- Enable or Disable Inherited Permissions for File, Folder, or Registry Key in Windows 11
- View Effective Permissions of File, Folder, Drive, or Registry Key in Windows 11
- Reset Permissions of File, Folder, or Registry Key in Windows 11