Cloning System Partition, Recreating EFI and Recovery partitions...


I will also ensure that the partition type is set to GPT before proceeding further.
Is that just a switch I need to add or is there some other process to do this?

EDIT:
Actually I just realized that since I have a pretty new laptop that came with Win 10, only because at the time Win 11 was not available to them yet, and it has an NVme SSD and my new drive is also an NVme drive, the act of cloning it should have automatically made it GPT. Is this a correct assumption? I'm asking as I am procrastinating re-cloning the drive until I can verify that it actually does not boot first.
 
Last edited:

My Computers

System One System Two

  • OS
    Windows 10 Home 10.0.22000.318 upgraded to 11 V:21H2
    Computer type
    Laptop
    Manufacturer/Model
    HP Spectre x360 Convertible 15T-eb100
    CPU
    11th Gen Intel(R) Core(TM) i7-1165G7 @ 2.80GHz 2.70 G
    Motherboard
    HP 8812 Version 55.19
    Memory
    16.0 GB (15.6 GB usable)
    Graphics Card(s)
    Intel(R) Iris(R) Xe Graphics (iRISx) - discrete graphics
    Sound Card
    Realtek High Definition Audio
    Monitor(s) Displays
    Dell
    Screen Resolution
    HP Laptop: 3840x2160, Dell external 1680x1050
    Hard Drives
    NVMe KXG60ZNV512G KIOXIA (NTFS) SSD
    external Samsung 980 PRO PCle 4.0 NVMe M.2 SSD
    (want to make this the internal drive somehow)
    PSU
    135 W Smart AC power adapter
    Case
    emerald cut
    Keyboard
    external HP USB slim KB - PH0U
    Mouse
    Logitech M510
    Internet Speed
    10.3 mbps download, 0.91mbps upload
    Browser
    Chrome Version 97.0.4692.99 (Official Build) (64-bit)
    Antivirus
    Norton 360
    Other Info
    1. Power AC input
    2. HDMI 2.0b12
    3. Audio combo jack
    4. MicroSD reader
    5. Webcam Kill Switch
    6. USB 3.2 Gen 2 Type-A
    7. USB 3.2 Gen 2 Type-C™
    8. USB 3.2 Gen 2 Type-C™ with Thunderbolt™ 312
    Synaptics Precision Touchpad
    64-bit operating system, x64-based processor
    Pen and touch support with 10 touch points w/Windows Ink installed
  • Operating System
    Windows 10 Pro 64
    Computer type
    Laptop
    Manufacturer/Model
    HP Spectre x360-15t Touch Convertible
    CPU
    i7
    Memory
    16GB
    Graphics card(s)
    Intel Iris - Inteli76560U Processor Intel HD Graphics 16GB
    Monitor(s) Displays
    15.6" UHD WLED Display -Touch S
    Screen Resolution
    3840x2160
    Hard Drives
    1TB PCIe(R) NVMe M.2 SSD
    Browser
    Chrome
    Antivirus
    Norton
    Other Info
    I am currently locked out of this system by Microsoft. I cannot prove ownership so I an stuck at this point

    Web Cam, Dual Mic's, Active Stylus Pen, Backlit KB
    Thunderbolt 3
    One USB-A 3.0 port, two SuperSpeed USB 10Gbps
Just a note, you can't format a new SSD. You can only format partitions after they are created on the SSD. If you attempt to format an SSD with no partitions on it you will get an error that no partition is selected.
So is there a way to add partitions after the fact without damaging any data?
 

My Computers

System One System Two

  • OS
    Windows 10 Home 10.0.22000.318 upgraded to 11 V:21H2
    Computer type
    Laptop
    Manufacturer/Model
    HP Spectre x360 Convertible 15T-eb100
    CPU
    11th Gen Intel(R) Core(TM) i7-1165G7 @ 2.80GHz 2.70 G
    Motherboard
    HP 8812 Version 55.19
    Memory
    16.0 GB (15.6 GB usable)
    Graphics Card(s)
    Intel(R) Iris(R) Xe Graphics (iRISx) - discrete graphics
    Sound Card
    Realtek High Definition Audio
    Monitor(s) Displays
    Dell
    Screen Resolution
    HP Laptop: 3840x2160, Dell external 1680x1050
    Hard Drives
    NVMe KXG60ZNV512G KIOXIA (NTFS) SSD
    external Samsung 980 PRO PCle 4.0 NVMe M.2 SSD
    (want to make this the internal drive somehow)
    PSU
    135 W Smart AC power adapter
    Case
    emerald cut
    Keyboard
    external HP USB slim KB - PH0U
    Mouse
    Logitech M510
    Internet Speed
    10.3 mbps download, 0.91mbps upload
    Browser
    Chrome Version 97.0.4692.99 (Official Build) (64-bit)
    Antivirus
    Norton 360
    Other Info
    1. Power AC input
    2. HDMI 2.0b12
    3. Audio combo jack
    4. MicroSD reader
    5. Webcam Kill Switch
    6. USB 3.2 Gen 2 Type-A
    7. USB 3.2 Gen 2 Type-C™
    8. USB 3.2 Gen 2 Type-C™ with Thunderbolt™ 312
    Synaptics Precision Touchpad
    64-bit operating system, x64-based processor
    Pen and touch support with 10 touch points w/Windows Ink installed
  • Operating System
    Windows 10 Pro 64
    Computer type
    Laptop
    Manufacturer/Model
    HP Spectre x360-15t Touch Convertible
    CPU
    i7
    Memory
    16GB
    Graphics card(s)
    Intel Iris - Inteli76560U Processor Intel HD Graphics 16GB
    Monitor(s) Displays
    15.6" UHD WLED Display -Touch S
    Screen Resolution
    3840x2160
    Hard Drives
    1TB PCIe(R) NVMe M.2 SSD
    Browser
    Chrome
    Antivirus
    Norton
    Other Info
    I am currently locked out of this system by Microsoft. I cannot prove ownership so I an stuck at this point

    Web Cam, Dual Mic's, Active Stylus Pen, Backlit KB
    Thunderbolt 3
    One USB-A 3.0 port, two SuperSpeed USB 10Gbps
When you connect a brand new disk to your computer, you will first have to set the partition type under Disk Management (File Explorer won't show the disk unless it is configured under Disk Management). Once that is done, there is no reason why you can't simply run the format command.
You would simply be mistaken. You can only run the format command on an existing partition. For example, if disk 3 below was a brand new SSD:

Code:
C:\windows\system32>diskpart

Microsoft DiskPart version 10.0.22000.1

Copyright (C) Microsoft Corporation.
On computer: RAIDER

DISKPART> list disk

  Disk ###  Status         Size     Free     Dyn  Gpt
  --------  -------------  -------  -------  ---  ---
  Disk 0    Online          953 GB      0 B        *
  Disk 1    Online          465 GB      0 B        *
  Disk 3    Online          127 GB   127 GB

DISKPART> select disk 3

Disk 3 is now the selected disk.

DISKPART> format fs=ntfs quick

There is no volume selected.
Please select a volume and try again.

DISKPART> convert gpt

DiskPart successfully converted the selected disk to GPT format.

DISKPART> format fs=ntfs quick

There is no volume selected.
Please select a volume and try again.

DISKPART>

You can only format partitions (volumes), not disks. You have to create a partition first:

Code:
DISKPART> create partition primary

DiskPart succeeded in creating the specified partition.

DISKPART> format fs=ntfs quick

  100 percent completed

DiskPart successfully formatted the volume.

You are free to disagree with me, but it won't change the fact that you can't format a disk, you can only format partitions.
 

My Computers

System One System Two

  • OS
    Windows 11
    Computer type
    PC/Desktop
    Manufacturer/Model
    Homebuilt
    CPU
    AMD Ryzen 7 3800XT
    Motherboard
    ASUS ROG Crosshair VII Hero (WiFi)
    Memory
    32GB
    Graphics Card(s)
    EVGA GeForce GTX 1080 Ti
  • Operating System
    Windows 11 Education
    Computer type
    Laptop
    Manufacturer/Model
    Dell Inspiron 7773
    CPU
    Intel i7-8550U
    Memory
    32GB
    Graphics card(s)
    Nvidia Geforce MX150
    Sound Card
    Realtek
    Monitor(s) Displays
    17"
    Screen Resolution
    1920 x 1080
    Hard Drives
    Toshiba 512GB NVMe SSD
    SK Hynix 512GB SATA SSD
    Internet Speed
    Fast!
So is there a way to add partitions after the fact without damaging any data?
Yes, you can add partitions to a disk without destroying data. If you do not have any unallocated space to create a partition in, then you shrink an existing partition to create unallocated space. Then you create you new partition in the unallocated space. Then you format the new partition to the filesystem you want (NTFS, FAT32, exFAT, etc.) usually NTFS. You cannot format a disk, it's impossible. You can only format partitions once a partition is created. A brand new SSD or HDD will be nothing but unallocated space. You cannot format unallocated space, there has to be a partition created in the unallocated space first.
 

My Computers

System One System Two

  • OS
    Windows 11
    Computer type
    PC/Desktop
    Manufacturer/Model
    Homebuilt
    CPU
    AMD Ryzen 7 3800XT
    Motherboard
    ASUS ROG Crosshair VII Hero (WiFi)
    Memory
    32GB
    Graphics Card(s)
    EVGA GeForce GTX 1080 Ti
  • Operating System
    Windows 11 Education
    Computer type
    Laptop
    Manufacturer/Model
    Dell Inspiron 7773
    CPU
    Intel i7-8550U
    Memory
    32GB
    Graphics card(s)
    Nvidia Geforce MX150
    Sound Card
    Realtek
    Monitor(s) Displays
    17"
    Screen Resolution
    1920 x 1080
    Hard Drives
    Toshiba 512GB NVMe SSD
    SK Hynix 512GB SATA SSD
    Internet Speed
    Fast!
Yes, you can add partitions to a disk without destroying data. If you do not have any unallocated space to create a partition in, then you shrink an existing partition to create unallocated space. Then you create you new partition in the unallocated space. Then you format the new partition to the filesystem you want (NTFS, FAT32, exFAT, etc.) usually NTFS. You cannot format a disk, it's impossible. You can only format partitions once a partition is created. A brand new SSD or HDD will be nothing but unallocated space. You cannot format unallocated space, there has to be a partition created in the unallocated space first.
Is the process listed above or do you have a link?
 

My Computers

System One System Two

  • OS
    Windows 10 Home 10.0.22000.318 upgraded to 11 V:21H2
    Computer type
    Laptop
    Manufacturer/Model
    HP Spectre x360 Convertible 15T-eb100
    CPU
    11th Gen Intel(R) Core(TM) i7-1165G7 @ 2.80GHz 2.70 G
    Motherboard
    HP 8812 Version 55.19
    Memory
    16.0 GB (15.6 GB usable)
    Graphics Card(s)
    Intel(R) Iris(R) Xe Graphics (iRISx) - discrete graphics
    Sound Card
    Realtek High Definition Audio
    Monitor(s) Displays
    Dell
    Screen Resolution
    HP Laptop: 3840x2160, Dell external 1680x1050
    Hard Drives
    NVMe KXG60ZNV512G KIOXIA (NTFS) SSD
    external Samsung 980 PRO PCle 4.0 NVMe M.2 SSD
    (want to make this the internal drive somehow)
    PSU
    135 W Smart AC power adapter
    Case
    emerald cut
    Keyboard
    external HP USB slim KB - PH0U
    Mouse
    Logitech M510
    Internet Speed
    10.3 mbps download, 0.91mbps upload
    Browser
    Chrome Version 97.0.4692.99 (Official Build) (64-bit)
    Antivirus
    Norton 360
    Other Info
    1. Power AC input
    2. HDMI 2.0b12
    3. Audio combo jack
    4. MicroSD reader
    5. Webcam Kill Switch
    6. USB 3.2 Gen 2 Type-A
    7. USB 3.2 Gen 2 Type-C™
    8. USB 3.2 Gen 2 Type-C™ with Thunderbolt™ 312
    Synaptics Precision Touchpad
    64-bit operating system, x64-based processor
    Pen and touch support with 10 touch points w/Windows Ink installed
  • Operating System
    Windows 10 Pro 64
    Computer type
    Laptop
    Manufacturer/Model
    HP Spectre x360-15t Touch Convertible
    CPU
    i7
    Memory
    16GB
    Graphics card(s)
    Intel Iris - Inteli76560U Processor Intel HD Graphics 16GB
    Monitor(s) Displays
    15.6" UHD WLED Display -Touch S
    Screen Resolution
    3840x2160
    Hard Drives
    1TB PCIe(R) NVMe M.2 SSD
    Browser
    Chrome
    Antivirus
    Norton
    Other Info
    I am currently locked out of this system by Microsoft. I cannot prove ownership so I an stuck at this point

    Web Cam, Dual Mic's, Active Stylus Pen, Backlit KB
    Thunderbolt 3
    One USB-A 3.0 port, two SuperSpeed USB 10Gbps

My Computer

System One

  • OS
    Windows 11 Pro Beta, 11 Dev, W11 Canary
    Computer type
    Laptop
    Manufacturer/Model
    Dell Alienware M15 Ryzen Edition R6
    CPU
    AMD Ryzen™ 9 5900HX
    Memory
    32GB
    Graphics Card(s)
    NVIDIA® GeForce RTX™ 3070 8GB GDDR6
    Hard Drives
    1 x Samsung 980 Pro 1TB
    1 x Samsung 970 Evo Plus 1TB
Is the process listed above or do you have a link?
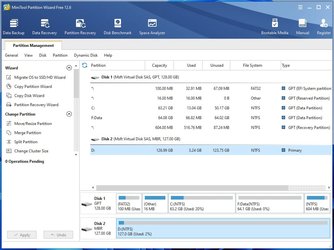
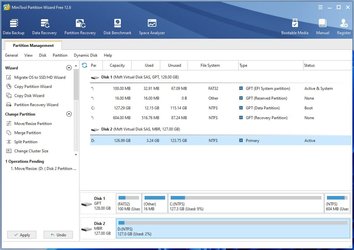
I am going to use MiniTool Partition Wizard Free, because it will do it all. Disk 1 has no free space. I am going to shrink C: drive by 64 GB to make the free space:

Capture1.jpg

Capture2.jpg

I need to reboot and let MiniTool Partition Wizard shrink the partition. After rebooting, I am going to create a partition in the free space, format it as NTFS and give it drive letter F: all in one step:

Capture3.jpg

Once that is done, I have F: drive available:

Capture4.jpg
 

My Computers

System One System Two

  • OS
    Windows 11
    Computer type
    PC/Desktop
    Manufacturer/Model
    Homebuilt
    CPU
    AMD Ryzen 7 3800XT
    Motherboard
    ASUS ROG Crosshair VII Hero (WiFi)
    Memory
    32GB
    Graphics Card(s)
    EVGA GeForce GTX 1080 Ti
  • Operating System
    Windows 11 Education
    Computer type
    Laptop
    Manufacturer/Model
    Dell Inspiron 7773
    CPU
    Intel i7-8550U
    Memory
    32GB
    Graphics card(s)
    Nvidia Geforce MX150
    Sound Card
    Realtek
    Monitor(s) Displays
    17"
    Screen Resolution
    1920 x 1080
    Hard Drives
    Toshiba 512GB NVMe SSD
    SK Hynix 512GB SATA SSD
    Internet Speed
    Fast!
You would simply be mistaken. You can only run the format command on an existing partition. For example, if disk 3 below was a brand new SSD:

Code:
C:\windows\system32>diskpart

Microsoft DiskPart version 10.0.22000.1

Copyright (C) Microsoft Corporation.
On computer: RAIDER

DISKPART> list disk

  Disk ###  Status         Size     Free     Dyn  Gpt
  --------  -------------  -------  -------  ---  ---
  Disk 0    Online          953 GB      0 B        *
  Disk 1    Online          465 GB      0 B        *
  Disk 3    Online          127 GB   127 GB

DISKPART> select disk 3

Disk 3 is now the selected disk.

DISKPART> format fs=ntfs quick

There is no volume selected.
Please select a volume and try again.

DISKPART> convert gpt

DiskPart successfully converted the selected disk to GPT format.

DISKPART> format fs=ntfs quick

There is no volume selected.
Please select a volume and try again.

DISKPART>

You can only format partitions (volumes), not disks. You have to create a partition first:

Code:
DISKPART> create partition primary

DiskPart succeeded in creating the specified partition.

DISKPART> format fs=ntfs quick

  100 percent completed

DiskPart successfully formatted the volume.

You are free to disagree with me, but it won't change the fact that you can't format a disk, you can only format partitions.
Nothing to disagree here. When I spoke about formatting, I was referring to formatting the disk (volume/ partition) as it shows up on File Explorer, i.e. right click and choose format.
 

My Computer

System One

  • OS
    Windows 11
    Computer type
    Laptop
    Manufacturer/Model
    HP Envy dv7
    CPU
    Intel Core i7 3630QM
    Motherboard
    HP
    Memory
    16 GB
    Graphics Card(s)
    Intel HD Graphics 4000 & Nvidia GeForce GT 635M
    Sound Card
    IDT High Definition
    Screen Resolution
    1080p
    Hard Drives
    1 TB Crucial MX500 on bay 1.
    1 TB Seagate HDD on bay 2.
    Antivirus
    Windows Defender
That is good to know. Does that mean it is in the UEFI and not on the current SSD? To be clear, my laptop has only one bay.
The activation key is stored securely on Microsoft servers and is tied to your hardware, primarily the Motherboard. So even when you change the disk that you boot from, Windows will be able to identify your device and activate the licence for you automatically.

So for me I need to re-format.
Since you had problems during the cloning process and it isn't booting, it will be a good idea to format it and start all over again.

I was never sure if the operating system drive should also include other items like Office, WinAmp , VLC etc, so Thanks for that tidbit.
Yes, they will if you install all your programs in the default location, which is the OS drive. That is what I would recommend too.

Can you point (or re-point if I missed it) to the process of creating a partition on my Old (500) drive to do this?
You can use the built-in Disk Management utility or use a 3rd party partition assistant software. There are many good ones out there, so choose any from AOMEI (my 1st preference), EaseUS, MiniTool, Gpart, etc.

I understand why you suggest the OP method, but as you can tell here, I am a struggling Techie at this point. That method seems convoluted even if it is not in actuality. I am still undecided at this point between it and Macrium Reflect Free.
If you are a Techie, then this will be a good opportunity to experiment with it so you can learn from your own experience. But if you rather prefer an easier route, you can always use a 3rd party software. Macrium isn't very intuitive, so watch a few video tutorials so you can get it right.

Funny thing is, after going through all of this up to this post, somehow the new drive (2000) went from not booting when installed, to not being recognized at all after returning it to the external case to actually booting via the USB. I did not catch it at first, but if you look at the picture at this post, and one I'll post here shortly it actually did boot - I think - we will see after I redo the boot sequence again.. If I was hallucinating, I will continue on from here ...
My guess is a faculty enclosure. Connect the device directly to the USB port on your laptop.

Is that just a switch I need to add or is there some other process to do this?

EDIT:
Actually I just realized that since I have a pretty new laptop that came with Win 10, only because at the time Win 11 was not available to them yet, and it has an NVme SSD and my new drive is also an NVme drive, the act of cloning it should have automatically made it GPT. Is this a correct assumption? I'm asking as I am procrastinating re-cloning the drive until I can verify that it actually does not boot first.
Since it is a new laptop, it should be GPT. You can confirm that in Disk Management by right clicking on it and viewing the Properties. If you are using 3rd party partition software, they will list the partition type on the main page itself.

Converting between GPT and MBR without data loss is possible using 3rd party tools. But confirm that first before performing any action. The built-in Disk Management should be used for conversion ONLY if you are ready to loose data or if it is an empty disk.

You cannot format a disk, it's impossible. You can only format partitions once a partition is created. A brand new SSD or HDD will be nothing but unallocated space. You cannot format unallocated space, there has to be a partition created in the unallocated space first.
Already answered.
 

My Computer

System One

  • OS
    Windows 11
    Computer type
    Laptop
    Manufacturer/Model
    HP Envy dv7
    CPU
    Intel Core i7 3630QM
    Motherboard
    HP
    Memory
    16 GB
    Graphics Card(s)
    Intel HD Graphics 4000 & Nvidia GeForce GT 635M
    Sound Card
    IDT High Definition
    Screen Resolution
    1080p
    Hard Drives
    1 TB Crucial MX500 on bay 1.
    1 TB Seagate HDD on bay 2.
    Antivirus
    Windows Defender
I am going to use MiniTool Partition Wizard Free, because it will do it all. Disk 1 has no free space. I am going to shrink C: drive by 64 GB to make the free space:

View attachment 21242

View attachment 21243

I need to reboot and let MiniTool Partition Wizard shrink the partition. After rebooting, I am going to create a partition in the free space, format it as NTFS and give it drive letter F: all in one step:

View attachment 21244

Once that is done, I have F: drive available:

View attachment 21245
This looks very promising for me. Thank you for taking the time to explain this,. I will give it a try maybe tomorrow if things go well. I have verified that the USB drive boots the computer, so I am going to ------- well maybe not. I am going to try and reformat the new drive first and then see if I am up to this today or not. I had no idea that I was going down such a deep rabbit hole. Thanks again.
 
Last edited:

My Computers

System One System Two

  • OS
    Windows 10 Home 10.0.22000.318 upgraded to 11 V:21H2
    Computer type
    Laptop
    Manufacturer/Model
    HP Spectre x360 Convertible 15T-eb100
    CPU
    11th Gen Intel(R) Core(TM) i7-1165G7 @ 2.80GHz 2.70 G
    Motherboard
    HP 8812 Version 55.19
    Memory
    16.0 GB (15.6 GB usable)
    Graphics Card(s)
    Intel(R) Iris(R) Xe Graphics (iRISx) - discrete graphics
    Sound Card
    Realtek High Definition Audio
    Monitor(s) Displays
    Dell
    Screen Resolution
    HP Laptop: 3840x2160, Dell external 1680x1050
    Hard Drives
    NVMe KXG60ZNV512G KIOXIA (NTFS) SSD
    external Samsung 980 PRO PCle 4.0 NVMe M.2 SSD
    (want to make this the internal drive somehow)
    PSU
    135 W Smart AC power adapter
    Case
    emerald cut
    Keyboard
    external HP USB slim KB - PH0U
    Mouse
    Logitech M510
    Internet Speed
    10.3 mbps download, 0.91mbps upload
    Browser
    Chrome Version 97.0.4692.99 (Official Build) (64-bit)
    Antivirus
    Norton 360
    Other Info
    1. Power AC input
    2. HDMI 2.0b12
    3. Audio combo jack
    4. MicroSD reader
    5. Webcam Kill Switch
    6. USB 3.2 Gen 2 Type-A
    7. USB 3.2 Gen 2 Type-C™
    8. USB 3.2 Gen 2 Type-C™ with Thunderbolt™ 312
    Synaptics Precision Touchpad
    64-bit operating system, x64-based processor
    Pen and touch support with 10 touch points w/Windows Ink installed
  • Operating System
    Windows 10 Pro 64
    Computer type
    Laptop
    Manufacturer/Model
    HP Spectre x360-15t Touch Convertible
    CPU
    i7
    Memory
    16GB
    Graphics card(s)
    Intel Iris - Inteli76560U Processor Intel HD Graphics 16GB
    Monitor(s) Displays
    15.6" UHD WLED Display -Touch S
    Screen Resolution
    3840x2160
    Hard Drives
    1TB PCIe(R) NVMe M.2 SSD
    Browser
    Chrome
    Antivirus
    Norton
    Other Info
    I am currently locked out of this system by Microsoft. I cannot prove ownership so I an stuck at this point

    Web Cam, Dual Mic's, Active Stylus Pen, Backlit KB
    Thunderbolt 3
    One USB-A 3.0 port, two SuperSpeed USB 10Gbps
Since you had problems during the cloning process and it isn't booting, it will be a good idea to format it and start all over again.
I think at this point that is the plan.

You can use the built-in Disk Management utility or use a 3rd party partition assistant software. There are many good ones out there, so choose any from AOMEI (my 1st preference), EaseUS, MiniTool, Gpart, etc.
I think I will use the MiniTool as NavyLCDR has so nicely laid out the process for me.

My guess is a faculty enclosure. Connect the device directly to the USB port on your laptop.
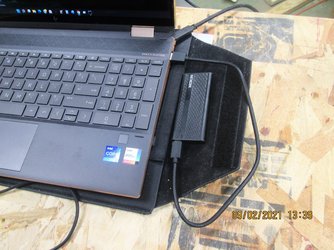
I assume you meant faulty. It may be, but it has been directly connected to the USB for some time now.

MOKiN SSD Enclosure - Compressed.jpg

Since it is a new laptop, it should be GPT. You can confirm that in Disk Management by right clicking on it and viewing the Properties. If you are using 3rd party partition software, they will list the partition type on the main page itself.

Converting between GPT and MBR without data loss is possible using 3rd party tools. But confirm that first before performing any action. The built-in Disk Management should be used for conversion ONLY if you are ready to loose data or if it is an empty disk.
I verified yesterday that both drives are already GPT

All the rest makes sense - we'll see about how I feel after reformatting the 2000 drive whether or not I will delve into the process you originally posted. Thanks again for your assistance.
 

My Computers

System One System Two

  • OS
    Windows 10 Home 10.0.22000.318 upgraded to 11 V:21H2
    Computer type
    Laptop
    Manufacturer/Model
    HP Spectre x360 Convertible 15T-eb100
    CPU
    11th Gen Intel(R) Core(TM) i7-1165G7 @ 2.80GHz 2.70 G
    Motherboard
    HP 8812 Version 55.19
    Memory
    16.0 GB (15.6 GB usable)
    Graphics Card(s)
    Intel(R) Iris(R) Xe Graphics (iRISx) - discrete graphics
    Sound Card
    Realtek High Definition Audio
    Monitor(s) Displays
    Dell
    Screen Resolution
    HP Laptop: 3840x2160, Dell external 1680x1050
    Hard Drives
    NVMe KXG60ZNV512G KIOXIA (NTFS) SSD
    external Samsung 980 PRO PCle 4.0 NVMe M.2 SSD
    (want to make this the internal drive somehow)
    PSU
    135 W Smart AC power adapter
    Case
    emerald cut
    Keyboard
    external HP USB slim KB - PH0U
    Mouse
    Logitech M510
    Internet Speed
    10.3 mbps download, 0.91mbps upload
    Browser
    Chrome Version 97.0.4692.99 (Official Build) (64-bit)
    Antivirus
    Norton 360
    Other Info
    1. Power AC input
    2. HDMI 2.0b12
    3. Audio combo jack
    4. MicroSD reader
    5. Webcam Kill Switch
    6. USB 3.2 Gen 2 Type-A
    7. USB 3.2 Gen 2 Type-C™
    8. USB 3.2 Gen 2 Type-C™ with Thunderbolt™ 312
    Synaptics Precision Touchpad
    64-bit operating system, x64-based processor
    Pen and touch support with 10 touch points w/Windows Ink installed
  • Operating System
    Windows 10 Pro 64
    Computer type
    Laptop
    Manufacturer/Model
    HP Spectre x360-15t Touch Convertible
    CPU
    i7
    Memory
    16GB
    Graphics card(s)
    Intel Iris - Inteli76560U Processor Intel HD Graphics 16GB
    Monitor(s) Displays
    15.6" UHD WLED Display -Touch S
    Screen Resolution
    3840x2160
    Hard Drives
    1TB PCIe(R) NVMe M.2 SSD
    Browser
    Chrome
    Antivirus
    Norton
    Other Info
    I am currently locked out of this system by Microsoft. I cannot prove ownership so I an stuck at this point

    Web Cam, Dual Mic's, Active Stylus Pen, Backlit KB
    Thunderbolt 3
    One USB-A 3.0 port, two SuperSpeed USB 10Gbps
CLONING THE SYSTEM PARTITION

Things Required

1. Backup/ Cloning software: Most cloning software allow system cloning only in their paid version, so keep that in mind. See comment 1 if you don't want to use 3rd party software.
Where is comment 1?

1. Boot to Recovery.
How do I do this? Do you mean change the UEFI to boot from my optical disk and use the recovery disk I created when I first purchased the laptop? Or can I use the Windows RE somehow?
 

My Computers

System One System Two

  • OS
    Windows 10 Home 10.0.22000.318 upgraded to 11 V:21H2
    Computer type
    Laptop
    Manufacturer/Model
    HP Spectre x360 Convertible 15T-eb100
    CPU
    11th Gen Intel(R) Core(TM) i7-1165G7 @ 2.80GHz 2.70 G
    Motherboard
    HP 8812 Version 55.19
    Memory
    16.0 GB (15.6 GB usable)
    Graphics Card(s)
    Intel(R) Iris(R) Xe Graphics (iRISx) - discrete graphics
    Sound Card
    Realtek High Definition Audio
    Monitor(s) Displays
    Dell
    Screen Resolution
    HP Laptop: 3840x2160, Dell external 1680x1050
    Hard Drives
    NVMe KXG60ZNV512G KIOXIA (NTFS) SSD
    external Samsung 980 PRO PCle 4.0 NVMe M.2 SSD
    (want to make this the internal drive somehow)
    PSU
    135 W Smart AC power adapter
    Case
    emerald cut
    Keyboard
    external HP USB slim KB - PH0U
    Mouse
    Logitech M510
    Internet Speed
    10.3 mbps download, 0.91mbps upload
    Browser
    Chrome Version 97.0.4692.99 (Official Build) (64-bit)
    Antivirus
    Norton 360
    Other Info
    1. Power AC input
    2. HDMI 2.0b12
    3. Audio combo jack
    4. MicroSD reader
    5. Webcam Kill Switch
    6. USB 3.2 Gen 2 Type-A
    7. USB 3.2 Gen 2 Type-C™
    8. USB 3.2 Gen 2 Type-C™ with Thunderbolt™ 312
    Synaptics Precision Touchpad
    64-bit operating system, x64-based processor
    Pen and touch support with 10 touch points w/Windows Ink installed
  • Operating System
    Windows 10 Pro 64
    Computer type
    Laptop
    Manufacturer/Model
    HP Spectre x360-15t Touch Convertible
    CPU
    i7
    Memory
    16GB
    Graphics card(s)
    Intel Iris - Inteli76560U Processor Intel HD Graphics 16GB
    Monitor(s) Displays
    15.6" UHD WLED Display -Touch S
    Screen Resolution
    3840x2160
    Hard Drives
    1TB PCIe(R) NVMe M.2 SSD
    Browser
    Chrome
    Antivirus
    Norton
    Other Info
    I am currently locked out of this system by Microsoft. I cannot prove ownership so I an stuck at this point

    Web Cam, Dual Mic's, Active Stylus Pen, Backlit KB
    Thunderbolt 3
    One USB-A 3.0 port, two SuperSpeed USB 10Gbps
I had no idea that I was going down such a deep rabbit hole.
It actually isn't as deep as it may appear to be.

I think I will use the MiniTool as NavyLCDR has so nicely laid out the process for me.
Sure. Use the one that works for you best.

I assume you meant faulty.
Correct.

Where is comment 1?
Post in thread 'Cloning System Partition, Recreating EFI and Recovery partitions...' Cloning System Partition, Recreating EFI and Recovery partitions...

How do I do this? Do you mean change the UEFI to boot from my optical disk and use the recovery disk I created when I first purchased the laptop? Or can I use the Windows RE somehow?
You can boot to recovery from either within Windows or using one of the function keys (which depends on the laptop model, so you'll have to find the correct one for your device) during boot. If you are inside Windows, go to Settings/ Windows Update/ Recovery (or Settings/ Recovery) or just type Recovery in search. Go to Advanced Restart and choose Recovery.

Alternatively, you can also boot from the Recovery disk if you have it.
 

My Computer

System One

  • OS
    Windows 11
    Computer type
    Laptop
    Manufacturer/Model
    HP Envy dv7
    CPU
    Intel Core i7 3630QM
    Motherboard
    HP
    Memory
    16 GB
    Graphics Card(s)
    Intel HD Graphics 4000 & Nvidia GeForce GT 635M
    Sound Card
    IDT High Definition
    Screen Resolution
    1080p
    Hard Drives
    1 TB Crucial MX500 on bay 1.
    1 TB Seagate HDD on bay 2.
    Antivirus
    Windows Defender
Where is comment 1?


How do I do this? Do you mean change the UEFI to boot from my optical disk and use the recovery disk I created when I first purchased the laptop? Or can I use the Windows RE somehow?
That advice about system cloning only being in paid versions is garbage. Macrium Reflect , Aomei backupper, Easeus todo free versions to name most popular one all do it.
 

My Computer

System One

  • OS
    Windows 10 Pro + others in VHDs
    Computer type
    Laptop
    Manufacturer/Model
    ASUS Vivobook 14
    CPU
    I7
    Motherboard
    Yep, Laptop has one.
    Memory
    16 GB
    Graphics Card(s)
    Integrated Intel Iris XE
    Sound Card
    Realtek built in
    Monitor(s) Displays
    N/A
    Screen Resolution
    1920x1080
    Hard Drives
    1 TB Optane NVME SSD, 1 TB NVME SSD
    PSU
    Yep, got one
    Case
    Yep, got one
    Cooling
    Stella Artois
    Keyboard
    Built in
    Mouse
    Bluetooth , wired
    Internet Speed
    72 Mb/s :-(
    Browser
    Edge mostly
    Antivirus
    Defender
    Other Info
    TPM 2.0
That advice about system cloning only being in paid versions is garbage. Macrium Reflect , Aomei backupper, Easeus todo free versions to name most popular one all do it.
Exactly. This from Aomei Backupper Free and Macrium Reflect Free:

Safe Clone​

  • Clone the whole hard drive disk that contains Windows operating system, installed programs, custom settings upgrade HDD to HDD/SSD without losing data.
  • Easily clone individual partition or volume to another one with intelligent sector clone by default, which skip the bad sectors on the source partition.
Source: Free Backup Software for Windows | AOMEI Backupper Standard

Are you looking for free backup, free cloning, or free disk imaging software?​

Reflect 8 Free is the best no-cost solution on the market. Why does Macrium offer such a feature-rich and powerful product for absolutely nothing? Because we believe the safety and security of your data should be available to everyone.

Where can I use Reflect Free (and other questions)? Details here.

Source: Reflect Free Edition

I don't think I need to add any other most popular backup programs, but they're out there.
 

My Computers

System One System Two

  • OS
    Windows 11 23H2 22631.2861
    Computer type
    PC/Desktop
    Manufacturer/Model
    HP Envy TE01-1xxx
    CPU
    Intel(R) Core(TM) i7-10700 CPU @ 2.90GHz 2.90 GHz
    Motherboard
    16.0GB Dual-Channel Unknown @ 1463MHz (21-21-21-47)
    Memory
    16384 MBytes
    Graphics Card(s)
    Intel UHD Graphics 630
    Sound Card
    Realtek High Definition Audio
    Monitor(s) Displays
    Monitor 1 - Acer 27" Monitor 2 - Acer 27"
    Screen Resolution
    1920 x 1080
    Hard Drives
    WDC PC SN530 SDBPNPZ-512G-1006 (SSD)
    Seagate ST1000DM003-1SB102
    Seagate BUP Slim SCSI Disk Device (SSD)
    PSU
    HP
    Case
    HP
    Cooling
    Standard
    Keyboard
    Logitech Wave K350
    Mouse
    Logitech M705
    Internet Speed
    500 mbps
    Browser
    Firefox
    Antivirus
    Windows Defender
    Other Info
    That's all Folks!
  • Operating System
    Windows 11
    Computer type
    PC/Desktop
    Manufacturer/Model
    HP
    CPU
    Intel Core i7 (10th gen) 10700
    Motherboard
    Intel
    Memory
    16 GB
    Graphics card(s)
    Intel UHD Graphics 630
    Sound Card
    Built-in
    Monitor(s) Displays
    Acer 27" & Samsung 24"
    Screen Resolution
    1920 x
    Hard Drives
    SSD (512 GB)
    HDD (1 TB)
    Seagate
    PSU
    Intel i7 10th Generation
    Case
    HP
    Cooling
    HP/Intel?
    Mouse
    Logitech M705
    Keyboard
    Logitech Wave K350
    Internet Speed
    50 mbps
    Browser
    Firefox 90.2
    Antivirus
    Windows Defender
    Other Info
    Headphone/Microphone Combo
    SuperSpeed USB Type-A (4 on front)
    HP 3-in-One Card Readr
    SuperSpeed USB Type-C
    DVD Writer
This tutorial attempts to achieve the objectives using built-in tools, without use of 3rd party software.

A fresh and clean installation is always the best thing to do, because in addition to a bug-free Windows experience, everything outside the Windows environment like the EFI partition, Recovery partition, and overall system integrity remains intact and well maintained.

However, there are times when simply cloning the current system is preferred. This is not just to save time, but also because the existing system may contain drivers (e.g. BootCamp drivers) and other factors that setting up everything fresh becomes too much time consuming, and sometimes not possible too.

Under these circumstances, the following guide will ensure that you can quickly clone your current system to an external SSD (or an internal one) that can be used on both Windows PC as well as a Mac (assuming the existing system already has the required BootCamp drivers).


BASICS

Before explaining the steps, just know some basics of how the computer functions.

Every time you power on your computer, your system firmware first loads a hidden partition on the boot device called the EFI partition. This partition contains information about the installed operating systems as well as their paths (on the disk). In my experience, simply cloning an existing system partition to another device will often not be enough to make it bootable. This is probably because it breaks the OS paths in the new EFI partition that is automatically created in the cloning process. When that happens, you cannot boot from the target device unless the EFI partition is fixed with the correct path to the OS installed in the target disk.


LESSONS IN THIS TUTORIAL

So in this tutorial, we will see 3 things:

1. How to clone the system partition.
2. How to fix the EFI partition.
3. How to restore the native Windows Recovery Environment (if that gets broken too in the cloning process).


CLONING THE SYSTEM PARTITION


Things Required

1. Backup/ Cloning software: Most cloning software allow system cloning only in their paid version, so keep that in mind. See comment 1 if you don't want to use 3rd party software.

2. External SSD/ HDD/ Flash Drive.

3. External keyboard and mouse (only if you want to boot from the target disk on a Mac and your existing system doesn't have BootCamp drivers).

Process

This is a very straight-forward process.

1. Ensure that the target disk is partitioned as GPT. This is best for Windows 10 and newer. If it is not partitioned as GPT, you can use a partition assistant software that will allow you to convert the partition from MBR to GPT without losing data. Most free versions of well known partition softwares will allow you to do this.
2. Clone the system to the target disk (or a partition in the target disk) using the cloning software. If you are cloning the system that you have booted into, use the System Clone feature. If you are cloning the system partition on another disk/ partition, use the Clone Disk/ Partition feature.
3. When using the System Clone feature, you will see that the hidden EFI partition is automatically included. This EFI partition is often broken in the target disk, and we will see how to fix this in the next section.
4. Once cloning is complete, try booting from the target device. If it boots fine, great. If it doesn't boot, then here are the steps to make it boot.


RECREATING THE EFI PARTITION

Things Required

1. Windows Recovery Disk (if you can't boot into Recovery or if the native Recovery doesn't have command prompt feature)

Process

1. Boot to Recovery. If you don't have one or if it is broken, then connect your Windows Recovery Disk (you have to create one if you don't already have it).
2. Go to Command Prompt while in Recovery:

diskpart
list vol
sel vol x
(here 'x' is the volume number of the EFI partition of the target disk; check the result from the previous command)
format quick fs=fat32 label="EFI T5" (you can give any name that helps you to identify the partition easily; in my case, I was installing Windows 10 on my Samsung T5 SSD, hence I named it as EFI T5; you can replace the text within the quotes with one of your choice)
set id=C12A7328-F81F-11D2-BA4B-00A0C93EC93B
assign letter=a
(you can replace 'a' with any alphabet that is not currently in use)
list vol (make sure that all the windows partitions in the target disk have a letter assigned to them; if any does not have a letter assigned, then assign a letter to each one of them as in the previous steps: select the correct volume number of the OS partition first and then assign a letter)

exit

Now we have to copy the boot files (which contain the OS paths) from each of the installed Windows OS to the EFI partition.

Pass the following command(s):

bcdboot c:\windows /s a:
(here, I'm assuming that the letter for the OS partition is 'c'; check the letter in your case as it need not be 'c'; use the correct letter for the OS partition that you see in your case; repeat this command for all the operating systems installed in the target disk, replacing 'c' with the corresponding letter of the OS; also remember that 'a' is the letter I used for the EFI partition; if you have assigned a different letter, then replace 'a' with the letter you have assigned for the EFI partition)

exit

Reboot.

If the disk has multiple OS installations, the OS Boot Manager should now show all of them, so you can choose which one to boot from.

If your target disk has multiple OS installed, you will see that there is an EFI partition for each of them. You can safely format/ delete all those except the first one. The system prefers the EFI partition to be installed at the beginning of the disk, so keep the 1st one and format the rest. In our case, it is the one that we assigned the letter 'a'.

To format the additional EFI partitions in the target disk, use DISKPART in command prompt:

diskpart

lis vol

sel vol x
(where 'x' is the volume number of the additional EFI partitions in the target disk; repeat this for all the additional EFI partitions)

format quick fs=fat32

Remember, that you must only delete the extra EFI partitions on the target disk, not the ones on other disks that are attached to your system.

Every bootable disk needs just one EFI partition (preferably at the beginning of the disk because that is where the firmware first looks for one) and one Recovery partition. If you are using a multi-boot disk (assuming they are all Windows), a single EFI partition is enough that should contain the paths of all the OSes in the disk. The process above will accomplish this.

Also, each disk needs to have just one Recovery partition. You don't need a separate EFI or separate Recovery partition for each of the OSes installed. Having one EFI and one Recovery on the disk itself would suffice.


RECREATING THE RECOVERY PARTITION (can be done from inside Windows)

Things Required

1. Windows ISO (preferably the latest one)

2. 7zip or any archiver installed


Sometimes, the recovery partition can become corrupt. If that is the case, you won't be able to boot into Recovery or create a recovery disk. Troubleshooting Windows from recovery won't be possible in such cases. But we can restore it as follows:

____________________________________________________________________________________________________________________________

If the recovery partition does not exist, create it as follows:

Open command prompt with administrative privileges:

diskpart
list vol
(note the volume number for Windows partition)
sel vol x (where x is the volume number of the Windows partition from above result)
shrink desired=1024 (this will create a Recovery partition of size 1 GB)
create par pri
format quick fs=NTFS label=Recovery
set id=DE94BBA4-06D1-4D40-A16A-BFD50179D6AC
(this is the id for Recovery partition)
gpt attributes=0x8000000000000001
exit


____________________________________________________________________________________________________________________________

If the recovery partition already exists but is corrupt, then format the recovery partition using command prompt:

diskpart

list vol
sel vol x
(where 'x' is the volume number of the recovery partition from the result above)
format quick fs=NTFS label=Recovery
set id=DE94BBA4-06D1-4D40-A16A-BFD50179D6AC
(this is the id for Recovery partition)
gpt attributes=0x8000000000000001
exit


____________________________________________________________________________________________________________________________

ENABLING THE RECOVERY ENVIRONMENT (do it from inside Windows)


1. reagentc /disable (you may see an output that says it is already disabled; it doesn't matter)

2. Go to C:\Windows\System32\Recovery and delete all files there.

3. Copy* WinRE.wim and the uninitialized ReAgent.xml files from the installation Media (ISO file) to C:\Windows\System32\Recovery

4. reagentc /enable (this will move WinRe.wim to the Recovery partition and set the GUID and location in ReAgent.xml)

After restoring the recovery partition, you'll be able to create a recovery disk on an external USB device.


*Here are the steps:

1. Right click the Windows ISO file
2. Use 7zip to open archive (just open; don't have to extract it)
3. Sources
4. Locate the install.wim (or install.esd) file
5. Right click and open
6. Choose the correct folder for your edition of Windows:

1 - Windows 10 Home
2 - Windows 10 Home N
3 - Windows 10 Home Single Language
4 - Windows 10 Education
5 - Windows 10 Education N
6 - Windows 10 Pro
7 - Windows 10 Pro N
8 - Windows 10 Pro Education
9 - Windows 10 Pro Education N
10 - Windows 10 Pro for Workstations
11 - Windows 10 Pro N for Workstations

In case of Windows Home, choose the folder '1'; for Windows Pro, choose folder '6', etc.

7. Go to Windows\ System32\ Recovery
8. Copy the two files (ReAgent.xml and Winre.wim) to your system (C:\Windows\System32\Recovery)


IN ALL OF THE DISKPART COMMANDS, BE EXTREMELY CAREFUL IN SELECTING THE CORRECT VOLUMES/ PARTITIONS/ DISKS. YOU MUST ONLY SELECT THE CORRECT VOLUMES IN YOUR TARGET DISK. DOUBLE CHECK THIS BEFORE PASSING THE COMMANDS.


DISCLAIMER

With the process above, you will have a bootable system with its own recovery environment. I am not sure if this breaks anything. Everything works fine as it should as far as I have tested. Your mileage may vary depending on the hardware you use and the way you use your system.

.
Thank you
 

My Computer

System One

  • OS
    Windows 11 Home
    Computer type
    Laptop
    Manufacturer/Model
    HP ENVY
    CPU
    11th Generation Intel Core i7
    Memory
    12GB
    Monitor(s) Displays
    17.3” FHD Display
This tutorial attempts to achieve the objectives using built-in tools, without use of 3rd party software.

A fresh and clean installation is always the best thing to do, because in addition to a bug-free Windows experience, everything outside the Windows environment like the EFI partition, Recovery partition, and overall system integrity remains intact and well maintained.

However, there are times when simply cloning the current system is preferred. This is not just to save time, but also because the existing system may contain drivers (e.g. BootCamp drivers) and other factors that setting up everything fresh becomes too much time consuming, and sometimes not possible too.

Under these circumstances, the following guide will ensure that you can quickly clone your current system to an external SSD (or an internal one) that can be used on both Windows PC as well as a Mac (assuming the existing system already has the required BootCamp drivers).


BASICS

Before explaining the steps, just know some basics of how the computer functions.

Every time you power on your computer, your system firmware first loads a hidden partition on the boot device called the EFI partition. This partition contains information about the installed operating systems as well as their paths (on the disk). In my experience, simply cloning an existing system partition to another device will often not be enough to make it bootable. This is probably because it breaks the OS paths in the new EFI partition that is automatically created in the cloning process. When that happens, you cannot boot from the target device unless the EFI partition is fixed with the correct path to the OS installed in the target disk.


LESSONS IN THIS TUTORIAL

So in this tutorial, we will see 3 things:

1. How to clone the system partition.
2. How to fix the EFI partition.
3. How to restore the native Windows Recovery Environment (if that gets broken too in the cloning process).


CLONING THE SYSTEM PARTITION


Things Required

1. Backup/ Cloning software: Most cloning software allow system cloning only in their paid version, so keep that in mind. See comment 1 if you don't want to use 3rd party software.

2. External SSD/ HDD/ Flash Drive.

3. External keyboard and mouse (only if you want to boot from the target disk on a Mac and your existing system doesn't have BootCamp drivers).

Process

This is a very straight-forward process.

1. Ensure that the target disk is partitioned as GPT. This is best for Windows 10 and newer. If it is not partitioned as GPT, you can use a partition assistant software that will allow you to convert the partition from MBR to GPT without losing data. Most free versions of well known partition softwares will allow you to do this.
2. Clone the system to the target disk (or a partition in the target disk) using the cloning software. If you are cloning the system that you have booted into, use the System Clone feature. If you are cloning the system partition on another disk/ partition, use the Clone Disk/ Partition feature.
3. When using the System Clone feature, you will see that the hidden EFI partition is automatically included. This EFI partition is often broken in the target disk, and we will see how to fix this in the next section.
4. Once cloning is complete, try booting from the target device. If it boots fine, great. If it doesn't boot, then here are the steps to make it boot.


RECREATING THE EFI PARTITION

Things Required

1. Windows Recovery Disk (if you can't boot into Recovery or if the native Recovery doesn't have command prompt feature)

Process

1. Boot to Recovery. If you don't have one or if it is broken, then connect your Windows Recovery Disk (you have to create one if you don't already have it).
2. Go to Command Prompt while in Recovery:

diskpart
list vol
sel vol x
(here 'x' is the volume number of the EFI partition of the target disk; check the result from the previous command)
format quick fs=fat32 label="EFI T5" (you can give any name that helps you to identify the partition easily; in my case, I was installing Windows 10 on my Samsung T5 SSD, hence I named it as EFI T5; you can replace the text within the quotes with one of your choice)
set id=C12A7328-F81F-11D2-BA4B-00A0C93EC93B
assign letter=a
(you can replace 'a' with any alphabet that is not currently in use)
list vol (make sure that all the windows partitions in the target disk have a letter assigned to them; if any does not have a letter assigned, then assign a letter to each one of them as in the previous steps: select the correct volume number of the OS partition first and then assign a letter)

exit

Now we have to copy the boot files (which contain the OS paths) from each of the installed Windows OS to the EFI partition.

Pass the following command(s):

bcdboot c:\windows /s a:
(here, I'm assuming that the letter for the OS partition is 'c'; check the letter in your case as it need not be 'c'; use the correct letter for the OS partition that you see in your case; repeat this command for all the operating systems installed in the target disk, replacing 'c' with the corresponding letter of the OS; also remember that 'a' is the letter I used for the EFI partition; if you have assigned a different letter, then replace 'a' with the letter you have assigned for the EFI partition)

exit

Reboot.

If the disk has multiple OS installations, the OS Boot Manager should now show all of them, so you can choose which one to boot from.

If your target disk has multiple OS installed, you will see that there is an EFI partition for each of them. You can safely format/ delete all those except the first one. The system prefers the EFI partition to be installed at the beginning of the disk, so keep the 1st one and format the rest. In our case, it is the one that we assigned the letter 'a'.

To format the additional EFI partitions in the target disk, use DISKPART in command prompt:

diskpart

lis vol

sel vol x
(where 'x' is the volume number of the additional EFI partitions in the target disk; repeat this for all the additional EFI partitions)

format quick fs=fat32

Remember, that you must only delete the extra EFI partitions on the target disk, not the ones on other disks that are attached to your system.

Every bootable disk needs just one EFI partition (preferably at the beginning of the disk because that is where the firmware first looks for one) and one Recovery partition. If you are using a multi-boot disk (assuming they are all Windows), a single EFI partition is enough that should contain the paths of all the OSes in the disk. The process above will accomplish this.

Also, each disk needs to have just one Recovery partition. You don't need a separate EFI or separate Recovery partition for each of the OSes installed. Having one EFI and one Recovery on the disk itself would suffice.


RECREATING THE RECOVERY PARTITION (can be done from inside Windows)

Things Required

1. Windows ISO (preferably the latest one)

2. 7zip or any archiver installed


Sometimes, the recovery partition can become corrupt. If that is the case, you won't be able to boot into Recovery or create a recovery disk. Troubleshooting Windows from recovery won't be possible in such cases. But we can restore it as follows:

____________________________________________________________________________________________________________________________

If the recovery partition does not exist, create it as follows:

Open command prompt with administrative privileges:

diskpart
list vol
(note the volume number for Windows partition)
sel vol x (where x is the volume number of the Windows partition from above result)
shrink desired=1024 (this will create a Recovery partition of size 1 GB)
create par pri
format quick fs=NTFS label=Recovery
set id=DE94BBA4-06D1-4D40-A16A-BFD50179D6AC
(this is the id for Recovery partition)
gpt attributes=0x8000000000000001
exit


____________________________________________________________________________________________________________________________

If the recovery partition already exists but is corrupt, then format the recovery partition using command prompt:

diskpart

list vol
sel vol x
(where 'x' is the volume number of the recovery partition from the result above)
format quick fs=NTFS label=Recovery
set id=DE94BBA4-06D1-4D40-A16A-BFD50179D6AC
(this is the id for Recovery partition)
gpt attributes=0x8000000000000001
exit


____________________________________________________________________________________________________________________________

ENABLING THE RECOVERY ENVIRONMENT (do it from inside Windows)


1. reagentc /disable (you may see an output that says it is already disabled; it doesn't matter)

2. Go to C:\Windows\System32\Recovery and delete all files there.

3. Copy* WinRE.wim and the uninitialized ReAgent.xml files from the installation Media (ISO file) to C:\Windows\System32\Recovery

4. reagentc /enable (this will move WinRe.wim to the Recovery partition and set the GUID and location in ReAgent.xml)

After restoring the recovery partition, you'll be able to create a recovery disk on an external USB device.


*Here are the steps:

1. Right click the Windows ISO file
2. Use 7zip to open archive (just open; don't have to extract it)
3. Sources
4. Locate the install.wim (or install.esd) file
5. Right click and open
6. Choose the correct folder for your edition of Windows:

1 - Windows 10 Home
2 - Windows 10 Home N
3 - Windows 10 Home Single Language
4 - Windows 10 Education
5 - Windows 10 Education N
6 - Windows 10 Pro
7 - Windows 10 Pro N
8 - Windows 10 Pro Education
9 - Windows 10 Pro Education N
10 - Windows 10 Pro for Workstations
11 - Windows 10 Pro N for Workstations

In case of Windows Home, choose the folder '1'; for Windows Pro, choose folder '6', etc.

7. Go to Windows\ System32\ Recovery
8. Copy the two files (ReAgent.xml and Winre.wim) to your system (C:\Windows\System32\Recovery)


IN ALL OF THE DISKPART COMMANDS, BE EXTREMELY CAREFUL IN SELECTING THE CORRECT VOLUMES/ PARTITIONS/ DISKS. YOU MUST ONLY SELECT THE CORRECT VOLUMES IN YOUR TARGET DISK. DOUBLE CHECK THIS BEFORE PASSING THE COMMANDS.


DISCLAIMER

With the process above, you will have a bootable system with its own recovery environment. I am not sure if this breaks anything. Everything works fine as it should as far as I have tested. Your mileage may vary depending on the hardware you use and the way you use your system.

.
Thanks for your great tutorial ... My question is, will all the solutions and steps above work in Windows 10, too (without modifying anything)?
 

My Computer

System One

  • OS
    Windows 11
Thanks for your great tutorial ... My question is, will all the solutions and steps above work in Windows 10, too (without modifying anything)?
Thank you.

Given the diversity of hardware (unlike Apple) on which Windows runs, this tutorial should work on Windows 10 and newer.
 

My Computer

System One

  • OS
    Windows 11
    Computer type
    Laptop
    Manufacturer/Model
    HP Envy dv7
    CPU
    Intel Core i7 3630QM
    Motherboard
    HP
    Memory
    16 GB
    Graphics Card(s)
    Intel HD Graphics 4000 & Nvidia GeForce GT 635M
    Sound Card
    IDT High Definition
    Screen Resolution
    1080p
    Hard Drives
    1 TB Crucial MX500 on bay 1.
    1 TB Seagate HDD on bay 2.
    Antivirus
    Windows Defender
macrium is the simplest way -- I don't like minitool --if I need a proper free partitioner then I can use the bootable stand alone version of GPARTED which doesn't have any features disabled for "Go Pro" --i.e pay, plus gparted handles any file system under the sun, and in a last resort you can easily clone a disk where you haven't been able to create any partitions on it via the built in terminal command dd -- which simply compies physical sectors from 1 disk (or partition) to another without regard to file system or data contennnt -- note DD will copy errors etc too -- it simply copies byte for byte whatever is on the source disk or partition to target but it's a possible tool if all else fails.

It's always better to have more than a single weapon in your armoury -- as they say if you go to a gunfight don't come only armed with a knife. !!

Cheers
jimbo
 

My Computer

System One

  • OS
    Windows XP,7,10,11 Linux Arch Linux
    Computer type
    PC/Desktop
    CPU
    2 X Intel i7
Back
Top Bottom