Cloning System Partition, Recreating EFI and Recovery partitions...


And if you just run "reagentc /disable" before you start messing with recovery partitions, you can avoid this whole, entire discussion because your recovery environment will go anywhere that you clone your Windows OS partition to.
Oh wow I didn't realize this. Is this why my recovery partition disappear when I cloned my whole OS to another ssd?

I am going to clone it again to another SSD - any precautions or tips to make sure everything comes over perfectly?

BTW the Samsung cloning tool doesn't work. Just gets stuck. Any freeware that's reliable?
 

My Computer

System One

  • OS
    Windows 11
Oh wow I didn't realize this. Is this why my recovery partition disappear when I cloned my whole OS to another ssd?

I am going to clone it again to another SSD - any precautions or tips to make sure everything comes over perfectly?

BTW the Samsung cloning tool doesn't work. Just gets stuck. Any freeware that's reliable?
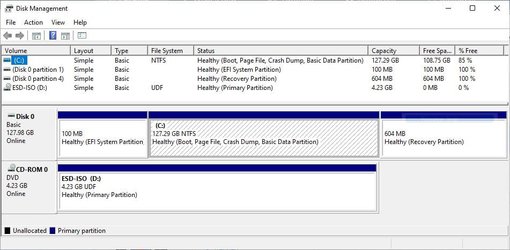
Here is the standard Windows UEFI install:

Capture.JPG

Code:
C:\Windows\system32>diskpart

Microsoft DiskPart version 10.0.22000.1

Copyright (C) Microsoft Corporation.
On computer: DESKTOP-V223ACD

DISKPART> select disk 0

Disk 0 is now the selected disk.

DISKPART> list part

  Partition ###  Type              Size     Offset
  -------------  ----------------  -------  -------
  Partition 1    System             100 MB  1024 KB
  Partition 2    Reserved            16 MB   101 MB
  Partition 3    Primary            127 GB   117 MB
  Partition 4    Recovery           604 MB   127 GB

First you need to make sure that your Windows Recovery Environment (WinRE) is enabled to begin with, run reagentc /info:

Code:
C:\Windows\system32>reagentc /info
Windows Recovery Environment (Windows RE) and system reset configuration
Information:

    Windows RE status:         Enabled
    Windows RE location:       \\?\GLOBALROOT\device\harddisk0\partition4\Recovery\WindowsRE
    Boot Configuration Data (BCD) identifier: fdf3710b-5ce8-11ec-9b3c-98a0304b965e
    Recovery image location:
    Recovery image index:      0
    Custom image location:
    Custom image index:        0

REAGENTC.EXE: Operation Successful.

Mine shows that it is enabled and it is on Drive 0, Partition 4, exactly where it should be. Now let's disable it with reagentc /disable:

Code:
C:\Windows\system32>reagentc /disable
REAGENTC.EXE: Operation Successful.

With the WinRE disabled, the recovery environment is stored in C:\Windows\\System32\Recovery and it will move with the C: drive OS partition - I can clone it to another drive, image it, whatever, WinRE will go with C: drive.

Code:
C:\Windows\System32>dir C:\Windows\System32\Recovery /a
 Volume in drive C has no label.
 Volume Serial Number is 42BF-FAAF

 Directory of C:\Windows\System32\Recovery

12/14/2021  06:39 AM    <DIR>          .
12/14/2021  06:27 AM    <DIR>          ..
12/14/2021  06:39 AM             1,079 ReAgent.xml
11/04/2021  06:10 AM       525,686,266 Winre.wim
               2 File(s)    525,687,345 bytes
               2 Dir(s)  116,191,354,880 bytes free

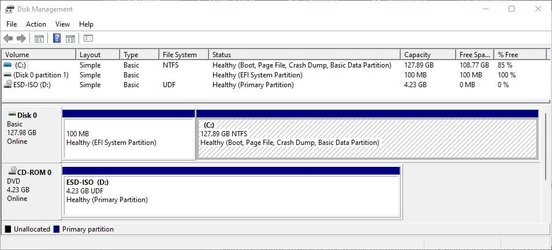
Here is the disk without the recovery partition:

Capture1.jpg

Since my WinRE was safely stored in C:\Windows\System32\Recovery using the reagentc /disable command, now I can re-enable WinRE without needing a recovery partition. It gets reinstated at C:\Recovery:

Code:
C:\Windows\system32>reagentc /enable
REAGENTC.EXE: Operation Successful.


C:\Windows\system32>reagentc /info
Windows Recovery Environment (Windows RE) and system reset configuration
Information:

    Windows RE status:         Enabled
    Windows RE location:       \\?\GLOBALROOT\device\harddisk0\partition3\Recovery\WindowsRE
    Boot Configuration Data (BCD) identifier: fdf3710d-5ce8-11ec-9b3c-98a0304b965e
    Recovery image location:
    Recovery image index:      0
    Custom image location:
    Custom image index:        0

REAGENTC.EXE: Operation Successful.


C:\Windows\system32>dir C:\Recovery /a
 Volume in drive C has no label.
 Volume Serial Number is 42BF-FAAF

 Directory of C:\Recovery

12/14/2021  06:47 AM    <DIR>          .
12/14/2021  06:22 AM    <DIR>          ..
12/14/2021  06:47 AM             1,040 ReAgentOld.xml
12/14/2021  06:47 AM    <DIR>          WindowsRE
               1 File(s)          1,040 bytes
               3 Dir(s)  116,781,924,352 bytes free

C:\Windows\system32>dir C:\Recovery\WindowsRE /a
 Volume in drive C has no label.
 Volume Serial Number is 42BF-FAAF

 Directory of C:\Recovery\WindowsRE

12/14/2021  06:47 AM    <DIR>          .
12/14/2021  06:47 AM    <DIR>          ..
06/05/2021  04:05 AM         3,170,304 boot.sdi
12/14/2021  06:47 AM             1,106 ReAgent.xml
11/04/2021  06:10 AM       525,686,266 Winre.wim
               3 File(s)    528,857,676 bytes
               2 Dir(s)  116,781,957,120 bytes free

If I had not disabled WinRE first, and did not properly keep the recovery partition with the Windows partition when I cloned or imaged or did whatever, I would have lost the recovery environment and it is not very easy at all to recover it once it is lost. That's why I always advise to run reagentc /disable before moving partitions around. In the above example, if I had cloned the recovery properly along with the Windows partition, when I did reagentc /enable, it actually would have re-enabled back to the recovery partition instead of C:\Recovery.

NOTE: prebuilt off-the-shelf computers may have a second recovery partition containing factory software - nothing in the above discussion applies to that partition. Your best insurance for that is to make an image of the entire disk - all partitions - so that you have it archived.

Finally, since MiniTool Partition Wizard will no longer copy system partitions with the free version, I use Macrium Reflect Free for all cloning/copying of partitions and disks.
 

My Computers

System One System Two

  • OS
    Windows 11
    Computer type
    PC/Desktop
    Manufacturer/Model
    Homebuilt
    CPU
    AMD Ryzen 7 3800XT
    Motherboard
    ASUS ROG Crosshair VII Hero (WiFi)
    Memory
    32GB
    Graphics Card(s)
    EVGA GeForce GTX 1080 Ti
  • Operating System
    Windows 11 Education
    Computer type
    Laptop
    Manufacturer/Model
    Dell Inspiron 7773
    CPU
    Intel i7-8550U
    Memory
    32GB
    Graphics card(s)
    Nvidia Geforce MX150
    Sound Card
    Realtek
    Monitor(s) Displays
    17"
    Screen Resolution
    1920 x 1080
    Hard Drives
    Toshiba 512GB NVMe SSD
    SK Hynix 512GB SATA SSD
    Internet Speed
    Fast!
it is not very easy at all to recover it once it is lost.
It is extremely easy to do that if you have the ISO or the win.re file.
since MiniTool Partition Wizard will no longer copy system partitions with the free version, I use Macrium Reflect Free for all cloning/copying of partitions and disks.
A workaround is if you have another disk to boot from. In that case, the system partition would be like any other partition and can be cloned using free versions of partition softwares.
 

My Computer

System One

  • OS
    Windows 11
    Computer type
    Laptop
    Manufacturer/Model
    HP Envy dv7
    CPU
    Intel Core i7 3630QM
    Motherboard
    HP
    Memory
    16 GB
    Graphics Card(s)
    Intel HD Graphics 4000 & Nvidia GeForce GT 635M
    Sound Card
    IDT High Definition
    Screen Resolution
    1080p
    Hard Drives
    1 TB Crucial MX500 on bay 1.
    1 TB Seagate HDD on bay 2.
    Antivirus
    Windows Defender
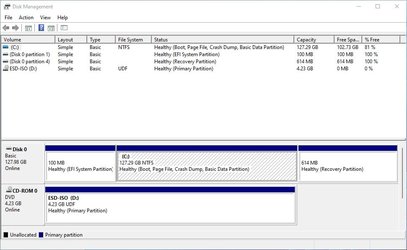
Here's an example of failure:
Before:
Capture.JPG
Code:
C:\WINDOWS\system32>reagentc /info
Windows Recovery Environment (Windows RE) and system reset configuration
Information:

    Windows RE status:         Enabled
    Windows RE location:       \\?\GLOBALROOT\device\harddisk0\partition4\Recovery\WindowsRE
    Boot Configuration Data (BCD) identifier: fdf37112-5ce8-11ec-9b3c-98a0304b965e
    Recovery image location:
    Recovery image index:      0
    Custom image location:
    Custom image index:        0

REAGENTC.EXE: Operation Successful.

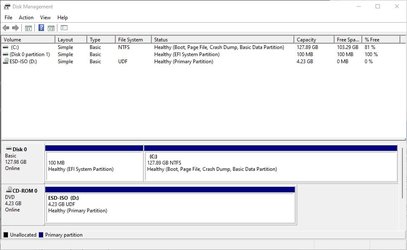
After:
Capture1.jpg
Code:
C:\WINDOWS\system32>reagentc /info
Windows Recovery Environment (Windows RE) and system reset configuration
Information:

    Windows RE status:         Disabled
    Windows RE location:
    Boot Configuration Data (BCD) identifier: fdf37112-5ce8-11ec-9b3c-98a0304b965e
    Recovery image location:
    Recovery image index:      0
    Custom image location:
    Custom image index:        0

REAGENTC.EXE: Operation Successful.


C:\WINDOWS\system32>reagentc /enable
REAGENTC.EXE: The Windows RE image was not found.
 
Last edited:

My Computers

System One System Two

  • OS
    Windows 11
    Computer type
    PC/Desktop
    Manufacturer/Model
    Homebuilt
    CPU
    AMD Ryzen 7 3800XT
    Motherboard
    ASUS ROG Crosshair VII Hero (WiFi)
    Memory
    32GB
    Graphics Card(s)
    EVGA GeForce GTX 1080 Ti
  • Operating System
    Windows 11 Education
    Computer type
    Laptop
    Manufacturer/Model
    Dell Inspiron 7773
    CPU
    Intel i7-8550U
    Memory
    32GB
    Graphics card(s)
    Nvidia Geforce MX150
    Sound Card
    Realtek
    Monitor(s) Displays
    17"
    Screen Resolution
    1920 x 1080
    Hard Drives
    Toshiba 512GB NVMe SSD
    SK Hynix 512GB SATA SSD
    Internet Speed
    Fast!
Assuming that you have the Windows 11 ISO file with install.wim downloaded from Microsoft (not install.esd), and that it is mounted as D: drive, these would be the commands to re-instate Windows Recovery Environment in the above scenario if you broke WinRE:

Code:
Microsoft Windows [Version 10.0.22000.318]
(c) Microsoft Corporation. All rights reserved.

C:\WINDOWS\system32>mkdir C:\TempImage

C:\WINDOWS\system32>dism /mount-image /imagefile:D:\Sources\Install.wim /index:6 /mountdir:C:\TempImage /ReadOnly

Deployment Image Servicing and Management tool
Version: 10.0.22000.1

Mounting image
[==========================100.0%==========================]
The operation completed successfully.

C:\WINDOWS\system32>copy C:\TempImage\Windows\System32\Recovery\*.* C:\Windows\System32\Recovery /Y
C:\TempImage\Windows\System32\Recovery\ReAgent.xml
C:\TempImage\Windows\System32\Recovery\Winre.wim
        2 file(s) copied.

C:\WINDOWS\system32>reagentc /setreimage /path C:\Windows\System32\Recovery
Directory set to: \\?\GLOBALROOT\device\harddisk0\partition3\Windows\System32\Recovery

REAGENTC.EXE: Operation Successful.


C:\WINDOWS\system32>reagentc /enable
REAGENTC.EXE: Operation Successful.


C:\WINDOWS\system32>dism /unmount-image /mountdir:C:\TempImage /Discard

Deployment Image Servicing and Management tool
Version: 10.0.22000.1

Unmounting image
[==========================100.0%==========================]
The operation completed successfully.

C:\WINDOWS\system32>rd C:\TempImage /S /Q

C:\WINDOWS\system32>
 

My Computers

System One System Two

  • OS
    Windows 11
    Computer type
    PC/Desktop
    Manufacturer/Model
    Homebuilt
    CPU
    AMD Ryzen 7 3800XT
    Motherboard
    ASUS ROG Crosshair VII Hero (WiFi)
    Memory
    32GB
    Graphics Card(s)
    EVGA GeForce GTX 1080 Ti
  • Operating System
    Windows 11 Education
    Computer type
    Laptop
    Manufacturer/Model
    Dell Inspiron 7773
    CPU
    Intel i7-8550U
    Memory
    32GB
    Graphics card(s)
    Nvidia Geforce MX150
    Sound Card
    Realtek
    Monitor(s) Displays
    17"
    Screen Resolution
    1920 x 1080
    Hard Drives
    Toshiba 512GB NVMe SSD
    SK Hynix 512GB SATA SSD
    Internet Speed
    Fast!
Here is the standard Windows UEFI install:

View attachment 16203

Code:
C:\Windows\system32>diskpart

Microsoft DiskPart version 10.0.22000.1

Copyright (C) Microsoft Corporation.
On computer: DESKTOP-V223ACD

DISKPART> select disk 0

Disk 0 is now the selected disk.

DISKPART> list part

  Partition ###  Type              Size     Offset
  -------------  ----------------  -------  -------
  Partition 1    System             100 MB  1024 KB
  Partition 2    Reserved            16 MB   101 MB
  Partition 3    Primary            127 GB   117 MB
  Partition 4    Recovery           604 MB   127 GB

First you need to make sure that your Windows Recovery Environment (WinRE) is enabled to begin with, run reagentc /info:

Code:
C:\Windows\system32>reagentc /info
Windows Recovery Environment (Windows RE) and system reset configuration
Information:

    Windows RE status:         Enabled
    Windows RE location:       \\?\GLOBALROOT\device\harddisk0\partition4\Recovery\WindowsRE
    Boot Configuration Data (BCD) identifier: fdf3710b-5ce8-11ec-9b3c-98a0304b965e
    Recovery image location:
    Recovery image index:      0
    Custom image location:
    Custom image index:        0

REAGENTC.EXE: Operation Successful.

Mine shows that it is enabled and it is on Drive 0, Partition 4, exactly where it should be. Now let's disable it with reagentc /disable:

Code:
C:\Windows\system32>reagentc /disable
REAGENTC.EXE: Operation Successful.

With the WinRE disabled, the recovery environment is stored in C:\Windows\\System32\Recovery and it will move with the C: drive OS partition - I can clone it to another drive, image it, whatever, WinRE will go with C: drive.

Code:
C:\Windows\System32>dir C:\Windows\System32\Recovery /a
 Volume in drive C has no label.
 Volume Serial Number is 42BF-FAAF

 Directory of C:\Windows\System32\Recovery

12/14/2021  06:39 AM    <DIR>          .
12/14/2021  06:27 AM    <DIR>          ..
12/14/2021  06:39 AM             1,079 ReAgent.xml
11/04/2021  06:10 AM       525,686,266 Winre.wim
               2 File(s)    525,687,345 bytes
               2 Dir(s)  116,191,354,880 bytes free

Here is the disk without the recovery partition:

View attachment 16204

Since my WinRE was safely stored in C:\Windows\System32\Recovery using the reagentc /disable command, now I can re-enable WinRE without needing a recovery partition. It gets reinstated at C:\Recovery:

Code:
C:\Windows\system32>reagentc /enable
REAGENTC.EXE: Operation Successful.


C:\Windows\system32>reagentc /info
Windows Recovery Environment (Windows RE) and system reset configuration
Information:

    Windows RE status:         Enabled
    Windows RE location:       \\?\GLOBALROOT\device\harddisk0\partition3\Recovery\WindowsRE
    Boot Configuration Data (BCD) identifier: fdf3710d-5ce8-11ec-9b3c-98a0304b965e
    Recovery image location:
    Recovery image index:      0
    Custom image location:
    Custom image index:        0

REAGENTC.EXE: Operation Successful.


C:\Windows\system32>dir C:\Recovery /a
 Volume in drive C has no label.
 Volume Serial Number is 42BF-FAAF

 Directory of C:\Recovery

12/14/2021  06:47 AM    <DIR>          .
12/14/2021  06:22 AM    <DIR>          ..
12/14/2021  06:47 AM             1,040 ReAgentOld.xml
12/14/2021  06:47 AM    <DIR>          WindowsRE
               1 File(s)          1,040 bytes
               3 Dir(s)  116,781,924,352 bytes free

C:\Windows\system32>dir C:\Recovery\WindowsRE /a
 Volume in drive C has no label.
 Volume Serial Number is 42BF-FAAF

 Directory of C:\Recovery\WindowsRE

12/14/2021  06:47 AM    <DIR>          .
12/14/2021  06:47 AM    <DIR>          ..
06/05/2021  04:05 AM         3,170,304 boot.sdi
12/14/2021  06:47 AM             1,106 ReAgent.xml
11/04/2021  06:10 AM       525,686,266 Winre.wim
               3 File(s)    528,857,676 bytes
               2 Dir(s)  116,781,957,120 bytes free

If I had not disabled WinRE first, and did not properly keep the recovery partition with the Windows partition when I cloned or imaged or did whatever, I would have lost the recovery environment and it is not very easy at all to recover it once it is lost. That's why I always advise to run reagentc /disable before moving partitions around. In the above example, if I had cloned the recovery properly along with the Windows partition, when I did reagentc /enable, it actually would have re-enabled back to the recovery partition instead of C:\Recovery.

NOTE: prebuilt off-the-shelf computers may have a second recovery partition containing factory software - nothing in the above discussion applies to that partition. Your best insurance for that is to make an image of the entire disk - all partitions - so that you have it archived.

Finally, since MiniTool Partition Wizard will no longer copy system partitions with the free version, I use Macrium Reflect Free for all cloning/copying of partitions and disks.

So I got another identical laptop to clone and sure enough the stock SSD had a bunch of partitions some of which I deleted not knowing if I could or should. So I thought the issue was that I just deleted some partitions after the clone.

I confidently cloned it again (with EASEUS) with all partitions and they all came over just fine. I was sure that was the solution to my "no recovery environment found" error. Welp I went to test the "Reset my PC" and the damn error came up again! I was so pissed and lost. I almost gave up on going from the stock 512GB SSD to a 2TB SSD. but THEN I just tried what you mentioned. I went to CMD and entered "reagentc /enable" and restarted my computer. I tried a reset this PC and VOILA everything WORKED perfectly as the stock computer (I did a full factory reset) ! I am so happy and not going to touch any of these partitions!

Now I know when I clone a drive with all partitions, in order for the recovery/ reset to work I have to reagentc /enable on the new SSD.

Thanks everyone here who helped. I spent hours on Google and other sites and nothing helped except this thread. Not sure how I found this website but it worked!
 

My Computer

System One

  • OS
    Windows 11
Like @treoneo, I have a laptop ( with a 500Gb SSD that I wish to change to a 2TB SSD) that only supports a single SSD at a time other than externally. I purchased an external enclosure (MOKiN model MOUD0102) and purchased LapLink Disk Image / PC Mover software. I was able to clone the disk, with many headaches, but it would not boot when I installed it. The directions were not that clear. A few days later I thought I had found a solution online, but by then, the computer decided it would no longer recognize my external drives. I have no clue why any of this has happened. All of my specs that I know of are listed in my profile.

What process should I use here? Much of this is over my head at the moment. I am not used to all of the designed in roadblocks for newer computers. I am an old DOS and then windows x86 builder.

Thanks in advance.

PS If this is not the appropriate place to ask about this, Mod's feel free to move it or create another thread.
 

My Computers

System One System Two

  • OS
    Windows 10 Home 10.0.22000.318 upgraded to 11 V:21H2
    Computer type
    Laptop
    Manufacturer/Model
    HP Spectre x360 Convertible 15T-eb100
    CPU
    11th Gen Intel(R) Core(TM) i7-1165G7 @ 2.80GHz 2.70 G
    Motherboard
    HP 8812 Version 55.19
    Memory
    16.0 GB (15.6 GB usable)
    Graphics Card(s)
    Intel(R) Iris(R) Xe Graphics (iRISx) - discrete graphics
    Sound Card
    Realtek High Definition Audio
    Monitor(s) Displays
    Dell
    Screen Resolution
    HP Laptop: 3840x2160, Dell external 1680x1050
    Hard Drives
    NVMe KXG60ZNV512G KIOXIA (NTFS) SSD
    external Samsung 980 PRO PCle 4.0 NVMe M.2 SSD
    (want to make this the internal drive somehow)
    PSU
    135 W Smart AC power adapter
    Case
    emerald cut
    Keyboard
    external HP USB slim KB - PH0U
    Mouse
    Logitech M510
    Internet Speed
    10.3 mbps download, 0.91mbps upload
    Browser
    Chrome Version 97.0.4692.99 (Official Build) (64-bit)
    Antivirus
    Norton 360
    Other Info
    1. Power AC input
    2. HDMI 2.0b12
    3. Audio combo jack
    4. MicroSD reader
    5. Webcam Kill Switch
    6. USB 3.2 Gen 2 Type-A
    7. USB 3.2 Gen 2 Type-C™
    8. USB 3.2 Gen 2 Type-C™ with Thunderbolt™ 312
    Synaptics Precision Touchpad
    64-bit operating system, x64-based processor
    Pen and touch support with 10 touch points w/Windows Ink installed
  • Operating System
    Windows 10 Pro 64
    Computer type
    Laptop
    Manufacturer/Model
    HP Spectre x360-15t Touch Convertible
    CPU
    i7
    Memory
    16GB
    Graphics card(s)
    Intel Iris - Inteli76560U Processor Intel HD Graphics 16GB
    Monitor(s) Displays
    15.6" UHD WLED Display -Touch S
    Screen Resolution
    3840x2160
    Hard Drives
    1TB PCIe(R) NVMe M.2 SSD
    Browser
    Chrome
    Antivirus
    Norton
    Other Info
    I am currently locked out of this system by Microsoft. I cannot prove ownership so I an stuck at this point

    Web Cam, Dual Mic's, Active Stylus Pen, Backlit KB
    Thunderbolt 3
    One USB-A 3.0 port, two SuperSpeed USB 10Gbps
Like @treoneo
What process should I use here? Much of this is over my head at the moment. I am not used to all of the designed in roadblocks for newer computers. I am an old DOS and then windows x86 builder.

Thanks in advance.

PS If this is not the appropriate place to ask about this, Mod's feel free to move it or create another thread.
You should have downloaded Macrium Reflect Free (which is free, no cost), cloned the entire old SSD, all partitions, to the new SSD. Then it should boot when installed. You can adjust partition sizes in Macrium Free during the cloning, or you can adjust the partition sizes with something like MiniTool Partition Wizard after the cloning is done.
 

My Computers

System One System Two

  • OS
    Windows 11
    Computer type
    PC/Desktop
    Manufacturer/Model
    Homebuilt
    CPU
    AMD Ryzen 7 3800XT
    Motherboard
    ASUS ROG Crosshair VII Hero (WiFi)
    Memory
    32GB
    Graphics Card(s)
    EVGA GeForce GTX 1080 Ti
  • Operating System
    Windows 11 Education
    Computer type
    Laptop
    Manufacturer/Model
    Dell Inspiron 7773
    CPU
    Intel i7-8550U
    Memory
    32GB
    Graphics card(s)
    Nvidia Geforce MX150
    Sound Card
    Realtek
    Monitor(s) Displays
    17"
    Screen Resolution
    1920 x 1080
    Hard Drives
    Toshiba 512GB NVMe SSD
    SK Hynix 512GB SATA SSD
    Internet Speed
    Fast!
You should have downloaded Macrium Reflect Free (which is free, no cost), cloned the entire old SSD, all partitions, to the new SSD. Then it should boot when installed. You can adjust partition sizes in Macrium Free during the cloning, or you can adjust the partition sizes with something like MiniTool Partition Wizard after the cloning is done.
I did not know about Macrium at all until I read this thread.

Do you think that will also fix the issue with the computer not recognizing the external drives?
 

My Computers

System One System Two

  • OS
    Windows 10 Home 10.0.22000.318 upgraded to 11 V:21H2
    Computer type
    Laptop
    Manufacturer/Model
    HP Spectre x360 Convertible 15T-eb100
    CPU
    11th Gen Intel(R) Core(TM) i7-1165G7 @ 2.80GHz 2.70 G
    Motherboard
    HP 8812 Version 55.19
    Memory
    16.0 GB (15.6 GB usable)
    Graphics Card(s)
    Intel(R) Iris(R) Xe Graphics (iRISx) - discrete graphics
    Sound Card
    Realtek High Definition Audio
    Monitor(s) Displays
    Dell
    Screen Resolution
    HP Laptop: 3840x2160, Dell external 1680x1050
    Hard Drives
    NVMe KXG60ZNV512G KIOXIA (NTFS) SSD
    external Samsung 980 PRO PCle 4.0 NVMe M.2 SSD
    (want to make this the internal drive somehow)
    PSU
    135 W Smart AC power adapter
    Case
    emerald cut
    Keyboard
    external HP USB slim KB - PH0U
    Mouse
    Logitech M510
    Internet Speed
    10.3 mbps download, 0.91mbps upload
    Browser
    Chrome Version 97.0.4692.99 (Official Build) (64-bit)
    Antivirus
    Norton 360
    Other Info
    1. Power AC input
    2. HDMI 2.0b12
    3. Audio combo jack
    4. MicroSD reader
    5. Webcam Kill Switch
    6. USB 3.2 Gen 2 Type-A
    7. USB 3.2 Gen 2 Type-C™
    8. USB 3.2 Gen 2 Type-C™ with Thunderbolt™ 312
    Synaptics Precision Touchpad
    64-bit operating system, x64-based processor
    Pen and touch support with 10 touch points w/Windows Ink installed
  • Operating System
    Windows 10 Pro 64
    Computer type
    Laptop
    Manufacturer/Model
    HP Spectre x360-15t Touch Convertible
    CPU
    i7
    Memory
    16GB
    Graphics card(s)
    Intel Iris - Inteli76560U Processor Intel HD Graphics 16GB
    Monitor(s) Displays
    15.6" UHD WLED Display -Touch S
    Screen Resolution
    3840x2160
    Hard Drives
    1TB PCIe(R) NVMe M.2 SSD
    Browser
    Chrome
    Antivirus
    Norton
    Other Info
    I am currently locked out of this system by Microsoft. I cannot prove ownership so I an stuck at this point

    Web Cam, Dual Mic's, Active Stylus Pen, Backlit KB
    Thunderbolt 3
    One USB-A 3.0 port, two SuperSpeed USB 10Gbps
I did not know about Macrium at all until I read this thread.

Do you think that will also fix the issue with the computer not recognizing the external drives?
No. The computer must recognize the external drive first before you can use it in any way, including cloning to it. Does the drive not show up in disk management, or does not show up in explorer?
 

My Computers

System One System Two

  • OS
    Windows 11
    Computer type
    PC/Desktop
    Manufacturer/Model
    Homebuilt
    CPU
    AMD Ryzen 7 3800XT
    Motherboard
    ASUS ROG Crosshair VII Hero (WiFi)
    Memory
    32GB
    Graphics Card(s)
    EVGA GeForce GTX 1080 Ti
  • Operating System
    Windows 11 Education
    Computer type
    Laptop
    Manufacturer/Model
    Dell Inspiron 7773
    CPU
    Intel i7-8550U
    Memory
    32GB
    Graphics card(s)
    Nvidia Geforce MX150
    Sound Card
    Realtek
    Monitor(s) Displays
    17"
    Screen Resolution
    1920 x 1080
    Hard Drives
    Toshiba 512GB NVMe SSD
    SK Hynix 512GB SATA SSD
    Internet Speed
    Fast!
This tutorial attempts to achieve the objectives using built-in tools, without use of 3rd party software.

A fresh and clean installation is always the best thing to do, because in addition to a bug-free Windows experience, everything outside the Windows environment like the EFI partition, Recovery partition, and overall system integrity remains intact and well maintained.

However, there are times when simply cloning the current system is preferred. This is not just to save time, but also because the existing system may contain drivers (e.g. BootCamp drivers) and other factors that setting up everything fresh becomes too much time consuming, and sometimes not possible too.

Under these circumstances, the following guide will ensure that you can quickly clone your current system to an external SSD (or an internal one) that can be used on both Windows PC as well as a Mac (assuming the existing system already has the required BootCamp drivers).


BASICS

Before explaining the steps, just know some basics of how the computer functions.

Every time you power on your computer, your system firmware first loads a hidden partition on the boot device called the EFI partition. This partition contains information about the installed operating systems as well as their paths (on the disk). In my experience, simply cloning an existing system partition to another device will often not be enough to make it bootable. This is probably because it breaks the OS paths in the new EFI partition that is automatically created in the cloning process. When that happens, you cannot boot from the target device unless the EFI partition is fixed with the correct path to the OS installed in the target disk.


LESSONS IN THIS TUTORIAL

So in this tutorial, we will see 3 things:

1. How to clone the system partition.
2. How to fix the EFI partition.
3. How to restore the native Windows Recovery Environment (if that gets broken too in the cloning process).


CLONING THE SYSTEM PARTITION


Things Required

1. Backup/ Cloning software: Most cloning software allow system cloning only in their paid version, so keep that in mind. See comment 1 if you don't want to use 3rd party software.

2. External SSD/ HDD/ Flash Drive.

3. External keyboard and mouse (only if you want to boot from the target disk on a Mac and your existing system doesn't have BootCamp drivers).

Process

This is a very straight-forward process.

1. Ensure that the target disk is partitioned as GPT. This is best for Windows 10 and newer. If it is not partitioned as GPT, you can use a partition assistant software that will allow you to convert the partition from MBR to GPT without losing data. Most free versions of well known partition softwares will allow you to do this.
2. Clone the system to the target disk (or a partition in the target disk) using the cloning software. If you are cloning the system that you have booted into, use the System Clone feature. If you are cloning the system partition on another disk/ partition, use the Clone Disk/ Partition feature.
3. When using the System Clone feature, you will see that the hidden EFI partition is automatically included. This EFI partition is often broken in the target disk, and we will see how to fix this in the next section.
4. Once cloning is complete, try booting from the target device. If it boots fine, great. If it doesn't boot, then here are the steps to make it boot.


RECREATING THE EFI PARTITION

Things Required

1. Windows Recovery Disk (if you can't boot into Recovery or if the native Recovery doesn't have command prompt feature)

Process

1. Boot to Recovery. If you don't have one or if it is broken, then connect your Windows Recovery Disk (you have to create one if you don't already have it).
2. Go to Command Prompt while in Recovery:

diskpart
list vol
sel vol x
(here 'x' is the volume number of the EFI partition of the target disk; check the result from the previous command)
format quick fs=fat32 label="EFI T5" (you can give any name that helps you to identify the partition easily; in my case, I was installing Windows 10 on my Samsung T5 SSD, hence I named it as EFI T5; you can replace the text within the quotes with one of your choice)
set id=C12A7328-F81F-11D2-BA4B-00A0C93EC93B
assign letter=a
(you can replace 'a' with any alphabet that is not currently in use)
list vol (make sure that all the windows partitions in the target disk have a letter assigned to them; if any does not have a letter assigned, then assign a letter to each one of them as in the previous steps: select the correct volume number of the OS partition first and then assign a letter)

exit

Now we have to copy the boot files (which contain the OS paths) from each of the installed Windows OS to the EFI partition.

Pass the following command(s):

bcdboot c:\windows /s a:
(here, I'm assuming that the letter for the OS partition is 'c'; check the letter in your case as it need not be 'c'; use the correct letter for the OS partition that you see in your case; repeat this command for all the operating systems installed in the target disk, replacing 'c' with the corresponding letter of the OS; also remember that 'a' is the letter I used for the EFI partition; if you have assigned a different letter, then replace 'a' with the letter you have assigned for the EFI partition)

exit

Reboot.

If the disk has multiple OS installations, the OS Boot Manager should now show all of them, so you can choose which one to boot from.

If your target disk has multiple OS installed, you will see that there is an EFI partition for each of them. You can safely format/ delete all those except the first one. The system prefers the EFI partition to be installed at the beginning of the disk, so keep the 1st one and format the rest. In our case, it is the one that we assigned the letter 'a'.

To format the additional EFI partitions in the target disk, use DISKPART in command prompt:

diskpart

lis vol

sel vol x
(where 'x' is the volume number of the additional EFI partitions in the target disk; repeat this for all the additional EFI partitions)

format quick fs=fat32

Remember, that you must only delete the extra EFI partitions on the target disk, not the ones on other disks that are attached to your system.

Every bootable disk needs just one EFI partition (preferably at the beginning of the disk because that is where the firmware first looks for one) and one Recovery partition. If you are using a multi-boot disk (assuming they are all Windows), a single EFI partition is enough that should contain the paths of all the OSes in the disk. The process above will accomplish this.

Also, each disk needs to have just one Recovery partition. You don't need a separate EFI or separate Recovery partition for each of the OSes installed. Having one EFI and one Recovery on the disk itself would suffice.


RECREATING THE RECOVERY PARTITION (can be done from inside Windows)

Things Required

1. Windows ISO (preferably the latest one)

2. 7zip or any archiver installed


Sometimes, the recovery partition can become corrupt. If that is the case, you won't be able to boot into Recovery or create a recovery disk. Troubleshooting Windows from recovery won't be possible in such cases. But we can restore it as follows:

____________________________________________________________________________________________________________________________

If the recovery partition does not exist, create it as follows:

Open command prompt with administrative privileges:

diskpart
list vol
(note the volume number for Windows partition)
sel vol x (where x is the volume number of the Windows partition from above result)
shrink desired=1024 (this will create a Recovery partition of size 1 GB)
create par pri
format quick fs=NTFS label=Recovery
set id=DE94BBA4-06D1-4D40-A16A-BFD50179D6AC
(this is the id for Recovery partition)
gpt attributes=0x8000000000000001
exit


____________________________________________________________________________________________________________________________

If the recovery partition already exists but is corrupt, then format the recovery partition using command prompt:

diskpart

list vol
sel vol x
(where 'x' is the volume number of the recovery partition from the result above)
format quick fs=NTFS label=Recovery
set id=DE94BBA4-06D1-4D40-A16A-BFD50179D6AC
(this is the id for Recovery partition)
gpt attributes=0x8000000000000001
exit


____________________________________________________________________________________________________________________________

ENABLING THE RECOVERY ENVIRONMENT (do it from inside Windows)


1. reagentc /disable (you may see an output that says it is already disabled; it doesn't matter)

2. Go to C:\Windows\System32\Recovery and delete all files there.

3. Copy* WinRE.wim and the uninitialized ReAgent.xml files from the installation Media (ISO file) to C:\Windows\System32\Recovery

4. reagentc /enable (this will move WinRe.wim to the Recovery partition and set the GUID and location in ReAgent.xml)

After restoring the recovery partition, you'll be able to create a recovery disk on an external USB device.


*Here are the steps:

1. Right click the Windows ISO file
2. Use 7zip to open archive (just open; don't have to extract it)
3. Sources
4. Locate the install.wim (or install.esd) file
5. Right click and open
6. Choose the correct folder for your edition of Windows:

1 - Windows 10 Home
2 - Windows 10 Home N
3 - Windows 10 Home Single Language
4 - Windows 10 Education
5 - Windows 10 Education N
6 - Windows 10 Pro
7 - Windows 10 Pro N
8 - Windows 10 Pro Education
9 - Windows 10 Pro Education N
10 - Windows 10 Pro for Workstations
11 - Windows 10 Pro N for Workstations

In case of Windows Home, choose the folder '1'; for Windows Pro, choose folder '6', etc.

7. Go to Windows\ System32\ Recovery
8. Copy the two files (ReAgent.xml and Winre.wim) to your system (C:\Windows\System32\Recovery)


IN ALL OF THE DISKPART COMMANDS, BE EXTREMELY CAREFUL IN SELECTING THE CORRECT VOLUMES/ PARTITIONS/ DISKS. YOU MUST ONLY SELECT THE CORRECT VOLUMES IN YOUR TARGET DISK. DOUBLE CHECK THIS BEFORE PASSING THE COMMANDS.


DISCLAIMER

With the process above, you will have a bootable system with its own recovery environment. I am not sure if this breaks anything. Everything works fine as it should as far as I have tested. Your mileage may vary depending on the hardware you use and the way you use your system.

.
Why on earth would I go to those lengths to clone my system, when Macrium Reflect free is so very easy to use and takes up much less time and energy. Besides, cloning takes up way more space than imaging anyway.
 

My Computers

System One System Two

  • OS
    Windows 11 23H2 22631.2861
    Computer type
    PC/Desktop
    Manufacturer/Model
    HP Envy TE01-1xxx
    CPU
    Intel(R) Core(TM) i7-10700 CPU @ 2.90GHz 2.90 GHz
    Motherboard
    16.0GB Dual-Channel Unknown @ 1463MHz (21-21-21-47)
    Memory
    16384 MBytes
    Graphics Card(s)
    Intel UHD Graphics 630
    Sound Card
    Realtek High Definition Audio
    Monitor(s) Displays
    Monitor 1 - Acer 27" Monitor 2 - Acer 27"
    Screen Resolution
    1920 x 1080
    Hard Drives
    WDC PC SN530 SDBPNPZ-512G-1006 (SSD)
    Seagate ST1000DM003-1SB102
    Seagate BUP Slim SCSI Disk Device (SSD)
    PSU
    HP
    Case
    HP
    Cooling
    Standard
    Keyboard
    Logitech Wave K350
    Mouse
    Logitech M705
    Internet Speed
    500 mbps
    Browser
    Firefox
    Antivirus
    Windows Defender
    Other Info
    That's all Folks!
  • Operating System
    Windows 11
    Computer type
    PC/Desktop
    Manufacturer/Model
    HP
    CPU
    Intel Core i7 (10th gen) 10700
    Motherboard
    Intel
    Memory
    16 GB
    Graphics card(s)
    Intel UHD Graphics 630
    Sound Card
    Built-in
    Monitor(s) Displays
    Acer 27" & Samsung 24"
    Screen Resolution
    1920 x
    Hard Drives
    SSD (512 GB)
    HDD (1 TB)
    Seagate
    PSU
    Intel i7 10th Generation
    Case
    HP
    Cooling
    HP/Intel?
    Mouse
    Logitech M705
    Keyboard
    Logitech Wave K350
    Internet Speed
    50 mbps
    Browser
    Firefox 90.2
    Antivirus
    Windows Defender
    Other Info
    Headphone/Microphone Combo
    SuperSpeed USB Type-A (4 on front)
    HP 3-in-One Card Readr
    SuperSpeed USB Type-C
    DVD Writer
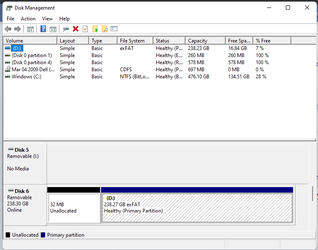
No. The computer must recognize the external drive first before you can use it in any way, including cloning to it. Does the drive not show up in disk management, or does not show up in explorer?
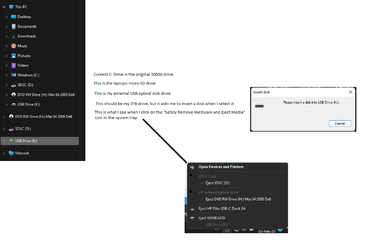
1644107329654.png

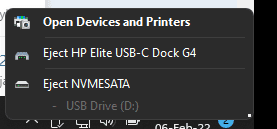
This is what I see in the Control Panel:

1644107293247.png
 

My Computers

System One System Two

  • OS
    Windows 10 Home 10.0.22000.318 upgraded to 11 V:21H2
    Computer type
    Laptop
    Manufacturer/Model
    HP Spectre x360 Convertible 15T-eb100
    CPU
    11th Gen Intel(R) Core(TM) i7-1165G7 @ 2.80GHz 2.70 G
    Motherboard
    HP 8812 Version 55.19
    Memory
    16.0 GB (15.6 GB usable)
    Graphics Card(s)
    Intel(R) Iris(R) Xe Graphics (iRISx) - discrete graphics
    Sound Card
    Realtek High Definition Audio
    Monitor(s) Displays
    Dell
    Screen Resolution
    HP Laptop: 3840x2160, Dell external 1680x1050
    Hard Drives
    NVMe KXG60ZNV512G KIOXIA (NTFS) SSD
    external Samsung 980 PRO PCle 4.0 NVMe M.2 SSD
    (want to make this the internal drive somehow)
    PSU
    135 W Smart AC power adapter
    Case
    emerald cut
    Keyboard
    external HP USB slim KB - PH0U
    Mouse
    Logitech M510
    Internet Speed
    10.3 mbps download, 0.91mbps upload
    Browser
    Chrome Version 97.0.4692.99 (Official Build) (64-bit)
    Antivirus
    Norton 360
    Other Info
    1. Power AC input
    2. HDMI 2.0b12
    3. Audio combo jack
    4. MicroSD reader
    5. Webcam Kill Switch
    6. USB 3.2 Gen 2 Type-A
    7. USB 3.2 Gen 2 Type-C™
    8. USB 3.2 Gen 2 Type-C™ with Thunderbolt™ 312
    Synaptics Precision Touchpad
    64-bit operating system, x64-based processor
    Pen and touch support with 10 touch points w/Windows Ink installed
  • Operating System
    Windows 10 Pro 64
    Computer type
    Laptop
    Manufacturer/Model
    HP Spectre x360-15t Touch Convertible
    CPU
    i7
    Memory
    16GB
    Graphics card(s)
    Intel Iris - Inteli76560U Processor Intel HD Graphics 16GB
    Monitor(s) Displays
    15.6" UHD WLED Display -Touch S
    Screen Resolution
    3840x2160
    Hard Drives
    1TB PCIe(R) NVMe M.2 SSD
    Browser
    Chrome
    Antivirus
    Norton
    Other Info
    I am currently locked out of this system by Microsoft. I cannot prove ownership so I an stuck at this point

    Web Cam, Dual Mic's, Active Stylus Pen, Backlit KB
    Thunderbolt 3
    One USB-A 3.0 port, two SuperSpeed USB 10Gbps
Frankly, who in their right mind would clone like this!

It is far easier and quicker to install Macrium Reflect Free or similar and clone using that, with very little user knowledge needed.

Also, I hate it when people say a clean install is the best. "Best" is a very subjective term.

It is funny when people say that, they neglect to tell people they need to make sure they have all installation keys for software available. I have lost count of number of times people find they cannot reactivate say Office after a clean install!

In my opinion, a clean install is a last resort.
Yup! One of my students had been reading stuff on the Internet and decided to ask about a clean installation instead of a backup and restore if things go South. I explained about Product keys and she wasn't real sure she had all of 'em. Kinda put the quietus to her clean install. I also explained that even if she has all her keys, how long it would take to "put the system back" to how she had it.

Sometimes a clean install is best, but not all that often. I'd do a repair install first.
 

My Computers

System One System Two

  • OS
    Windows 11 23H2 22631.2861
    Computer type
    PC/Desktop
    Manufacturer/Model
    HP Envy TE01-1xxx
    CPU
    Intel(R) Core(TM) i7-10700 CPU @ 2.90GHz 2.90 GHz
    Motherboard
    16.0GB Dual-Channel Unknown @ 1463MHz (21-21-21-47)
    Memory
    16384 MBytes
    Graphics Card(s)
    Intel UHD Graphics 630
    Sound Card
    Realtek High Definition Audio
    Monitor(s) Displays
    Monitor 1 - Acer 27" Monitor 2 - Acer 27"
    Screen Resolution
    1920 x 1080
    Hard Drives
    WDC PC SN530 SDBPNPZ-512G-1006 (SSD)
    Seagate ST1000DM003-1SB102
    Seagate BUP Slim SCSI Disk Device (SSD)
    PSU
    HP
    Case
    HP
    Cooling
    Standard
    Keyboard
    Logitech Wave K350
    Mouse
    Logitech M705
    Internet Speed
    500 mbps
    Browser
    Firefox
    Antivirus
    Windows Defender
    Other Info
    That's all Folks!
  • Operating System
    Windows 11
    Computer type
    PC/Desktop
    Manufacturer/Model
    HP
    CPU
    Intel Core i7 (10th gen) 10700
    Motherboard
    Intel
    Memory
    16 GB
    Graphics card(s)
    Intel UHD Graphics 630
    Sound Card
    Built-in
    Monitor(s) Displays
    Acer 27" & Samsung 24"
    Screen Resolution
    1920 x
    Hard Drives
    SSD (512 GB)
    HDD (1 TB)
    Seagate
    PSU
    Intel i7 10th Generation
    Case
    HP
    Cooling
    HP/Intel?
    Mouse
    Logitech M705
    Keyboard
    Logitech Wave K350
    Internet Speed
    50 mbps
    Browser
    Firefox 90.2
    Antivirus
    Windows Defender
    Other Info
    Headphone/Microphone Combo
    SuperSpeed USB Type-A (4 on front)
    HP 3-in-One Card Readr
    SuperSpeed USB Type-C
    DVD Writer
Why on earth would I go to those lengths to clone my system, when Macrium Reflect free is so very easy to use and takes up much less time and energy. Besides, cloning takes up way more space than imaging anyway.
The OP starts with the answer to your question, yet you ignore it. The tutorial is for people who want to use built-in tools, or who are not comfortable using 3rd party solutions, especially those that require unnecessary permissions or forcibly run background services even when not required or override user created rules in firewall.

Some of these are typical behaviour of malware and so users like me stay away from such solutions even if there is a large fan following who don't care about some of the potential risks of such behaviour.
 

My Computer

System One

  • OS
    Windows 11
    Computer type
    Laptop
    Manufacturer/Model
    HP Envy dv7
    CPU
    Intel Core i7 3630QM
    Motherboard
    HP
    Memory
    16 GB
    Graphics Card(s)
    Intel HD Graphics 4000 & Nvidia GeForce GT 635M
    Sound Card
    IDT High Definition
    Screen Resolution
    1080p
    Hard Drives
    1 TB Crucial MX500 on bay 1.
    1 TB Seagate HDD on bay 2.
    Antivirus
    Windows Defender
@blasirl,

Unhook all USB drives and remove all Micro SD cards. Restart the computer. Open a command prompt with admin privileges and run:
diskpart
automount scrub
exit
exit

Then reconnect your external USB drive and see if you can access it.
 

My Computers

System One System Two

  • OS
    Windows 11
    Computer type
    PC/Desktop
    Manufacturer/Model
    Homebuilt
    CPU
    AMD Ryzen 7 3800XT
    Motherboard
    ASUS ROG Crosshair VII Hero (WiFi)
    Memory
    32GB
    Graphics Card(s)
    EVGA GeForce GTX 1080 Ti
  • Operating System
    Windows 11 Education
    Computer type
    Laptop
    Manufacturer/Model
    Dell Inspiron 7773
    CPU
    Intel i7-8550U
    Memory
    32GB
    Graphics card(s)
    Nvidia Geforce MX150
    Sound Card
    Realtek
    Monitor(s) Displays
    17"
    Screen Resolution
    1920 x 1080
    Hard Drives
    Toshiba 512GB NVMe SSD
    SK Hynix 512GB SATA SSD
    Internet Speed
    Fast!
I found the original post most informative, I must admit I would stick to Macrium if I wanted to clone a disk
 

My Computers

System One System Two

  • OS
    Windows 11 Pro
    Computer type
    Laptop
    Manufacturer/Model
    Alienware M18 R1
    CPU
    13th Gen Core i9 13900HX
    Memory
    32GB DDR5 @4800MHz 2x16GB
    Graphics Card(s)
    Geforce RTX 4090HX 16GB
    Sound Card
    Nvidia HD / Realtek ALC3254
    Monitor(s) Displays
    18" QHD+
    Screen Resolution
    25660 X 1600
    Hard Drives
    C: KIOXIA (Toshiba) 2TB KXG80ZNV2T04 NVMe PCIe M.2 SSD
    D: KIOXIA (Toshiba) 2TB KXG80ZNV2T04 NVMe PCIe M.2 SSD
    Case
    Dark Metallic Moon
    Keyboard
    Alienware M Series per-key AlienFX RGB
    Mouse
    Alienware AW610M
    Browser
    Chrome and Firefox
    Antivirus
    Norton
    Other Info
    Killer E3000 Ethernet Controller
    Killer Killer AX1690 Wi-Fi Network Adaptor Wi-Fi 6E
    Bluetooth 5.2
    Alienware Z01G Graphic Amplifier
  • Operating System
    Windows 11 Pro
    Computer type
    Laptop
    Manufacturer/Model
    Alienware Area 51m R2
    CPU
    10th Gen i-9 10900 K
    Memory
    32Gb Dual Channel DDR4 @ 8843MHz
    Graphics card(s)
    Nvidia RTX 2080 Super
    Sound Card
    Nvidia
    Screen Resolution
    1920 x 1080
    Hard Drives
    Hard Drive C: Samsung 2TB SSD PM981a NVMe
    Hard Drive D:Samsung 2TB SSD 970 EVO Plus
    Mouse
    Alienware 610M
    Browser
    Chrome
    Antivirus
    Norton
Like @treoneo, I have a laptop ( with a 500Gb SSD that I wish to change to a 2TB SSD) that only supports a single SSD at a time other than externally. I purchased an external enclosure (MOKiN model MOUD0102) and purchased LapLink Disk Image / PC Mover software. I was able to clone the disk, with many headaches, but it would not boot when I installed it. The directions were not that clear. A few days later I thought I had found a solution online, but by then, the computer decided it would no longer recognize my external drives. I have no clue why any of this has happened. All of my specs that I know of are listed in my profile.

What process should I use here? Much of this is over my head at the moment. I am not used to all of the designed in roadblocks for newer computers. I am an old DOS and then windows x86 builder.

Thanks in advance.

PS If this is not the appropriate place to ask about this, Mod's feel free to move it or create another thread.
Are you trying to boot from your external disk?

Set your USB 3.0 ports to Auto mode in BIOS first.

If that is done and it still isn't recognised, try changing the USB ports.

I'm assuming that your computer is not able to recognise the external disk when you are trying to boot from it.
 

My Computer

System One

  • OS
    Windows 11
    Computer type
    Laptop
    Manufacturer/Model
    HP Envy dv7
    CPU
    Intel Core i7 3630QM
    Motherboard
    HP
    Memory
    16 GB
    Graphics Card(s)
    Intel HD Graphics 4000 & Nvidia GeForce GT 635M
    Sound Card
    IDT High Definition
    Screen Resolution
    1080p
    Hard Drives
    1 TB Crucial MX500 on bay 1.
    1 TB Seagate HDD on bay 2.
    Antivirus
    Windows Defender
Are you trying to boot from your external disk?

Set your USB 3.0 ports to Auto mode in BIOS first.

If that is done and it still isn't recognised, try changing the USB ports.

I'm assuming that your computer is not able to recognise the external disk when you are trying to boot from it.
I am struggling to open Run as an administrator at the moment. I have just finished unplugging all of my drives and rebooting, then Windows needed to update and then I had to figure out why my docking station wasn't working. I am now ready to finish what @NavyLCDR proposed.

My original intent was to clone the drive and then swap it with the original installed drive and then keep the smaller one as a copy of my Windows and possibly use it as an external drive for seldom needed items.

Oh, and yes the external drive was not being recognized.

EDIT,

I have just finished scrubbing the mounts.
 

My Computers

System One System Two

  • OS
    Windows 10 Home 10.0.22000.318 upgraded to 11 V:21H2
    Computer type
    Laptop
    Manufacturer/Model
    HP Spectre x360 Convertible 15T-eb100
    CPU
    11th Gen Intel(R) Core(TM) i7-1165G7 @ 2.80GHz 2.70 G
    Motherboard
    HP 8812 Version 55.19
    Memory
    16.0 GB (15.6 GB usable)
    Graphics Card(s)
    Intel(R) Iris(R) Xe Graphics (iRISx) - discrete graphics
    Sound Card
    Realtek High Definition Audio
    Monitor(s) Displays
    Dell
    Screen Resolution
    HP Laptop: 3840x2160, Dell external 1680x1050
    Hard Drives
    NVMe KXG60ZNV512G KIOXIA (NTFS) SSD
    external Samsung 980 PRO PCle 4.0 NVMe M.2 SSD
    (want to make this the internal drive somehow)
    PSU
    135 W Smart AC power adapter
    Case
    emerald cut
    Keyboard
    external HP USB slim KB - PH0U
    Mouse
    Logitech M510
    Internet Speed
    10.3 mbps download, 0.91mbps upload
    Browser
    Chrome Version 97.0.4692.99 (Official Build) (64-bit)
    Antivirus
    Norton 360
    Other Info
    1. Power AC input
    2. HDMI 2.0b12
    3. Audio combo jack
    4. MicroSD reader
    5. Webcam Kill Switch
    6. USB 3.2 Gen 2 Type-A
    7. USB 3.2 Gen 2 Type-C™
    8. USB 3.2 Gen 2 Type-C™ with Thunderbolt™ 312
    Synaptics Precision Touchpad
    64-bit operating system, x64-based processor
    Pen and touch support with 10 touch points w/Windows Ink installed
  • Operating System
    Windows 10 Pro 64
    Computer type
    Laptop
    Manufacturer/Model
    HP Spectre x360-15t Touch Convertible
    CPU
    i7
    Memory
    16GB
    Graphics card(s)
    Intel Iris - Inteli76560U Processor Intel HD Graphics 16GB
    Monitor(s) Displays
    15.6" UHD WLED Display -Touch S
    Screen Resolution
    3840x2160
    Hard Drives
    1TB PCIe(R) NVMe M.2 SSD
    Browser
    Chrome
    Antivirus
    Norton
    Other Info
    I am currently locked out of this system by Microsoft. I cannot prove ownership so I an stuck at this point

    Web Cam, Dual Mic's, Active Stylus Pen, Backlit KB
    Thunderbolt 3
    One USB-A 3.0 port, two SuperSpeed USB 10Gbps
I am struggling to open Run as an administrator at the moment. I have just finished unplugging all of my drives and rebooting, then Windows needed to update and then I had to figure out why my docking station wasn't working. I am now ready to finish what @NavyLCDR proposed.

My original intent was to clone the drive and then swap it with the original installed drive and then keep the smaller one as a copy of my Windows and possibly use it as an external drive for seldom needed items.

Oh, and yes the external drive was not being recognized.
I don't think it is a good idea to boot from an external disk that is connected via a docking station. Try connecting the disk directly to the usb port on the laptop. Not all ports support booting. In my laptop, I have 4 usb ports, but I can only boot from 2 of them. So you have to identify which usb ports on your system support booting. But before that, you have to set your USB 3.0 ports to AUTO mode in BIOS or boot from the USB 2.0 port.
 

My Computer

System One

  • OS
    Windows 11
    Computer type
    Laptop
    Manufacturer/Model
    HP Envy dv7
    CPU
    Intel Core i7 3630QM
    Motherboard
    HP
    Memory
    16 GB
    Graphics Card(s)
    Intel HD Graphics 4000 & Nvidia GeForce GT 635M
    Sound Card
    IDT High Definition
    Screen Resolution
    1080p
    Hard Drives
    1 TB Crucial MX500 on bay 1.
    1 TB Seagate HDD on bay 2.
    Antivirus
    Windows Defender
@blasirl,

Unhook all USB drives and remove all Micro SD cards. Restart the computer. Open a command prompt with admin privileges and run:
diskpart
automount scrub
exit
exit

Then reconnect your external USB drive and see if you can access it.
After following your instructions and then plugging the USB dive, this is what I see:


1644181092358.png1644181118863.png1644181185707.png1644181269924.png

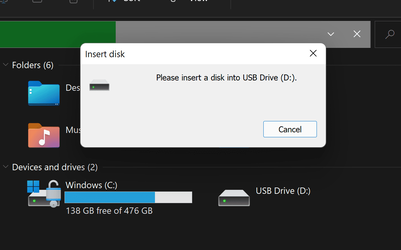
As you can see, the External is now D: drive, but it is still not accessible. Do you think I made a mistake during cloning?

And after all settled down, I clicked on D: drive to see if it would now work and I get this again:


1644181534880.png
 
Last edited:

My Computers

System One System Two

  • OS
    Windows 10 Home 10.0.22000.318 upgraded to 11 V:21H2
    Computer type
    Laptop
    Manufacturer/Model
    HP Spectre x360 Convertible 15T-eb100
    CPU
    11th Gen Intel(R) Core(TM) i7-1165G7 @ 2.80GHz 2.70 G
    Motherboard
    HP 8812 Version 55.19
    Memory
    16.0 GB (15.6 GB usable)
    Graphics Card(s)
    Intel(R) Iris(R) Xe Graphics (iRISx) - discrete graphics
    Sound Card
    Realtek High Definition Audio
    Monitor(s) Displays
    Dell
    Screen Resolution
    HP Laptop: 3840x2160, Dell external 1680x1050
    Hard Drives
    NVMe KXG60ZNV512G KIOXIA (NTFS) SSD
    external Samsung 980 PRO PCle 4.0 NVMe M.2 SSD
    (want to make this the internal drive somehow)
    PSU
    135 W Smart AC power adapter
    Case
    emerald cut
    Keyboard
    external HP USB slim KB - PH0U
    Mouse
    Logitech M510
    Internet Speed
    10.3 mbps download, 0.91mbps upload
    Browser
    Chrome Version 97.0.4692.99 (Official Build) (64-bit)
    Antivirus
    Norton 360
    Other Info
    1. Power AC input
    2. HDMI 2.0b12
    3. Audio combo jack
    4. MicroSD reader
    5. Webcam Kill Switch
    6. USB 3.2 Gen 2 Type-A
    7. USB 3.2 Gen 2 Type-C™
    8. USB 3.2 Gen 2 Type-C™ with Thunderbolt™ 312
    Synaptics Precision Touchpad
    64-bit operating system, x64-based processor
    Pen and touch support with 10 touch points w/Windows Ink installed
  • Operating System
    Windows 10 Pro 64
    Computer type
    Laptop
    Manufacturer/Model
    HP Spectre x360-15t Touch Convertible
    CPU
    i7
    Memory
    16GB
    Graphics card(s)
    Intel Iris - Inteli76560U Processor Intel HD Graphics 16GB
    Monitor(s) Displays
    15.6" UHD WLED Display -Touch S
    Screen Resolution
    3840x2160
    Hard Drives
    1TB PCIe(R) NVMe M.2 SSD
    Browser
    Chrome
    Antivirus
    Norton
    Other Info
    I am currently locked out of this system by Microsoft. I cannot prove ownership so I an stuck at this point

    Web Cam, Dual Mic's, Active Stylus Pen, Backlit KB
    Thunderbolt 3
    One USB-A 3.0 port, two SuperSpeed USB 10Gbps

Latest Support Threads

Back
Top Bottom