Did you manually update your Secure Boot Keys ?


This topic is way beyond my limited technical knowledge.
When I start reading about running Mosby and entering setup mode on my Dell XPS 13 9360 (which is a bit awkward when it comes to using the BIOS), I get scared and afraid of bricking the PC.
I've repeated the commands several times without success.
The command in Powershell doesn't seem to execute, even though I run it as an administrator.
Maybe I'll wait a little longer before things get worse.
And yes, this is the key I need (2023 Microsoft Corporation KEK 2k CA 2023 key).
I don't know why it won't enter the BIOS.

PS - Thanks for the important and valuable help you've given.
Very grateful!

Thanks a lot! ;-)
If the KEK is not updated, you will stop receiving update to DB and DBX from Microsoft in June 2026. If you ran the command and booted at least twice and still KEK is not updated, it indicates that Dell has not provided Microsoft with a new signed KEK to install. If your computer is still receiving UEFI updates from Dell, you should just wait. Either Dell or Microsoft will eventually update the KEP (hopefully!). If you know that Dell no longer supports your PC, you will need to use the Mosby tool. That tool is a bit complicated to install on a flash drive but easy to run. However, it deletes the OEM PK in doing so. This means that updated from Dell to the UEFI will probably not install. So don't use Mosby if you ever expect to update the UEFI again. Dell does not make it simple to enter Secure Boot setup mode. With Secure Boot still enabled, select Custom Mode instead of Standard Mode. Delete all Secure Boot keys: PK, DB, DBX, and KEK. Then set Secure Boot to disabled. Boot from the Mosby drive. Type "mosby" in the prompt. Let it generate a new PK. When it is done. Enter the UEFI and set Secure Boot to enabled. Then in Windows, set the registry to run one last update to Secure Boot. Run the Powershell command that triggers it and reboot. Note: if you go ahead and revoke the 2011 certificate now, you can no longer run Memtest from Windows and the Windows Secure Boot Recovery will no longer work. These have not been updated by Window yet. I highly recommend backing up the four Secure Boot keys to a flash drive; then, you don't really need Secure Boot Recovery.
 

My Computer

System One

  • OS
    Windows 11 Pro
    Computer type
    PC/Desktop
    Manufacturer/Model
    iBUYPOWER
    CPU
    Intel i9-13900KF
    Motherboard
    ASUS ROG Maximus Z790 Hero
    Memory
    32 GB Corsair Vengeance DDR5-6000 MHz
    Graphics Card(s)
    ASUS Dual GeForce RTX 4070
    Sound Card
    none
    Monitor(s) Displays
    Dell U2412M
    Screen Resolution
    1920 x 1200
    Hard Drives
    WD Black SN850X NVMe SSD - 1 TB
    PSU
    Thermaltake Toughpower GF3 1000W
    Case
    Fractal Design Meshify 2 RGB
    Cooling
    Corsair H150i RGB Elite
    Keyboard
    Deck Hassium Pro
    Mouse
    Logitech MX Master 4
    Internet Speed
    1500 Mbps download, 40 Mbps upload
    Browser
    Firefox
    Antivirus
    Bitdefender Internet Security
you will stop receiving update to DB and DBX from Microsoft in June 2026
Except he does have all three of the 2023 keys... the Windows key, the Microsoft key and even the OpROM key. look back in the thread to post 1175 where he's showing us that. He's even running from 2023 signed boot files.

I do see the issue with updates to DBX though since what I've read about how SVN works suggests Microsoft will need to make periodic updates to it, I didn't think about that. But do you think Microsoft will make DB updates again? Before 2038 when the 2023 keys expire that is.
 

My Computers

System One System Two

  • OS
    Windows 11 Pro
    Computer type
    PC/Desktop
    Manufacturer/Model
    DIY
    CPU
    Ryzen 7 5800X
    Motherboard
    Gigabyte B550M Aorus Pro
    Memory
    GSkill 3200, 2x8GB
    Graphics Card(s)
    MSI RX 6800 XT Gaming Z
    Sound Card
    on-board Realtek
    Monitor(s) Displays
    MSI 180hz
    Screen Resolution
    1440p
    Hard Drives
    Samsung 980 Pro, Samsung 870 Evo, generic PCIe NVME, WD 1TB 2.5" laptop spinner
    PSU
    Corsair RM 650
    Case
    mATX
    Cooling
    BeQuiet 240mm AIO and a bunch of case fans
    Keyboard
    one that clacks softly
    Mouse
    logitech
    Internet Speed
    bunches of bps
    Browser
    Firefox
    Antivirus
    Windows' own
  • Operating System
    Win11 Pro
    Computer type
    PC/Desktop
    Manufacturer/Model
    DIY
    CPU
    Ryzen 7 1700
    Motherboard
    GA-AB350M G-3
    Memory
    16GB DDR4
    Graphics card(s)
    RX-480
    Sound Card
    In-Built Realtek
    Monitor(s) Displays
    Samsung
    Screen Resolution
    1440p
    Hard Drives
    NVME/SSD's
    PSU
    Thermaltake BX1 550W
    Case
    Some junky thing
    Cooling
    ThermalTake Assassin(?)
    Browser
    FF/Edge
    Antivirus
    Whatever Windows does
    Other Info
    Secure Boot enabled updated to 2023 CA keys, TPM2.0 enabled with system drive Bitlocker'd.
If the KEK is not updated, you will stop receiving update to DB and DBX from Microsoft in June 2026. If you ran the command and booted at least twice and still KEK is not updated, it indicates that Dell has not provided Microsoft with a new signed KEK to install. If your computer is still receiving UEFI updates from Dell, you should just wait. Either Dell or Microsoft will eventually update the KEP (hopefully!). If you know that Dell no longer supports your PC, you will need to use the Mosby tool. That tool is a bit complicated to install on a flash drive but easy to run. However, it deletes the OEM PK in doing so. This means that updated from Dell to the UEFI will probably not install. So don't use Mosby if you ever expect to update the UEFI again. Dell does not make it simple to enter Secure Boot setup mode. With Secure Boot still enabled, select Custom Mode instead of Standard Mode. Delete all Secure Boot keys: PK, DB, DBX, and KEK. Then set Secure Boot to disabled. Boot from the Mosby drive. Type "mosby" in the prompt. Let it generate a new PK. When it is done. Enter the UEFI and set Secure Boot to enabled. Then in Windows, set the registry to run one last update to Secure Boot. Run the Powershell command that triggers it and reboot. Note: if you go ahead and revoke the 2011 certificate now, you can no longer run Memtest from Windows and the Windows Secure Boot Recovery will no longer work. These have not been updated by Window yet. I highly recommend backing up the four Secure Boot keys to a flash drive; then, you don't really need Secure Boot Recovery.
Hey!
Thanks a lot.
This explanation is very enlightening.
Yes, Dell won't release any more UEFI updates for my PC (Dell XPS 13 9360), but given the distance until the revocation
of the 2011 certificate, I'll wait a little longer, and if no updated KEK is released from Microsoft/Dell for a few more months, I'll have to run Mosby.
Thank you for the very thorough step-by-step guide on how to use Mosby.
Exactly what I needed.
I'd already researched this step extensively but didn't find anything as clear.
I'll also make a backup of those Secure Boot keys as suggested.

Just one question:

"Then in Windows, set the registry to run one last update to Secure Boot. Run the Powershell command that triggers it and reboot."

Do you mean the script I tried that didn't find the KEK key in question?

Thank you very much ;-)
 

My Computer

System One

  • OS
    Windows 11 Pro 25H2
    Computer type
    Laptop
    Manufacturer/Model
    Dell XPS 13 9360
    CPU
    Intel(R) Core(TM) i7-7500U CPU @ 2.70GHz
    Memory
    8 GB
Except he does have all three of the 2023 keys... the Windows key, the Microsoft key and even the OpROM key. look back in the thread to post 1175 where he's showing us that. He's even running from 2023 signed boot files.

I do see the issue with updates to DBX though since what I've read about how SVN works suggests Microsoft will need to make periodic updates to it. But do you think Microsoft will make DB updates again? Before 2038 when the 2023 keys expire that is.
We still don't know if they will continue to work after the revocation of the 2011 certificate that validated them.!
;-)!
 

My Computer

System One

  • OS
    Windows 11 Pro 25H2
    Computer type
    Laptop
    Manufacturer/Model
    Dell XPS 13 9360
    CPU
    Intel(R) Core(TM) i7-7500U CPU @ 2.70GHz
    Memory
    8 GB
We still don't know if they will continue to work after the revocation of the 2011 certificate that validated them.!
;-)!
Everything I read suggests they will continue to work for launching with Secure Boot so long as they remain in place. But the problem is if you ever reset CMOS, or anything similar which resets all keys to the 2011 defaults, then Windows will have to push new 2023 keys into variables again. If Microsoft stops using the three DB keys signed by the 2011 KEK then it will fail. And future updates to DBX for SVN updates (which they will do periodically) will also fail since they can not be signed with an expired 2011 key. We don't know what Microsoft will do for sure.

Bottom line: since HP has abandoned your system with no BIOS updates to provide 2023 defaults, unless they furnish Microsoft a KEK signed by them then the only way you can be sure of keeping your system running with secure boot is to use MOSBY. It's not really that hard to do... I learned so it can't be.
 
Last edited:

My Computers

System One System Two

  • OS
    Windows 11 Pro
    Computer type
    PC/Desktop
    Manufacturer/Model
    DIY
    CPU
    Ryzen 7 5800X
    Motherboard
    Gigabyte B550M Aorus Pro
    Memory
    GSkill 3200, 2x8GB
    Graphics Card(s)
    MSI RX 6800 XT Gaming Z
    Sound Card
    on-board Realtek
    Monitor(s) Displays
    MSI 180hz
    Screen Resolution
    1440p
    Hard Drives
    Samsung 980 Pro, Samsung 870 Evo, generic PCIe NVME, WD 1TB 2.5" laptop spinner
    PSU
    Corsair RM 650
    Case
    mATX
    Cooling
    BeQuiet 240mm AIO and a bunch of case fans
    Keyboard
    one that clacks softly
    Mouse
    logitech
    Internet Speed
    bunches of bps
    Browser
    Firefox
    Antivirus
    Windows' own
  • Operating System
    Win11 Pro
    Computer type
    PC/Desktop
    Manufacturer/Model
    DIY
    CPU
    Ryzen 7 1700
    Motherboard
    GA-AB350M G-3
    Memory
    16GB DDR4
    Graphics card(s)
    RX-480
    Sound Card
    In-Built Realtek
    Monitor(s) Displays
    Samsung
    Screen Resolution
    1440p
    Hard Drives
    NVME/SSD's
    PSU
    Thermaltake BX1 550W
    Case
    Some junky thing
    Cooling
    ThermalTake Assassin(?)
    Browser
    FF/Edge
    Antivirus
    Whatever Windows does
    Other Info
    Secure Boot enabled updated to 2023 CA keys, TPM2.0 enabled with system drive Bitlocker'd.
Everything I read suggests they will continue to work for launching with Secure Boot. But the problem is if you ever reset CMOS, or anything similar which resets all keys to the 2011 defaults, then Windows will have to push new keys into variables again. If Microsoft stops using the three DB keys that are signed by the 2011 KEK then it will fail. And future updates to DBX for SVN updates will also fail since they can not be signed with an expired 2011 key. We don't know what Microsoft will do for sure.

Bottom line: since HP has abandoned your system with no BIOS updates to provide 2023 defaults, unless they furnish Microsoft a KEK signed by them then the only way you can be sure of keeping your system running with secure boot is to use MOSBY. It's not really that hard to do... I learned so it can't be.
Yes, resetting the CMOS might be a problem, but I think I should wait a little longer since there's still some time left.
Then there's Mosby, if the situation doesn't improve and the miraculous KEK doesn't appear, I really have to run it...
I've always been afraid of messing with the BIOS, especially since it's not very intuitive on my Dell
Finally, as a last resort, I always have the option of disabling secure boot :LOL:

Thank you very much for all the suggestions.
They were very enlightening ;-)(y)
 

My Computer

System One

  • OS
    Windows 11 Pro 25H2
    Computer type
    Laptop
    Manufacturer/Model
    Dell XPS 13 9360
    CPU
    Intel(R) Core(TM) i7-7500U CPU @ 2.70GHz
    Memory
    8 GB
Finally, as a last resort, I always have the option of disabling secure boot :LOL:
Even as-is it may never come to that, and I do not think you'll be alone with that choice if you have to in order to keep using it.

One thing though is right now is a good time to experiment since you can just reset CMOS (or whatever's similar to that in a Dell laptop BIOS) to restore all the default keys, then run the two Microsoft commands again to get right back where you are. I don't really think there can be a lot of customization you can do like you can with a DIY PC BIOS which makes it pretty complicated to get back to work after a reset.
 
Last edited:

My Computers

System One System Two

  • OS
    Windows 11 Pro
    Computer type
    PC/Desktop
    Manufacturer/Model
    DIY
    CPU
    Ryzen 7 5800X
    Motherboard
    Gigabyte B550M Aorus Pro
    Memory
    GSkill 3200, 2x8GB
    Graphics Card(s)
    MSI RX 6800 XT Gaming Z
    Sound Card
    on-board Realtek
    Monitor(s) Displays
    MSI 180hz
    Screen Resolution
    1440p
    Hard Drives
    Samsung 980 Pro, Samsung 870 Evo, generic PCIe NVME, WD 1TB 2.5" laptop spinner
    PSU
    Corsair RM 650
    Case
    mATX
    Cooling
    BeQuiet 240mm AIO and a bunch of case fans
    Keyboard
    one that clacks softly
    Mouse
    logitech
    Internet Speed
    bunches of bps
    Browser
    Firefox
    Antivirus
    Windows' own
  • Operating System
    Win11 Pro
    Computer type
    PC/Desktop
    Manufacturer/Model
    DIY
    CPU
    Ryzen 7 1700
    Motherboard
    GA-AB350M G-3
    Memory
    16GB DDR4
    Graphics card(s)
    RX-480
    Sound Card
    In-Built Realtek
    Monitor(s) Displays
    Samsung
    Screen Resolution
    1440p
    Hard Drives
    NVME/SSD's
    PSU
    Thermaltake BX1 550W
    Case
    Some junky thing
    Cooling
    ThermalTake Assassin(?)
    Browser
    FF/Edge
    Antivirus
    Whatever Windows does
    Other Info
    Secure Boot enabled updated to 2023 CA keys, TPM2.0 enabled with system drive Bitlocker'd.
@Buddywh I managed to fix the the Current UEFI DBX failures with this script michaelmsonne/public -Github
Is there a way I can tell which SVN version I'm currently on ? Thanks
 

Attachments

  • 2.webp
    2.webp
    255.9 KB · Views: 6

My Computer

System One

  • OS
    Windows 11 25H2
    Computer type
    PC/Desktop
    Manufacturer/Model
    ASUS DIY
The 2023 certificate updates are early for now. You have to wait. And see if Dell will give a signed kek 2023 certificate to Microsoft in 2026. Otherwise, you will have to use Mosby.
 

My Computer

System One

  • OS
    windows 11
@Buddywh I managed to fix the the Current UEFI DBX failures with this script michaelmsonne/public -Github
Is there a way I can tell which SVN version I'm currently on ? Thanks
That's an interesting script. But it reports I don't have the Microsoft UEFI CA key while the other scripts reports I have that key in DB (I got it using MOSBY). But I do know my updated BIOS lacks that key in the defaults but it also lacks the OpROM key and it's reporting I have that. I'm not sure if that matters, but it's a bit odd to mess that up.

It's pretty cool how it lets you interactively choose what and how to do the updates though. I'm still not going to do updates to DBX. I Will let Microsoft do that in their own good time, during what they call the "enforcement phase" (not before Jan of 26).

Since this SVN thing has only recently been rolled out I wonder if that's also when they'll start enforcing boot manager versioning. I don't know exactly what the SVN number is or even if there is a one to one relationship with a boot manager... it may even be just a concept that's potentially unique to a device based on its firmware and boot manager update levels taken together. It's rather confusing to me, that's why I'm just letting Microsoft handle it.
 
Last edited:

My Computers

System One System Two

  • OS
    Windows 11 Pro
    Computer type
    PC/Desktop
    Manufacturer/Model
    DIY
    CPU
    Ryzen 7 5800X
    Motherboard
    Gigabyte B550M Aorus Pro
    Memory
    GSkill 3200, 2x8GB
    Graphics Card(s)
    MSI RX 6800 XT Gaming Z
    Sound Card
    on-board Realtek
    Monitor(s) Displays
    MSI 180hz
    Screen Resolution
    1440p
    Hard Drives
    Samsung 980 Pro, Samsung 870 Evo, generic PCIe NVME, WD 1TB 2.5" laptop spinner
    PSU
    Corsair RM 650
    Case
    mATX
    Cooling
    BeQuiet 240mm AIO and a bunch of case fans
    Keyboard
    one that clacks softly
    Mouse
    logitech
    Internet Speed
    bunches of bps
    Browser
    Firefox
    Antivirus
    Windows' own
  • Operating System
    Win11 Pro
    Computer type
    PC/Desktop
    Manufacturer/Model
    DIY
    CPU
    Ryzen 7 1700
    Motherboard
    GA-AB350M G-3
    Memory
    16GB DDR4
    Graphics card(s)
    RX-480
    Sound Card
    In-Built Realtek
    Monitor(s) Displays
    Samsung
    Screen Resolution
    1440p
    Hard Drives
    NVME/SSD's
    PSU
    Thermaltake BX1 550W
    Case
    Some junky thing
    Cooling
    ThermalTake Assassin(?)
    Browser
    FF/Edge
    Antivirus
    Whatever Windows does
    Other Info
    Secure Boot enabled updated to 2023 CA keys, TPM2.0 enabled with system drive Bitlocker'd.
That's an interesting script. But it reports I don't have the Microsoft UEFI CA key while the other scripts reports I have that key in DB (I got it using MOSBY). But I do know my updated BIOS lacks that key in the defaults but it also lacks the OpROM key and it's reporting I have that. I'm not sure if that matters, but it's a bit odd to mess that up.

It's pretty cool how it lets you interactively choose what and how to do the updates though; I'm still not going to do updates to DBX. I Will let Microsoft do that in their own good time, and that's during what they call the "enforcement phase".

Since this SVN thing has only recently been rolled out I wonder if that's also when they'll start enforcing boot manager versioning. At any rate, I wonder if you could examine the properties of the boot manager binary in your EFI partition and find it's SVN number in there since you can find the signing certificate details that way.
The script was very user friendly at least me, So yea everything appeared to be updated like there was nothing else for me to do but I kept poking the bear :D 
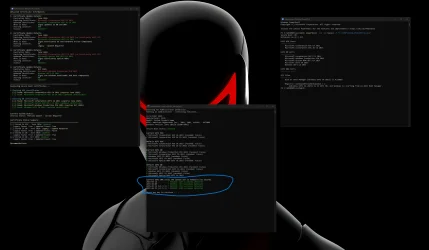
re-did all the steps from scratch using that script I posted above with the exemption of updating the dbx for revocation which is what it's saying in the screenshot that needs updating , restarted my pc and boom all the failures showing up in red for the current dbx were all gone and turned green that's all i wanted really without breaking windows lol. Yea I heard about MOSBY but never tried my bios is in it's virgin state when it comes to that. Anyway thanks for all the responses.
 

My Computer

System One

  • OS
    Windows 11 25H2
    Computer type
    PC/Desktop
    Manufacturer/Model
    ASUS DIY
I heard about MOSBY but never tried
There is one very good reason to use it aside from using it to populate all the 2023 secure boot keys. It lets an average user finally take true and complete ownership of their system since it generates a completely unique PK when you run it. Manufacturers generate the PK that's at the root of the trust chain and use that same PK across their entire product line. So lose control of it (and many have apparently) and you really lose control of the chain of trust in Secure Boot.
 

My Computers

System One System Two

  • OS
    Windows 11 Pro
    Computer type
    PC/Desktop
    Manufacturer/Model
    DIY
    CPU
    Ryzen 7 5800X
    Motherboard
    Gigabyte B550M Aorus Pro
    Memory
    GSkill 3200, 2x8GB
    Graphics Card(s)
    MSI RX 6800 XT Gaming Z
    Sound Card
    on-board Realtek
    Monitor(s) Displays
    MSI 180hz
    Screen Resolution
    1440p
    Hard Drives
    Samsung 980 Pro, Samsung 870 Evo, generic PCIe NVME, WD 1TB 2.5" laptop spinner
    PSU
    Corsair RM 650
    Case
    mATX
    Cooling
    BeQuiet 240mm AIO and a bunch of case fans
    Keyboard
    one that clacks softly
    Mouse
    logitech
    Internet Speed
    bunches of bps
    Browser
    Firefox
    Antivirus
    Windows' own
  • Operating System
    Win11 Pro
    Computer type
    PC/Desktop
    Manufacturer/Model
    DIY
    CPU
    Ryzen 7 1700
    Motherboard
    GA-AB350M G-3
    Memory
    16GB DDR4
    Graphics card(s)
    RX-480
    Sound Card
    In-Built Realtek
    Monitor(s) Displays
    Samsung
    Screen Resolution
    1440p
    Hard Drives
    NVME/SSD's
    PSU
    Thermaltake BX1 550W
    Case
    Some junky thing
    Cooling
    ThermalTake Assassin(?)
    Browser
    FF/Edge
    Antivirus
    Whatever Windows does
    Other Info
    Secure Boot enabled updated to 2023 CA keys, TPM2.0 enabled with system drive Bitlocker'd.
Excellent thread , lots of useful information thanks to everyone , Guys I have a question if anyone can help me in the screenshot below what am i missing it's showing lots of red failures in the current UEFI DBX section also missing a ROM, any ideas ?? thanks!!!
The option ROM certificate is missing from the default DB. There is nothing you can do about that, since it managed by the motherboard manufacturer when the UEFI is updated. It just means some new add-on cards might not work if you returned the DB to the Default setting--at least until you updated from Windows again. The DBX entries in red just mean that these old DBX updates were never installed. The latest, version 1.6.1, should have been installed by Windows on October 14. The script is out of date and does not even check for version 1.6.1. The script can be easily updated to compare the current DBX with the following file: c:\windows\system32\securebootupdates\dbxupdate.bin. It just needs one line added at the end of the DBX checking section.
 

My Computer

System One

  • OS
    Windows 11 Pro
    Computer type
    PC/Desktop
    Manufacturer/Model
    iBUYPOWER
    CPU
    Intel i9-13900KF
    Motherboard
    ASUS ROG Maximus Z790 Hero
    Memory
    32 GB Corsair Vengeance DDR5-6000 MHz
    Graphics Card(s)
    ASUS Dual GeForce RTX 4070
    Sound Card
    none
    Monitor(s) Displays
    Dell U2412M
    Screen Resolution
    1920 x 1200
    Hard Drives
    WD Black SN850X NVMe SSD - 1 TB
    PSU
    Thermaltake Toughpower GF3 1000W
    Case
    Fractal Design Meshify 2 RGB
    Cooling
    Corsair H150i RGB Elite
    Keyboard
    Deck Hassium Pro
    Mouse
    Logitech MX Master 4
    Internet Speed
    1500 Mbps download, 40 Mbps upload
    Browser
    Firefox
    Antivirus
    Bitdefender Internet Security
AFAIK you can add Microsoft Option Rom UEFI CA 2023 to bios directly by entering bios and add using 'append' and sellect Public Key from a FAT formatted USB. I have added to my Gigabyte motherboard (B760 & H110).
Thanks
Manu
 

My Computers

System One System Two

  • OS
    Windows 11 Pro
    Computer type
    PC/Desktop
    Manufacturer/Model
    Custom Made
    CPU
    Intel 14100
    Motherboard
    Gigabyte B760M D2H
    Memory
    G.Skill Trident Z5 Neo RGB 32GB (2x16GB) DDR5 6000
    Graphics Card(s)
    Integrated
    Sound Card
    Built-in
    Monitor(s) Displays
    40Inch Blaupunkt 1920X1080 & Acer 24Inch 1920X1080
    Screen Resolution
    1920 X 1080
    Hard Drives
    Samsung 990Pro 1TB &
    Western Digital WD Black SN850X NVMe 1TB
    PSU
    550W Corsair
    Case
    Chiptronix
    Cooling
    Default
    Keyboard
    Logitech Wireless
    Mouse
    Logitech Wireless
    Internet Speed
    500Mbps
    Browser
    Brave
    Antivirus
    Kaspersky Premium
  • Operating System
    Windows 11 Pro
    Computer type
    PC/Desktop
    Manufacturer/Model
    Custom Built
    CPU
    Intel G7600
    Motherboard
    Asus PRIME-H610M-E-D4
    Memory
    16GB Corsair Vengeance
    Graphics card(s)
    Integrated
    Sound Card
    In Built
    Monitor(s) Displays
    Samsung 22Inch
    Screen Resolution
    1920 X 1080
    Hard Drives
    Samsung Evo 970 Pro 500GB
    PSU
    CoolerMaster 450W
    Case
    Normal
    Cooling
    Default
    Keyboard
    Logitech Wireless
    Mouse
    Logitech Wireless
    Internet Speed
    500Mbps
    Browser
    Brave
    Antivirus
    Kaspersky Total Security
AFAIK you can add Microsoft Option Rom UEFI CA 2023 to bios directly by entering bios and add using 'append' and sellect Public Key from a FAT formatted USB. I have added to my Gigabyte motherboard (B760 & H110).
I had to do that for adding the OpROM certificate to my old Gigabyte motherboard (before MOSBY included the OpROM). It had two options: one for a Public Key and one for a Validated Key. The first OpROM certificate I DL'd from Microsoft's GitHub was an unsigned certificate and it failed using the validated key option and I had to use the public key option for appending it.

Then I went back to Microsoft's GitHUB and found (in another folder) signed DB certificate binaries which I could use to append using the Validated Key option.

I was left wondering about the effect of using an unsigned certificate vs. a signed certificate in DB. I noticed on my other/newer motherboards I could only append using the signed certificate, the unsigned certificate always failed and there was no public key option for appending. I suspected it may fail to validate boot files when needed so used the signed certificate just to be sure.
 
Last edited:

My Computers

System One System Two

  • OS
    Windows 11 Pro
    Computer type
    PC/Desktop
    Manufacturer/Model
    DIY
    CPU
    Ryzen 7 5800X
    Motherboard
    Gigabyte B550M Aorus Pro
    Memory
    GSkill 3200, 2x8GB
    Graphics Card(s)
    MSI RX 6800 XT Gaming Z
    Sound Card
    on-board Realtek
    Monitor(s) Displays
    MSI 180hz
    Screen Resolution
    1440p
    Hard Drives
    Samsung 980 Pro, Samsung 870 Evo, generic PCIe NVME, WD 1TB 2.5" laptop spinner
    PSU
    Corsair RM 650
    Case
    mATX
    Cooling
    BeQuiet 240mm AIO and a bunch of case fans
    Keyboard
    one that clacks softly
    Mouse
    logitech
    Internet Speed
    bunches of bps
    Browser
    Firefox
    Antivirus
    Windows' own
  • Operating System
    Win11 Pro
    Computer type
    PC/Desktop
    Manufacturer/Model
    DIY
    CPU
    Ryzen 7 1700
    Motherboard
    GA-AB350M G-3
    Memory
    16GB DDR4
    Graphics card(s)
    RX-480
    Sound Card
    In-Built Realtek
    Monitor(s) Displays
    Samsung
    Screen Resolution
    1440p
    Hard Drives
    NVME/SSD's
    PSU
    Thermaltake BX1 550W
    Case
    Some junky thing
    Cooling
    ThermalTake Assassin(?)
    Browser
    FF/Edge
    Antivirus
    Whatever Windows does
    Other Info
    Secure Boot enabled updated to 2023 CA keys, TPM2.0 enabled with system drive Bitlocker'd.
I had to do that for adding the OpROM certificate to my old Gigabyte motherboard (before MOSBY included the OpROM). It had two options: one for a Public Key and one for a Validated Key. The first OpROM certificate I DL'd from Microsoft's GitHub was an unsigned certificate and it failed using the validated key option and I had to use the public key option for appending it.

Then I went back to Microsoft's GitHUB and found (in another folder) signed DB certificate binaries which I could use to append using the Validated Key option.

I was left wondering about the effect of using an unsigned certificate vs. a signed certificate in DB. I noticed on my other/newer motherboards I could only append using the signed certificate, the unsigned certificate always failed and there was no public key option for appending. I suspected it may fail to validate boot files when needed so used the signed certificate just to be sure.
I used the certificate from the links I had provided. I didn't face any issues. Anyways thanks for the headsup.

Thanks
Manu
 

My Computers

System One System Two

  • OS
    Windows 11 Pro
    Computer type
    PC/Desktop
    Manufacturer/Model
    Custom Made
    CPU
    Intel 14100
    Motherboard
    Gigabyte B760M D2H
    Memory
    G.Skill Trident Z5 Neo RGB 32GB (2x16GB) DDR5 6000
    Graphics Card(s)
    Integrated
    Sound Card
    Built-in
    Monitor(s) Displays
    40Inch Blaupunkt 1920X1080 & Acer 24Inch 1920X1080
    Screen Resolution
    1920 X 1080
    Hard Drives
    Samsung 990Pro 1TB &
    Western Digital WD Black SN850X NVMe 1TB
    PSU
    550W Corsair
    Case
    Chiptronix
    Cooling
    Default
    Keyboard
    Logitech Wireless
    Mouse
    Logitech Wireless
    Internet Speed
    500Mbps
    Browser
    Brave
    Antivirus
    Kaspersky Premium
  • Operating System
    Windows 11 Pro
    Computer type
    PC/Desktop
    Manufacturer/Model
    Custom Built
    CPU
    Intel G7600
    Motherboard
    Asus PRIME-H610M-E-D4
    Memory
    16GB Corsair Vengeance
    Graphics card(s)
    Integrated
    Sound Card
    In Built
    Monitor(s) Displays
    Samsung 22Inch
    Screen Resolution
    1920 X 1080
    Hard Drives
    Samsung Evo 970 Pro 500GB
    PSU
    CoolerMaster 450W
    Case
    Normal
    Cooling
    Default
    Keyboard
    Logitech Wireless
    Mouse
    Logitech Wireless
    Internet Speed
    500Mbps
    Browser
    Brave
    Antivirus
    Kaspersky Total Security
I didn't face any issues.
That was my experience when I used the unsigned certificates too.

But then I thought about it some and realized there are actually two possible outcomes. The first is easy: it simply won't validate boot files when starting in Secure Boot mode and it fails.

But the other isn't so obvious since it won't present as an issue: it allows any boot file at all without validation, effectively no different from Secure Boot Disabled. That kind of makes sense for Public, meaning not private, key behavior (assuming it's not also revoked in DBX which overrules everything).

I simply didn't know which happens, so I used the signed ones to be safe.
 
Last edited:

My Computers

System One System Two

  • OS
    Windows 11 Pro
    Computer type
    PC/Desktop
    Manufacturer/Model
    DIY
    CPU
    Ryzen 7 5800X
    Motherboard
    Gigabyte B550M Aorus Pro
    Memory
    GSkill 3200, 2x8GB
    Graphics Card(s)
    MSI RX 6800 XT Gaming Z
    Sound Card
    on-board Realtek
    Monitor(s) Displays
    MSI 180hz
    Screen Resolution
    1440p
    Hard Drives
    Samsung 980 Pro, Samsung 870 Evo, generic PCIe NVME, WD 1TB 2.5" laptop spinner
    PSU
    Corsair RM 650
    Case
    mATX
    Cooling
    BeQuiet 240mm AIO and a bunch of case fans
    Keyboard
    one that clacks softly
    Mouse
    logitech
    Internet Speed
    bunches of bps
    Browser
    Firefox
    Antivirus
    Windows' own
  • Operating System
    Win11 Pro
    Computer type
    PC/Desktop
    Manufacturer/Model
    DIY
    CPU
    Ryzen 7 1700
    Motherboard
    GA-AB350M G-3
    Memory
    16GB DDR4
    Graphics card(s)
    RX-480
    Sound Card
    In-Built Realtek
    Monitor(s) Displays
    Samsung
    Screen Resolution
    1440p
    Hard Drives
    NVME/SSD's
    PSU
    Thermaltake BX1 550W
    Case
    Some junky thing
    Cooling
    ThermalTake Assassin(?)
    Browser
    FF/Edge
    Antivirus
    Whatever Windows does
    Other Info
    Secure Boot enabled updated to 2023 CA keys, TPM2.0 enabled with system drive Bitlocker'd.
Hi.

Current Microsoft Secure Boot Keys will expire in 2026. Therefore, it may be advisable to update the keys manually in advance.

I did the update and it was successful.

If you have bitlocker enabled, you are advised to save your bitlocker keys. You will need them after the secure boot key update. I don't have bitlocker enabled.

In powershell console opened as administrator, you must run the following commands, one at a time:

Set-ItemProperty -Path “HKLM:\SYSTEM\CurrentControlSet\Control\SecureBoot” -Name “AvailableUpdates” -Value 0x40

Start-ScheduledTask -TaskName “\Microsoft\Windows\PI\Secure-Boot-Update”

After you run the commands, you have to restart your PC twice for the update to take effect.

To check if the update is successful, you must run the following command in a powershell console with admin privileges:

[System.Text.Encoding]::ASCII.GetString((Get-SecureBootUEFI db).bytes) -match ‘Windows UEFI CA 2023’

This command should return the value TRUE. The below screenshot is from my PC. It returned a True value.

View attachment 135085

For further information, you may refer to the following Microsoft Windows IT Pro Blog:


Hope you find this post helpful.
So, if I did this and it said True (after 2 restarts etc), then my certs are updated and the mid 2026 thing is something that I need not worry about anymore?
Hopefully that will resolve the recent issues I've seen in EventViewer about certs and even TPM failing.
 

My Computer

System One

  • OS
    Win 11 23H2 Enterprise
    Computer type
    PC/Desktop
    Manufacturer/Model
    Self-Built
    CPU
    Ryzen 9800X3D
    Motherboard
    MSI MAG X870 Tomahawk WiFi
    Memory
    G.Skill Trident Z RGB 6200MT CL30
    Graphics Card(s)
    MSI RTX 5090 Suprim SoC
    Sound Card
    Sound Blaster G8
    Monitor(s) Displays
    LG C2 42 Main Desktop, 3x Gigabyte FI32Q in a triple array for gaming simulations
    Screen Resolution
    3840x2160, 2560x1440 (3)
    Hard Drives
    WD SN850X 2TB M.2 NVME (OS Drive), WD SN850X 2TB M.2 NVME, 2x Crucial 2TB SSD, Crucial 1TB SSD, Seagate Barracuda 2TB HDD
    PSU
    NZXT C1200 Gold ATX 3.1-Fully Modular/Low-Noise-1200 Watts-12V-2x6 Connector-Zero Fan Mode-100% Japanese Capacitors
    Case
    NZXT H7
    Cooling
    EK AIO Elite 360mm Elite
    Keyboard
    Razer Huntsman V3 Pro
    Mouse
    Logitech G502X
    Internet Speed
    1GB
    Browser
    Edge Chromium
    Antivirus
    Windows Defender

Latest Support Threads

Back
Top Bottom