- Local time
- 4:40 PM
- Posts
- 15
- OS
- Windows 11
If your WinRE image is outdated, it is probably because the recovery partition is too small. I started noticing this issue on Windows 10/Server 2019 devices but now more and more on Windows 11 devices too, now that I know what to look for. I It is easy to miss this issue in the first place in Windows 11 because if the recovery partition is too small, Windows Update will silently continue and 'successfully' install the update even though it failed to service the recovery environment. This is something that is handled better in Windows 10/Server 2019 where an update which services RE will fail with an error code which, if you google it, will lead you to recognizing that the recovery partition is too small.
Downloading a winre.wim from the web is a bad idea. Under normal circumstances, the WinRE on your system contains the generic parts and critical drivers that pertain to your system (your hardware) which ensures that WinRE actually boots up when needed. Injected OEM drivers are also the reason why your WinRE image has a different size than everybody else's despite having the same update build revision (UBR) although there may non driver related customizations added by your device manufacturer that can also cause a difference in size.
Source: Updating the on-disk Windows Recovery Environment
Sourcing winre.wim from the web or from another system leaves it to chance if it even boots. Best case scenario, you end up with a generic winre.wim and it does boot. Worst case, it doesn't boot and/or comes with drivers that pertain to different hardware than yours.
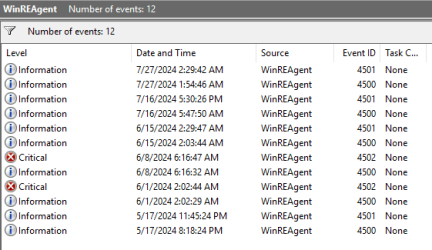
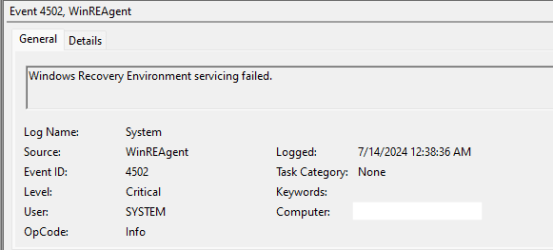
In my case, the event logs of several Windows 11 computers contain critical errors that go back to 2023 (if the System log even goes back that far), stating: "Windows Recovery Environment servicing failed." I assumed the recovery partition was too small and I increased it from 604 MiB to 1 GiB. Now my Windows is on the latest version (22631.3880) but my WinRE hasn't been serviced since March 2023 and is on 22621.525.
The problem is: How to service the recovery environment? Or tell Windows to do it?
I tried downloading the latest cumulative update and install it manually. Obviously in the hopes that it would re-install and service my WinRE image in the process, but the installer just tells me that it is already installed and does nothing.
How do I update my WinRE, other than waiting for the next patch day?
Luckily, @hdmi already linked the tutorial: Add an update package to Windows RE. However, adding an update to Windows RE is not the same as servicing Windows RE. Servicing means injecting or updating critical OEM drivers in addition to applying the latest patch.
As a side note, it uses undocumented command line switches for ReAgentC (
I decided to try and do a complete servicing, injection of drivers included and to do everything in PowerShell and to add some screenshots to it.
Here is how to manually service the Windows Recovery Environment
Proceed in an elevated PowerShell 7 window.
Create two folders:
Download the latest cumulative update (LCU) from the Microsoft Update Catalog. Search for "Cumulative Update for Windows 11 Version 23H2". The update will be called something like this: "2024-07 Cumulative Update Preview for Windows 11 Version 23H2 for x64-based Systems (KB5040527)"
Download it and save it to
Verify that the recovery partition is of sufficient size. 1 GiB should be enough.

Now set a few variables.
Verify that you have the update file, recovery image file and the mount folder ready.

Now is a good time to check if the recovery image is really outdated and this one looks very outdated.
Move the recovery image to the
Mount the recovery image to
If this worked, the
Apply the latest cumulative update to the recovery image. This may take a long time.

The result should look like this.

Next, critical drivers should be injected into or updated inside the recovery image. This is likely done by
Take inventory of boot critical OEM device drivers as well as input OEM device drivers in your main OS.

Optionally, look for OEM drivers in the recovery image. There should be some unless your recovery image is a blank slate (downloaded from somewhere).

Update OEM drivers in the recovery image by removing them all and then inject recent drivers from the main OS into the recovery image.
Optionally, do a component cleanup.

Umount the serviced recovery image.


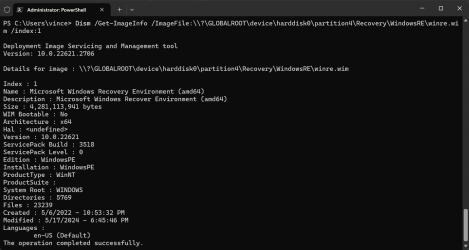
You can now check the build version of the patched image.

and compare this to your main OS.

or with
Note that the recovery image build number (22621) may trail behind the main OS's (22631) but the Update Build Revision (UBR) is the same (3880).
This step will do two things: Compressing the winre.wim image and copying it back to its original location on the recovery partition.
Fix that the
According to Microsoft, if you have BitLocker drive encryption on, you should do these steps.
Do some cleanup. This will remove the update, the
This completes servicing of the recovery environment. Optionally, you can check if your recovery environment works and that you can boot into it.
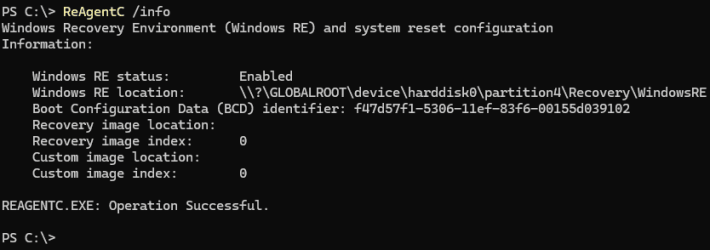
Boot into the recovery environment.
After reboot, you should be in the recovery environment. You can once again check the build number here by opening the console.
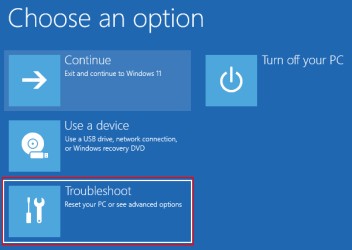
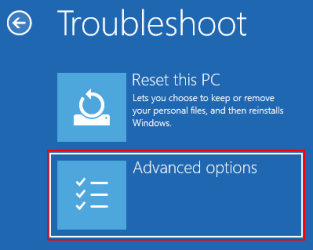
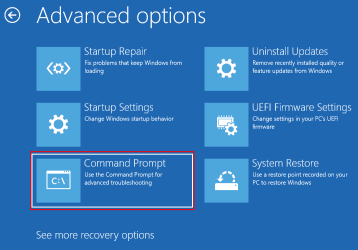
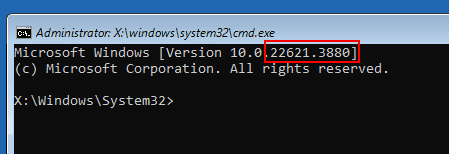
If this worked, you can now safely delete the backup image file.
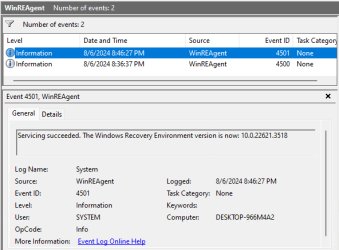
- In Windows 11, you can look for error 4502 from source WinREAgent in the System log. Apparently, this happens once a month. Perhaps, when the cumulative update is installed.
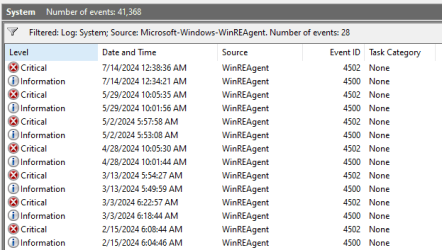
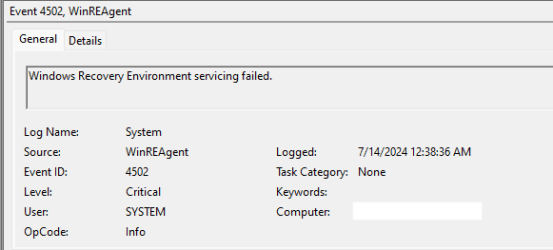
- You can also check the size of the recovery partition. If it is around 600 MiB, it is too small. You need 700-800 MiB, perhaps 1 GiB to future-proof it a bit.
Powershell:Get-Partition | Where-Object -Property 'Type' -EQ 'Recovery'
- As previously shown here, check the update build revision and the time it was last modified.
Powershell:Get-WindowsImage ` -ImagePath '\\?\GLOBALROOT\device\harddisk0\partition4\Recovery\WindowsRE\winre.wim' ` -Index 1 | Select-Object -Property Version, ModifiedTime
Downloading a winre.wim from the web is a bad idea. Under normal circumstances, the WinRE on your system contains the generic parts and critical drivers that pertain to your system (your hardware) which ensures that WinRE actually boots up when needed. Injected OEM drivers are also the reason why your WinRE image has a different size than everybody else's despite having the same update build revision (UBR) although there may non driver related customizations added by your device manufacturer that can also cause a difference in size.
Unlike the normal OS update process, updates for Windows RE don't directly service the on-disk Windows RE image (winre.wim). Instead, a newer version of the Windows RE image replaces the existing one, with the following contents being injected or migrated into the new image:
- Boot critical and input device drivers from the full OS environment are added to the new Windows RE image.
Source: Updating the on-disk Windows Recovery Environment
Sourcing winre.wim from the web or from another system leaves it to chance if it even boots. Best case scenario, you end up with a generic winre.wim and it does boot. Worst case, it doesn't boot and/or comes with drivers that pertain to different hardware than yours.
In my case, the event logs of several Windows 11 computers contain critical errors that go back to 2023 (if the System log even goes back that far), stating: "Windows Recovery Environment servicing failed." I assumed the recovery partition was too small and I increased it from 604 MiB to 1 GiB. Now my Windows is on the latest version (22631.3880) but my WinRE hasn't been serviced since March 2023 and is on 22621.525.
The problem is: How to service the recovery environment? Or tell Windows to do it?
I tried downloading the latest cumulative update and install it manually. Obviously in the hopes that it would re-install and service my WinRE image in the process, but the installer just tells me that it is already installed and does nothing.
How do I update my WinRE, other than waiting for the next patch day?
Luckily, @hdmi already linked the tutorial: Add an update package to Windows RE. However, adding an update to Windows RE is not the same as servicing Windows RE. Servicing means injecting or updating critical OEM drivers in addition to applying the latest patch.
As a side note, it uses undocumented command line switches for ReAgentC (
ReAgentC.exe /mountre, ReAgentC.exe /unmountre). I don't know why Microsoft uses 'hidden' parameters that do not show in '/?' and in the documentation REAgentC command-line options. REAgentC has 38 command line options and the official documentation states only 7 options whereas 'ReAgentC.exe /?' only states 6 options. How does ReAgentC.exe /migratedrivers work? Does anybody outside of Microsoft know?I decided to try and do a complete servicing, injection of drivers included and to do everything in PowerShell and to add some screenshots to it.
Here is how to manually service the Windows Recovery Environment
Proceed in an elevated PowerShell 7 window.
Create two folders:
C:\tempC:\temp\WinREMounted
Powershell:
New-Item -Path 'c:\temp' -Name 'WinREMounted' -ItemType 'directory' -ForceDownload the latest cumulative update (LCU) from the Microsoft Update Catalog. Search for "Cumulative Update for Windows 11 Version 23H2". The update will be called something like this: "2024-07 Cumulative Update Preview for Windows 11 Version 23H2 for x64-based Systems (KB5040527)"
Download it and save it to
C:\temp. Like so: 'C:\temp\windows11.0-kb5040442-x64_c1ba0e4607fd0ee46254a625c55438ffb70edcd0.msu'.Verify that the recovery partition is of sufficient size. 1 GiB should be enough.
Powershell:
$RecoveryPartition = Get-Partition | Where-Object -Property 'Type' -EQ 'Recovery'
$RecoveryPartition
Now set a few variables.
Powershell:
$LCU = (Get-Item -Path 'C:\temp\*.msu').FullName
$WinREMountFolder = 'C:\temp\WinREMounted'
$WinREWimFile = Join-Path -Path $RecoveryPartition.AccessPaths[0] -ChildPath '\Recovery\WindowsRe\winre.wim'
$WinREWimFileTemp = 'C:\temp\winre.wim'
$WinREWimFileBackup = 'C:\temp\winre backup.wim'
Verify that you have the update file, recovery image file and the mount folder ready.
Powershell:
Get-Item -LiteralPath $LCU, $WinREWimFile, $WinREMountFolder | Select-Object -Property Name
Now is a good time to check if the recovery image is really outdated and this one looks very outdated.
Powershell:
PS C:\> Get-WindowsImage -ImagePath $WinREWimFile -Index 1 | Select-Object -Property Version, ModifiedTime

Version        ModifiedTime
-------        ------------
10.0.22621.525 3/13/2023 11:22:36 AM

PS C:\>
Move the recovery image to the
C: drive and make a backup while you're at it.
Powershell:
Move-Item -LiteralPath $WinREWimFile -Destination $WinREWimFileTemp
Copy-Item -Path $WinREWimFileTemp -Destination $WinREWimFileBackup
Mount the recovery image to
C:\temp\WinREMounted
Powershell:
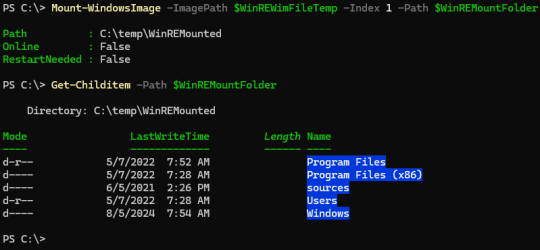
Mount-WindowsImage -ImagePath $WinREWimFileTemp -Index 1 -Path $WinREMountFolderIf this worked, the
WinReMounted folder should be populated with the contents of the recovery image.
Powershell:
Get-Childitem -Path $WinREMountFolder
Apply the latest cumulative update to the recovery image. This may take a long time.
Powershell:
Add-WindowsPackage -PackagePath $LCU -NoRestart -Path $WinREMountFolder
The result should look like this.

Next, critical drivers should be injected into or updated inside the recovery image. This is likely done by
ReAgentC /migratedrivers but Microsoft did not document this switch, and I did not get it to work. Instead, I will use PowerShell.Take inventory of boot critical OEM device drivers as well as input OEM device drivers in your main OS.
Powershell:
$CriticalDrivers = Get-WindowsDriver -Online | Where-Object {($_.BootCritical -EQ $True) -OR ($_.ClassName -EQ 'HIDClass')}
Powershell:
$CriticalDrivers | Select-Object -Property Driver, ProviderName, Date, Version | Format-Table
$CriticalDrivers | Measure-Object | Select-Object -Property 'Count'
Optionally, look for OEM drivers in the recovery image. There should be some unless your recovery image is a blank slate (downloaded from somewhere).
Powershell:
Get-WindowsDriver -Path $WinREMountFolder | Measure-Object | Select-Object -Property 'Count'
Update OEM drivers in the recovery image by removing them all and then inject recent drivers from the main OS into the recovery image.
Powershell:
#remove all OEM drivers from recovery image
Get-WindowsDriver -Path $WinREMountFolder | ForEach-Object {$_.Driver;Remove-WindowsDriver -Driver $_.Driver -Path $WinREMountFolder}
#add critical boot and input OEM device drivers to recovery image
$CriticalDrivers | ForEach-Object {Add-WindowsDriver -Path $WinREMountFolder -BasicDriverObject $_}
Optionally, do a component cleanup.
Powershell:
#This is equivalent to  '& dism /Image:$WinREMountFolder /Cleanup-Image /StartComponentCleanup /ResetBase'
Repair-WindowsImage -StartComponentCleanup -ResetBase -NoRestart -Path $WinREMountFolder
Umount the serviced recovery image.
Powershell:
DisMount-WindowsImage -Path $WinREMountFolder -Save -CheckIntegrity

You can now check the build version of the patched image.
Powershell:
Get-WindowsImage -ImagePath $WinREWimFileTemp -Index 1 | Select-Object -Property Version, ModifiedTime
and compare this to your main OS.
Powershell:
Get-ItemProperty -Path 'HKLM:\SOFTWARE\Microsoft\Windows NT\CurrentVersion' `
  | Select-Object -Property CurrentBuildNumber, UBR
or with
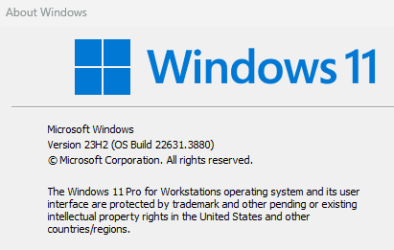
winver.exe
Note that the recovery image build number (22621) may trail behind the main OS's (22631) but the Update Build Revision (UBR) is the same (3880).
This step will do two things: Compressing the winre.wim image and copying it back to its original location on the recovery partition.
Powershell:
Export-WindowsImage `
  -CheckIntegrity `
  -CompressionType 'maximum' `
  -DestinationImagePath $WinREWimFile `
  -SourceImagePath $WinREWimFileTemp `
  -SourceIndex 1
Fix that the
winre.wim file's System and Hiddenflags got lost in the process.
Powershell:
Set-ItemProperty -LiteralPath $WinREWimFile -Name Attributes -Value 'Archive, Hidden, System'According to Microsoft, if you have BitLocker drive encryption on, you should do these steps.
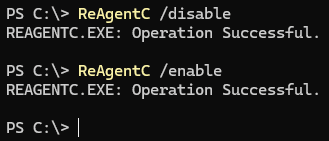
If the PC's disk is protected by BitLocker or Device Encryption: Use ReagentC to disable and then re-enable Windows RE. This ensures that the updated Windows RE image is turned on and correctly configured for your Windows installation:
Powershell:
ReAgentC /disable
ReAgentC /enable
Do some cleanup. This will remove the update, the
C:\temp\WinREMounted folder and delete the temporary recovery image C:\temp\winre.wim.
Powershell:
Remove-Item -Path $LCU, $WinREMountFolder, $WinREWimFileTemp -ForceThis completes servicing of the recovery environment. Optionally, you can check if your recovery environment works and that you can boot into it.
Powershell:
ReAgentC /info
Boot into the recovery environment.
Powershell:
ReAgentC /boottore
Restart-Computer
After reboot, you should be in the recovery environment. You can once again check the build number here by opening the console.


If this worked, you can now safely delete the backup image file.
Powershell:
Remove-Item -Path 'C:\temp\winre backup.wim' -ForceAttachments
Last edited:
My Computer
System One
-
- OS
- Windows 11
- Computer type
- PC/Desktop
- Manufacturer/Model
- custom
- CPU
- Intel® Core i7-12700K
- Motherboard
- Gigabyte Z690 AORUS ELITE DDR4 (rev. 1.0)


