This tutorial will show you how to set priority notifications while do not disturb is on for your account in Windows 11.
Notifications are alerts from apps, system, and other senders.
Starting with Windows 11 build 22557, Microsoft reimagined focus assist experiences on Windows. Do not disturb makes it easy to silence notifications. Focus is a new experience that enables everyone to stay in the moment and minimize distractions on their PC. To help you stay on track, focus integrates with the Clock app for other focus tools, such as a focus timer and calming music.
It’s now easier than ever to silence notification banners with do not disturb. When you are ready to see the notifications that you may have missed, you can find them in Notification Center (Win+N).
You are always in control of your notifications. You can set up rules to automatically turn on do not disturb. For example, you could set do not disturb to automatically turn on outside of your work hours. Additionally, you can set priority notifications to control whether calls, reminders, and specific apps break through when do not disturb is on.
Set priority notifications allows you to choose which notifications are allowed while do not disturb is on, all others will remain in the Notification Center (Win+N). Alarms and important app notifications are not affected by Set priority notifications settings.
Starting with Windows 11 version 22H2 KB5030310 Build 22621.2361, urgent or important notifications that break through when do not disturb is turned on while using apps at full screen will now display a “view notification” button to view the content of the notification for privacy.
Reference:
Notifications and Do Not Disturb in Windows - Microsoft Support
Learn how to manage and configure notifications in Windows, including using the "Do Not Disturb" feature to silence alerts and stay focused. Discover how to activate "Do Not Disturb" from the Notification Center and use shortcuts to enhance productivity.
 support.microsoft.com
Contents
- Option One: Set Priority Notifications for "Calls and reminders" in Settings
- Option Two: Add Apps to Set Priority Notifications in Settings
- Option Three: Remove Apps from Set Priority Notifications in Settings
1 Open Settings (Win+I).
2 Click/tap on System on the left side, and click/tap on Notifications on the right side. (see screenshot below)
3 Click/tap on Set priority notifications. (see screenshot below)
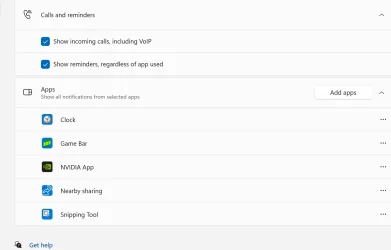
4 Under Calls and reminders, check (on - default) or uncheck (off) Show incoming calls, including VoIP and Show reminders, regardless of app used for what you want. (see screenshot below)
5 You can now close Settings if you like.
1 Open Settings (Win+I).
2 Click/tap on System on the left side, and click/tap on Notifications on the right side. (see screenshot below)
3 Click/tap on Set priority notifications. (see screenshot below)
4 Under Apps, click/tap on the Add apps button, and select an app you want to add. (see screenshot below)
5 When finished adding apps, you can close Settings if you like.
1 Open Settings (Win+I).
2 Click/tap on System on the left side, and click/tap on Notifications on the right side. (see screenshot below)
3 Click/tap on Set priority notifications. (see screenshot below)
4 Under Apps, click/tap on the More options (3 dots) button for the app you want to remove, and click/tap on Remove. (see screenshot below)
5 When finished removing apps, you can close Settings if you like.
That's it,
Shawn Brink
Related Tutorials
- Turn On or Off Do Not Disturb for Notifications in Windows 11
- Enable or Disable Turn On Do Not Disturb when Start Focus Session in Windows 11
- Turn On or Off Notifications in Windows 11
- Change How Long Notifications Stay Open in Windows 11
- Change Priority of Notifications in Notification Center in Windows 11
Last edited:

")