Manual Secure Boot Update Fix on Dell XPS8930 that did not and will never receive a new BIOS. Hopefully will help you and be searchable so that others relying on AI for help will find what they need to apply to their attempts as well. I accomplished this using AI assistance.
Originally, I reset the keys to factory and could no longer boot with Secure Boot enabled for my in-between steps while figuring this out without disabling Secure Boot each time. So, don't do that. If you did, this will work to restore your boot and upgrade to the new certificates. Your BYTE sizes may differ because of this. Be sure to append the new certs so as not to break your current Secure Boot capability.
The system initially failed Secure Boot with:
Secure Boot ViolationInvalid signature detected.Check Secure Boot Policy in Setup.
Windows reported:
Get-ItemProperty HKLM:\SYSTEM\CurrentControlSet\Control\SecureBoot\Servicing
Result:
WindowsUEFICA2023Capable = 0UEFICA2023Status = NotStartedKEKLastUpdateErrorReason = Firmware_MissingKEKInPackage
After manually appending four Microsoft 2023 Secure Boot certificates directly into the BIOS Secure Boot databases, the system successfully booted with Secure Boot enabled and Windows reported:
WindowsUEFICA2023Capable = 2UEFICA2023Status = Updated
and:
Confirm-SecureBootUEFI
returned:
True
In fact, restoring factory keys temporarily made the system unable to boot with Secure Boot enabled.
The actual successful repair was accomplished by APPENDING the missing Microsoft 2023 certificates.
If your system is still bootable, consider backing up your Secure Boot databases before making any changes.
Microsoft Secure Boot Objects Repository
Microsoft Corporation KEK 2K CA 2023 DER
Filename:
microsoft corporation kek 2k ca 2023.der
Windows UEFI CA 2023 DER
Filename:
windows uefi ca 2023.der
Download:
Microsoft UEFI CA 2023 DER
Filename:
microsoft uefi ca 2023.der
Download:
Microsoft Option ROM UEFI CA 2023 DER
Filename:
microsoft option rom uefi ca 2023.der
Copy all four DER files to a FAT32 USB flash drive.
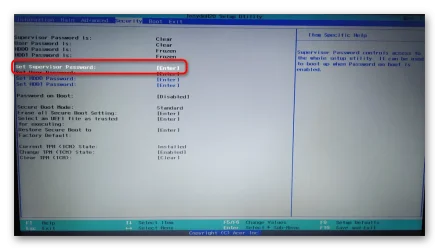
Secure Boot→ Expert Key Management→ Key Exchange Keys (KEK)→ Append→ Load From External Media→ Public Key Certificate
Import:
microsoft corporation kek 2k ca 2023.der
Result on successful system:
KEKSize 1560 → 3066Keys 1 → 2Source Factory → Mixed
Secure Boot→ Expert Key Management→ Authorized Signatures (DB)→ Append→ Load From External Media→ Public Key Certificate
Import ALL THREE:
windows uefi ca 2023.dermicrosoft uefi ca 2023.dermicrosoft option rom uefi ca 2023.der
Result on successful system:
DBSize 3143 → 7636Keys 2 → 5Source Factory → Mixed
DBXUpdate*.bindbxupdate*.bin
No DBX modifications were required to achieve a successful migration.
Save BIOS settings.
Boot Windows normally.
Confirm-SecureBootUEFI
Expected result:
True
PowerShell:
Get-ItemProperty HKLM:\SYSTEM\CurrentControlSet\Control\SecureBoot\Servicing
Expected result:
WindowsUEFICA2023Capable = 2UEFICA2023Status = Updated
PK = 834KEK = 3066DB = 7636DBX = 3724
Verified from both BIOS and Windows:
(Get-SecureBootUEFI -Name PK).Bytes.Length(Get-SecureBootUEFI -Name KEK).Bytes.Length(Get-SecureBootUEFI -Name db).Bytes.Length(Get-SecureBootUEFI -Name dbx).Bytes.Length
Originally, I reset the keys to factory and could no longer boot with Secure Boot enabled for my in-between steps while figuring this out without disabling Secure Boot each time. So, don't do that. If you did, this will work to restore your boot and upgrade to the new certificates. Your BYTE sizes may differ because of this. Be sure to append the new certs so as not to break your current Secure Boot capability.
Dell XPS 8930 Secure Boot 2023 Certificate Migration Fix (BIOS 1.1.31)
Summary
This procedure successfully resolved the Microsoft Secure Boot 2023 certificate migration problem on a Dell XPS 8930 running BIOS 1.1.31 and Windows 11 25H2.The system initially failed Secure Boot with:
Secure Boot ViolationInvalid signature detected.Check Secure Boot Policy in Setup.
Windows reported:
Get-ItemProperty HKLM:\SYSTEM\CurrentControlSet\Control\SecureBoot\Servicing
Result:
WindowsUEFICA2023Capable = 0UEFICA2023Status = NotStartedKEKLastUpdateErrorReason = Firmware_MissingKEKInPackage
After manually appending four Microsoft 2023 Secure Boot certificates directly into the BIOS Secure Boot databases, the system successfully booted with Secure Boot enabled and Windows reported:
WindowsUEFICA2023Capable = 2UEFICA2023Status = Updated
and:
Confirm-SecureBootUEFI
returned:
True
Important Notes
DO NOT RESET FACTORY KEYS AS A FIRST STEP
Although factory key restoration was performed during troubleshooting, it was NOT proven necessary for the final solution.In fact, restoring factory keys temporarily made the system unable to boot with Secure Boot enabled.
The actual successful repair was accomplished by APPENDING the missing Microsoft 2023 certificates.
If your system is still bootable, consider backing up your Secure Boot databases before making any changes.
Certificate Downloads
Official Microsoft Secure Boot Objects Repository:Microsoft Secure Boot Objects Repository
KEK Certificate
Download:Microsoft Corporation KEK 2K CA 2023 DER
Filename:
microsoft corporation kek 2k ca 2023.der
DB Certificates
Download:Windows UEFI CA 2023 DER
Filename:
windows uefi ca 2023.der
Download:
Microsoft UEFI CA 2023 DER
Filename:
microsoft uefi ca 2023.der
Download:
Microsoft Option ROM UEFI CA 2023 DER
Filename:
microsoft option rom uefi ca 2023.der
Copy all four DER files to a FAT32 USB flash drive.
BIOS Procedure
Step 1 - Append KEK 2023 Certificate
BIOS:Secure Boot→ Expert Key Management→ Key Exchange Keys (KEK)→ Append→ Load From External Media→ Public Key Certificate
Import:
microsoft corporation kek 2k ca 2023.der
Result on successful system:
KEKSize 1560 → 3066Keys 1 → 2Source Factory → Mixed
Step 2 - Append DB Certificates
BIOS:Secure Boot→ Expert Key Management→ Authorized Signatures (DB)→ Append→ Load From External Media→ Public Key Certificate
Import ALL THREE:
windows uefi ca 2023.dermicrosoft uefi ca 2023.dermicrosoft option rom uefi ca 2023.der
Result on successful system:
DBSize 3143 → 7636Keys 2 → 5Source Factory → Mixed
Step 3 - Leave DBX Alone
DO NOT manually import:DBXUpdate*.bindbxupdate*.bin
No DBX modifications were required to achieve a successful migration.
Step 4 - Enable Secure Boot
Enable Secure Boot.Save BIOS settings.
Boot Windows normally.
Verification
PowerShell:Confirm-SecureBootUEFI
Expected result:
True
PowerShell:
Get-ItemProperty HKLM:\SYSTEM\CurrentControlSet\Control\SecureBoot\Servicing
Expected result:
WindowsUEFICA2023Capable = 2UEFICA2023Status = Updated
Final Secure Boot Database Values
Verified on successful Dell XPS 8930 system:PK = 834KEK = 3066DB = 7636DBX = 3724
Verified from both BIOS and Windows:
(Get-SecureBootUEFI -Name PK).Bytes.Length(Get-SecureBootUEFI -Name KEK).Bytes.Length(Get-SecureBootUEFI -Name db).Bytes.Length(Get-SecureBootUEFI -Name dbx).Bytes.Length
Final Outcome
- Secure Boot Enabled
- Windows Boots Normally
- Microsoft 2023 Secure Boot Migration Complete
- WindowsUEFICA2023Capable = 2
- UEFICA2023Status = Updated
- No BIOS update newer than Dell 1.1.31 required
- No DBX updates required
- No Secure Boot key reset required as part of the proven solution
My Computer
System One
-
- OS
- Windows 11
- Computer type
- PC/Desktop
- Manufacturer/Model
- Dell PowerEdge T30
- CPU
- Xeon E-1225 v5 (3.3 GHz)
- Memory
- 16Gb
- Other Info
- 8 year old entry level server that was supposed to max-out at Server 2016.