If you’re prevented from updating Secure Boot certificates - Microsoft Support
 support.microsoft.com
UPDATE 4/02:
Secure Boot certificate update status in the Windows Security app | Microsoft Support
Secure Boot certificate update status in the Windows Security app
support.microsoft.com
UPDATE 2/10:

Refreshing the root of trust: industry collaboration on Secure Boot certificate updates
Windows Experience Blog: Secure Boot is a foundational security feature of the Windows and Windows Server experience, providing protection from the moment a device powers on. Introduced in 2011, Secure Boot runs at startup – before Windows loads – and helps ensure only trusted, digitally signed...
 www.elevenforum.com
Official OEM Secure Boot guides
If your computer still shows a yellow or red warning in the Windows Security app, or you simply want to verify that your device has received the new 2023 Secure Boot certificates, check your manufacturer’s official support page. Windows IT Pro Blog:
Secure Boot playbook for certificates expiring in 2026
The first set of tools and steps are now available to help you proactively update your Secure Boot certificates before they expire in June of 2026.
Secure Boot is more mature and robust today than it was some years ago. Coupled with the Unified Extensible Firmware Interface (UEFI) firmware signing process, Secure Boot uses cryptographic keys, known as certificate authorities (CAs), to validate that firmware modules come from a trusted source. This helps prevent malware from running early in the startup sequence of a Windows device.
Secure Boot certificates have always had expiration dates. New certificates help ensure that your devices stay up to date with the latest security protections. That is why your organization will need to install the 2023 CAs before the 2011 CAs start expiring in June of 2026.
Note: Need a refresher on why updating Secure Boot certificates is so important?
- Read Act now: Secure Boot certificates expire in June 2026.
- Bookmark Windows Secure Boot certificate expiration and CA updates.
- Learn more about Secure Boot, signature databases and keys, and boot sequence.
If you wish to proactively update your Secure Boot certificates, this post contains initial steps you can take and tools you can use, with more scalable approaches coming soon. At a minimum, we encourage you to monitor the progress of your device fleet from the start.
Let’s get started. Here’s a summary of what you can do today to prepare:
- Step 1: Inventory and prepare your environment
- Step 2: Monitor and check your devices for Secure Boot status
- Step 3: Apply OEM firmware updates before Microsoft updates
- Step 4: Plan and pilot Secure Boot certificate deployments
- Step 5: Troubleshoot and remediate common issues
Step 1: Inventory and prepare your environment
For most devices in your organization, Microsoft will automatically update high-confidence devices via Windows Update. However, you can validate and actively roll out these updates, in which case, you would start by conducting an inventory.Inventory
Most devices manufactured since 2012 have Secure Boot enabled, but you should always verify that. You should also check the status of the Secure Boot certificates with sample inventory PowerShell commands or by checking the value of the UEFICA2023Status registry key (it should ultimately be “updated”). Out of the devices that show up as not updated, build a small, representative sample. We recommend that you focus on the less common devices, for which high confidence determination isn’t automatic. Then follow the rest of the steps outlined in this post to pilot the certificate updates and help ensure that deployment is successful
Prepare select devices
To prepare devices for Secure Boot certificate deployment, consider how you’ll manage it. There are several approaches to managing Secure Boot certificate updates. Today, you can use registry keys or Group Policy. A Configuration Service Provider (CSP) for mobile device management (MDM), such as Microsoft Intune, is coming soon. Bookmark Windows Secure Boot certificate expiration and CA updates - Microsoft Support for the latest updates.
- The primary method is to deploy the certificates to devices that have been validated as ready for the update. See Step 4 when you’re ready to deploy these updates!
- For the more common device configurations in your environment, you can utilize two “assists” to manage your deployment:
- Get new certificates through monthly Windows updates for high-confidence devices. This option is enabled by default for devices that are ready for new certificates. Microsoft will update these devices for you unless you opt out. To opt out, set the HighConfidenceOptOut registry key<a href="Secure Boot playbook for certificates expiring in 2026 - Windows IT Pro Blog" target="_self" rel="nofollow noopener noreferrer">ii</a> value to 1 or set the Automatic Certificate Deployment via Updates Group Policy to Disabled.
- Opt devices in to Microsoft-managed controlled feature rollout. With registry keys, set the value of MicrosoftUpdateManagedOptIn to 1 to opt in to Microsoft-managed controlled feature rollout. The value of 0 or non-existent key means that you’re opted out. With Group Policy, configure the Certificate Deployment via Controlled Feature Rollout policy to Enabled. Note: To opt in, please configure devices to share required diagnostic data with Microsoft.
HKEY_LOCAL_MACHINE\SYSTEM\CurrentControlSet\Control\SecureBoot
HKEY_LOCAL_MACHINE\SYSTEM\CurrentControlSet\Control\SecureBoot\Servicing
See Registry key updates for Secure Boot: Windows devices with IT-managed updates for more details.
Group Policy settings are available to you under the following path: Computer Configuration > Administrative Templates > Windows Components > Secure Boot. To get the updates that include the Group Policy for deploying Secure Boot certificate updates, download the latest Administrative Templates (.admx) for Windows 11 and Windows Server.
Step 2: Monitor and check your devices for Secure Boot status
Check the Secure Boot status of your devices before and after deployment. Soon, you will be able to use your preferred management and reporting tools. For now, you can use registry keys or Windows Event Log events to identify which devices already have new certificates and which ones need attention.Deployment progress
The text value of the UEFICA2023Status registry key will indicate if your certificate deployment status is not started, in progress, or updated. The value will change progressively until all new certificates and the new boot manager have been deployed successfully.
Successful deployment
- Audit the Windows System Event Log events for Event ID 1808. This informational event indicates that the device has the required new Secure Boot certificates applied to the device’s firmware.
- Audit the UEFICA2023Error registry key for issues. This key should not exist unless an error is pending.
- Check that the text value of the UEFICA2023Status registry key reads as “Updated.”
- Audit the Windows System Event Log for Event ID 1801.This error event indicates that the updated certificates have not been applied to the device. Analyze details specific to the device, including device attributes, that will help you in correlating which devices still need updating.
- Check if the UEFICA2023Error registry key exists. If so, it indicates an error in certificate deployment. The error itself won’t appear in the Event Log. Trace related issues through Secure Boot DB and DBX variable update events.
Step 3: Apply OEM firmware updates before Microsoft updates
Updated firmware can help prevent compatibility problems and ensure new Secure Boot certificates are accepted. If your organization has identified Secure Boot update issues or your OEM recommends a firmware update, apply the latest BIOS/UEFI update before installing Secure Boot–related Windows updates.Some OEMs provide firmware updates that include important fixes and updated certificate stores. These updates help Secure Boot function correctly with new Windows certificates. Microsoft works closely with OEM partners to ensure these updates integrate smoothly with Windows.
Step 4: Plan and pilot Secure Boot certificate deployments
As you’ve seen in Step 1, Microsoft can assist with your Secure Boot updates if you enable diagnostic data.You can also deploy new Secure Boot certificates yourself for devices that don’t already have them. Choose a way to do this with registry keys, via Windows Configuration System (WinCS) command-line interface (CLI), or using Group Policy today. Pilot your desired method first on a representative set of devices to gain confidence.
In a typical enterprise deployment, whatever option you choose, allow approximately 48 hours and one or more restarts after changing configuration for updates to fully apply. See How updates are deployed for more details. For testing scenarios, you can accelerate the experience by following the steps outlined in Device Testing Using Registry Keys.
Important: Avoid mixing deployment methods on the same device. For additional technical recommendations to help you plan and deploy your Secure Boot updates, see Deployment strategies.
Option 1: Deploy certificates with registry keys
Find the AvailableUpdates registry key located under this registry path:HKEY_LOCAL_MACHINE\SYSTEM\CurrentControlSet\Control\SecureBoot
Set its value to 0x5944 to deploy all needed certificates and update to the Windows UEFI CA 2023 signed boot manager. This key corresponds to the Group Policy setting Enable Secure Boot certificate deployment. For details, see Registry key updates for Secure Boot: Windows devices with IT-managed updates.
Option 2: Deploy certificates via Windows Configuration System (WinCS)
New command-line tools are now available for domain-joined clients on Windows 11, versions 25H2, 24H2, and 23H2.These include both a traditional executable and a PowerShell module to query and apply Secure Boot configurations locally to a device. For step-by-step guidance, see Windows Configuration System (WinCS) APIs for Secure Boot.
Deploy the Secure Boot updates via WinCS:
- Feature name: Feature_AllKeysAndBootMgrByWinCS
- WinCS key value: F33E0C8E002
- Secure Boot configuration state: Enabled
Option 3: Deploy certificates using Group Policy
Group Policy settings are available by navigating to Computer Configuration > Administrative Templates > Windows Components > Secure Boot.To apply Secure Boot updates to devices using Group Policy, set the Enable Secure Boot certificate deployment policy to Enabled. This lets Windows automatically begin the certificate deployment process. This setting corresponds to the registry key AvailableUpdates.
Be sure to get the latest version of the .admx for Windows 11 and Windows Server. For more details, see Group Policy Objects (GPO) method of Secure Boot for Windows devices with IT-managed updates.
Option 4: Deploy certificates using mobile device management (coming soon)
Soon, you’ll be able to manage Secure Boot updates using MDM solutions, such as Microsoft Intune. When this method is available, we will post updated guidance at Windows Secure Boot certificate expiration and CA updates - Microsoft Support.Step 5. Troubleshoot and remediate common issues
You can also use registry keys and Windows Event Log events to identify and resolve common issues:- The UEFICA2023Error registry key doesn’t exist if there are no errors. If it exists with a value other than 0, check your remediation recommendations in Secure Boot DB and DBX variable update events.
- The AvailableUpdates registry key on a device is set to 0x4104. If it doesn’t clear the 0x0004 bit even after multiple restarts, the device doesn’t progress past deploying the new Key Exchange Key (KEK) certificate. If you encounter this error, check with your OEM to confirm they have followed the steps outlined in Windows Secure Boot Key Creation and Management Guidance.
- If Event Viewer Windows Logs for System registers an Event ID 1795, it means that there was an error when Windows attempted to hand off the certificates to firmware. Check with the OEM to see if there is a firmware update available for the device to resolve this issue.
Your update strategy begins today
Today, you can start preparing, monitoring, deploying, and troubleshooting Secure Boot certificates in advance of the June 2026 expiration date. The new registry keys, WinCS, Group Policy, and Windows Log tools are here to support you and are just the beginning. More tools for additional scenarios are in development.For the latest information, bookmark Windows Secure Boot certificate expiration and CA updates. Looking for a specific topic?
- Find the deployment playbook and troubleshooting guidance in the updated Secure Boot Certificate Updates: Guidance for IT Professionals and Organizations.
- New! Registry key updates for Secure Boot: Windows devices with IT-managed updates.
- New! Group Policy Objects (GPO) method of Secure Boot for Windows devices with IT-managed updates.
- New! Windows Configuration System (WinCS) APIs for Secure Boot.
- Have a question? Browse answers to Frequently asked questions about the Secure Boot update process.
- If you’re an OEM, find helpful resources at Windows Secure Boot Key Creation and Management Guidance.
Source:
Secure Boot playbook for certificates expiring in 2026
Explore tools and step-by-step guidance to help you proactively update your Secure Boot certificates.
 techcommunity.microsoft.com
Windows IT Pro Blog:
Updating Microsoft Secure Boot keys
Microsoft, in collaboration with our ecosystem partners, is preparing to roll out replacement certificates that’ll set new Unified Extensible Firmware Interface (UEFI) Certificate Authorities (CAs) trust anchors in Secure Boot for the future. Look out for Secure Boot database updates rolling out in phases to add trust for the new database (DB) and Key Exchange Key (KEK) certificates. This new DB update is available as an optional servicing update for all Secure Boot enabled devices from February 13, 2024.What is Secure Boot?
Secure Boot is a security feature in the UEFI that helps ensure that only trusted software runs during the system’s boot sequence. It works by verifying the digital signature of any software against a set of trusted digital keys stored in the UEFI. As an industry standard, UEFI’s Secure Boot defines how platform firmware manages certificates, authenticates firmware, and how the operating system (OS) interfaces with this process. For more details on UEFI and Secure Boot, please refer to this article.Secure Boot was first introduced to Windows systems with the Windows 8 release to protect against the emerging pre-boot malware (bootkit) threat at that time. Since then, Secure Boot has continued to be a part of Microsoft's Trusted Boot security architecture. Secure Boot authenticates modules such as UEFI firmware drivers, bootloaders, applications, and option ROMs (Read-Only Memory), which are firmware run by the PC BIOS during platform initialization, before they are all executed. As the final step of the Secure Boot process, the firmware verifies the Windows boot loader is trusted by Secure Boot and then passes control to the boot loader which in turn verifies, loads into memory, and launches Windows. This process coupled with the UEFI firmware signing process helps to ensure that only verified code executes before Windows, preventing attackers from utilizing the boot path as an attack vector. To learn more about how Secure Boot fits in with the overall Windows chip-t-cloud security, please refer to the Windows Security Book RWMyFE.
Trust and authenticity in Secure Boot are built using the Public-Key Infrastructure (PKI). This establishes a certificate management system which utilizes CAs to store digital certificates. These CAs, consisting of Original Equipment Manufacturer (OEM) or their delegates and Microsoft, generate key pairs that form the root of trust of a system.

Secure Boot “root of trust”: Setting trust anchors for the future
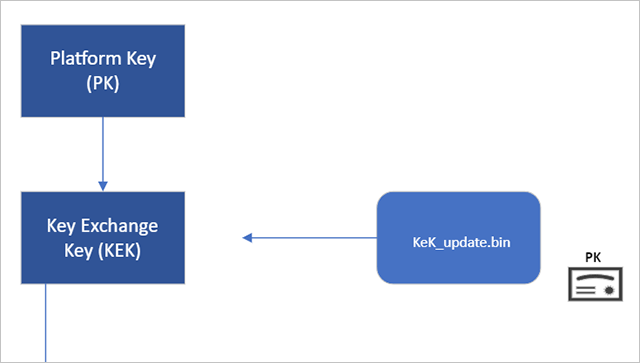
Secure Boot’s root of trust utilizes a hierarchical system, where the Platform Key (PK) is typically managed by the OEM and used to sign updates to the KEK database. The KEK in turn signs updates to both the Allowed Signature DB and the Forbidden Signature Database (DBX).The Secure Boot Allowed Signature DB and the DBX are integral to the functionality of Secure Boot. Bootloader modules’ signing authority must be allowlisted by the Secure Boot DB, while the DBX is used for revoking previously trusted boot components. Updates to the DB and DBX must be signed by a KEK in the Secure Boot KEK database.
The configuration of Secure Boot DB and KEK for Windows devices has remained the same since Windows 8. Microsoft requires every OEM to include the same three certificates managed by Microsoft for Windows and in support of the third-party hardware and OS ecosystem. These include the Microsoft Corporation KEK CA 2011 stored in the KEK database, and two certificates stored in the DB called the Microsoft Windows Production PCA 2011, which signs the Windows bootloader, and the Microsoft UEFI CA 2011 (or third-party UEFI CA), which signs third-party OS and hardware driver components.
All three of these Microsoft certificates expire in 2026. So, in collaboration with our ecosystem partners, Microsoft is preparing to roll out replacement certificates that will set new UEFI CA trust anchors for the future. Microsoft will be rolling out Secure Boot database updates in phases to add trust for the new DB and KEK certificates. The first DB update will add the Microsoft Windows UEFI CA 2023 to the system DB. The new Microsoft Windows UEFI CA 2023 will be used to sign Windows boot components prior to the expiration of the Windows Production CA 2011. This DB update will be optional for the February 2024 servicing and preview updates, and can be manually applied to devices. Microsoft will slowly roll out this DB update as we validate devices and firmware compatibility globally. The full DB update’s controlled-rollout process to all Windows customers will begin during the 2024 April servicing and preview updates, ahead of the certificate expiration in 2026. Meanwhile, efforts to update the Microsoft UEFI CA 2011 (aka third-party UEFI CA) and Microsoft Corporation KEK CA 2011 will begin late 2024, and will follow a similar controlled rollout process as this DB update.
While Microsoft has frequently performed DBX updates globally since the inception of Secure Boot, this will be the first DB update performed on such a large scale. We’re actively collaborating with our OEM partners to identify and address bugs in firmware implementation that could result in unbootable systems or render a device unreceptive to the DB update. To ensure a successful rollout, devices with identified issues will be suspended from receiving the update until a fix is released.
Microsoft is taking a very deliberate and cautious approach to rolling out this update. With this DB update, Microsoft will sustain its ability to service all Windows devices’ boot components.
Guidance to manually apply DB update
The DB update is available on February 13, 2024, along with manual steps to allow customers to test for firmware compatibility, especially for organizations with fleets of devices. If you would like to manually apply the DB update to validate that your system is compatible, please read the following instructions. These actions should be completed with non-critical hardware representing devices in your environment.Pre-requisite checks
Before attempting the DB update, please ensure to perform the necessary pre-requisite checks:- If you intend to manually apply this update to a large group of devices, we advise that you begin by rolling out to individual devices with the same firmware and specifications first to minimize the risks in the case of firmware bugs in your devices.
- Please verify that your UEFI firmware version is the most recent available version by your firmware vendor or OEM.
- For data backup steps, please refer to this guide.
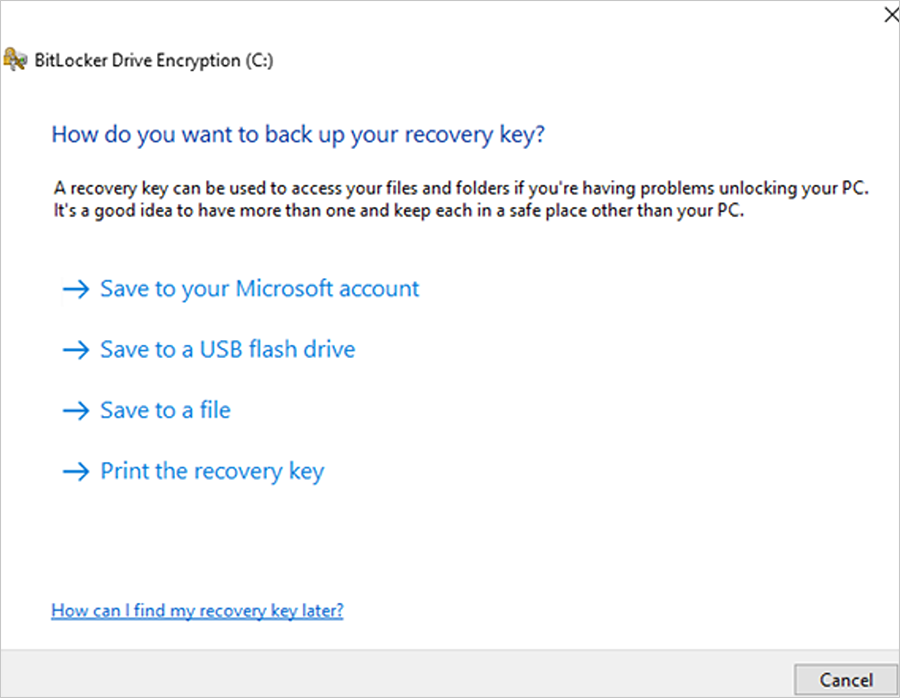
- If you use BitLocker or if your enterprise has deployed BitLocker on your machine, ensure to backup BitLocker Keys:

Backup BitLocker Recovery Key in Windows 11
This tutorial will show you how to back up the BitLocker recovery key for a drive in Windows 10 and Windows 11. BitLocker Drive Encryption is a data protection feature that integrates with the operating system and addresses the threats of data theft or exposure from lost, stolen, or...
www.elevenforum.com
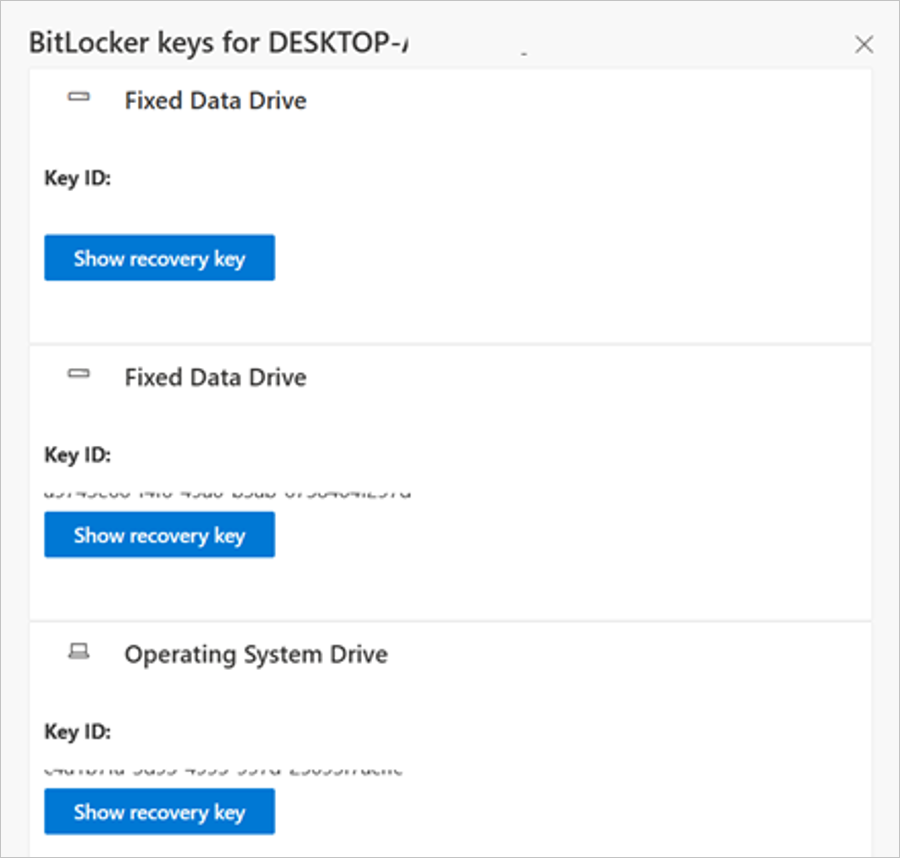
A) See this portal to ensure your BitLocker keys are backed up before your next reboot for your selfhost device. In the unlikely event that device becomes inoperable after receiving the update, the hard drive can still be unlocked.
B) If the keys are backed up, the UI should resemble the following:
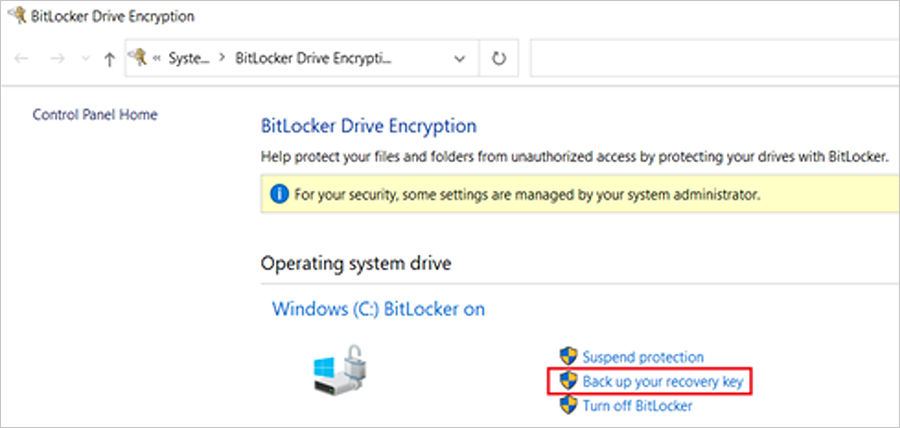
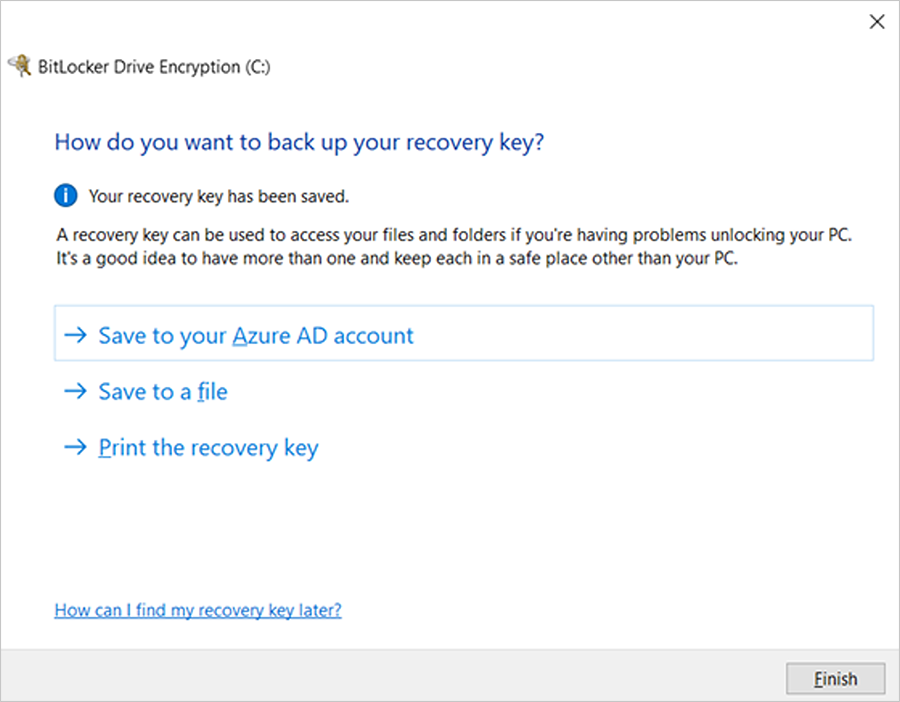
C) If the keys are not backed up, please open Windows Search to search for “Manage BitLocker” and select Back up your recovery key followed by Save to your Azure AD or MSA account.
Formal DB update steps
- Apply the February 2024 (or later) security update.
- Open a PowerShell console and ensure that PowerShell is running as an administrator before running the following commands:
- Set the registry key to:
Set-ItemProperty -Path "HKLM:\SYSTEM\CurrentControlSet\Control\SecureBoot" -Name "AvailableUpdates" -Value 0x40 - Run the following scheduled task as:
Start-ScheduledTask -TaskName "\Microsoft\Windows\PI\Secure-Boot-Update"
- Set the registry key to:
- Reboot the machine twice after running these commands to confirm that the machine is booting with the updated DB.
- To verify that the Secure Boot DB update was successful, open a PowerShell console and ensure that PowerShell is running as an administrator before running the following command:
[System.Text.Encoding]::ASCII.GetString((Get-SecureBootUEFI db).bytes) -match ‘Windows UEFI CA 2023’

Source:
Updating Microsoft Secure Boot keys | Windows IT Pro blog
A new Microsoft Windows UEFI CA 2023 will replace the existing Windows Production 2011 CA.
techcommunity.microsoft.com
Secure Boot playbook for certificates expiring in 2026
Explore tools and step-by-step guidance to help you proactively update your Secure Boot certificates.
techcommunity.microsoft.com
Windows Server Secure Boot playbook for certificates expiring in 2026 | Microsoft Community Hub
This guidance describes the tools and options available to help organizations update Secure Boot certificates on Windows Server before the certificates begin...
techcommunity.microsoft.com
See also:

Act now: Secure Boot certificates expire in June 2026
UPDATE: https://www.elevenforum.com/t/updating-microsoft-secure-boot-keys-before-expiration-in-june-2026.22477/ Windows IT Pro Blog: Prepare for the first global large-scale certificate update to Secure Boot. The Microsoft certificates used in Secure Boot are the basis of trust for operating...
www.elevenforum.com
Windows Secure Boot certificate expiration and CA updates - Microsoft Support
support.microsoft.com
Windows Secure Boot certificate expiration and CA updates | Microsoft Support
Windows Secure Boot certificate expiration and CA updates
support.microsoft.com
Frequently asked questions about the Secure Boot update process - Microsoft Support
support.microsoft.com
Last edited: