Windows wont boot anymore - DISM doesnt work in Windows PE


a copy of wimlib is in USBprograms\BIN\wlx64
 

My Computers

System One System Two

  • OS
    Win7,Win11
    Computer type
    PC/Desktop
    CPU
    i5-8400
    Motherboard
    gigabyte b365m ds3h
    Memory
    2x8gb 3200mhz
    Monitor(s) Displays
    benq gw2480
    PSU
    bequiet pure power 11 400CM
    Cooling
    cryorig m9i
  • Operating System
    win7,win11
    Computer type
    PC/Desktop
    CPU
    pentium g5400
    Motherboard
    gigabyte b365m ds3h
    Memory
    1x8gb 2400
    PSU
    xfx pro 450
Ran this DISM command:

Batch:
Dism /Capture-Image /ImageFile:"F:\WEASELRTX\shadow.wim" /CaptureDir:\\?\GLOBALROOT\Device\HarddiskVolumeShadowCopy1\ /Name:weaselrtximg

I think almost for 25 minutes and the cursor keeps blinking. In Task-Manager it runs and seems to be doing something:
1728664297430.png

Drive is 1TB and is with 571GB full. I wait a little and i might switch to wimlib if its faster
 

My Computer

System One

  • OS
    Windows 11
    Computer type
    PC/Desktop
    Manufacturer/Model
    MSI
the wim is going to be huge

you wont be able to move 571gb into oldos and also restore a wim that is 571gb expanded because the disk is only 1tb. Dism does exclude sysvolinfo and the .sys files on the root from the capture so it wont be the entiure 571gb when applied . And you wont be moving sysvolinfo and dont need to move the .sys files into oldos either, but you havent got masses of space on there.

you dont need
\hiberfil.sys
\pagefile.sys
\swapfile.sys
in oldos folder . You can delete them before applying the wim
 

My Computers

System One System Two

  • OS
    Win7,Win11
    Computer type
    PC/Desktop
    CPU
    i5-8400
    Motherboard
    gigabyte b365m ds3h
    Memory
    2x8gb 3200mhz
    Monitor(s) Displays
    benq gw2480
    PSU
    bequiet pure power 11 400CM
    Cooling
    cryorig m9i
  • Operating System
    win7,win11
    Computer type
    PC/Desktop
    CPU
    pentium g5400
    Motherboard
    gigabyte b365m ds3h
    Memory
    1x8gb 2400
    PSU
    xfx pro 450
the wim is going to be massive

you wont be able to move 571gb into oldos and also restore a wim that is 571gb expanded because the disk is only 1tb. Dism does exclude sysvolinfo and the .sys files on the root from the capture so it wont be the entiure 571gb when applied . You havent got masses of space on there.
the oldos folder is on my windows partition. i saved the WIM file to F:\ which is an HDD which still has 778GB free of space.
 

My Computer

System One

  • OS
    Windows 11
    Computer type
    PC/Desktop
    Manufacturer/Model
    MSI
saved the WIM file to F:\ which is an HDD

that will take a while hdd are especially slow with small files.

might as well have a cup of char and a jammy barm cake while you are waiting
 

My Computers

System One System Two

  • OS
    Win7,Win11
    Computer type
    PC/Desktop
    CPU
    i5-8400
    Motherboard
    gigabyte b365m ds3h
    Memory
    2x8gb 3200mhz
    Monitor(s) Displays
    benq gw2480
    PSU
    bequiet pure power 11 400CM
    Cooling
    cryorig m9i
  • Operating System
    win7,win11
    Computer type
    PC/Desktop
    CPU
    pentium g5400
    Motherboard
    gigabyte b365m ds3h
    Memory
    1x8gb 2400
    PSU
    xfx pro 450
Yup. I aborted the command. I forgot this is the slowest HDD i have with 5400RPM only. I made some space on my C: drive which is an SSD. Im also going to execute it via wimlib and dism.

Well no good :(

I executed with DISM and got this error:

Error: 1392

The file or directory is corrupted and unreadable

The DISM log file can be found at dism.zip

With Wimlib it immediately stops with this error:

Batch:
I:\USBprograms\BIN\wlx64>wimlib-imagex.exe capture \\?\GLOBALROOT\Device\HarddiskVolumeShadowCopy1 "C:\WEASELRTX\shadow.wim" --compress=fast --config=X:\Users\Default\Documents\wimscript.ini
[WARNING] X:\Users\Default\Documents\wimscript.ini:1: Unrecognized section "[Exclusionlist]"
Scanning "\\?\GLOBALROOT\Device\HarddiskVolumeShadowCopy1"
[WARNING] "GLOBALROOT\Device\HarddiskVolumeShadowCopy1": Can't get volume attributes (status=c0000010): The specified request is not a valid operation for the target device
[WARNING] "GLOBALROOT\Device\HarddiskVolumeShadowCopy1": Can't get volume ID (status=c0000010): The specified request is not a valid operation for the target device
[WARNING] "GLOBALROOT\Device\HarddiskVolumeShadowCopy1": Can't get file information (status=c0000010): The specified request is not a valid operation for the target device
[ERROR] "GLOBALROOT\Device\HarddiskVolumeShadowCopy1": Can't get file information (status=c000000d): An invalid parameter was passed to a service or function
ERROR: Exiting with error code 63:
       Could not read the metadata for a file or directory.

I:\USBprograms\BIN\wlx64>
 

Attachments

My Computer

System One

  • OS
    Windows 11
    Computer type
    PC/Desktop
    Manufacturer/Model
    MSI
That is a bit convoluted. Easier to copy wimlib-imagex.exe and libwim-15.dll onto the root of the usb. Put wimscript.ini on the root as well
then the command paths are short and simple.

[WARNING] X:\Users\Default\Documents\wimscript.ini:1: Unrecognized section "[Exclusionlist]"
dont know waht you did there

sadly looks like the shadowcopy is damaged
Can't get volume attributes (status=c0000010):

Unless you have another shadowcopy.
 

My Computers

System One System Two

  • OS
    Win7,Win11
    Computer type
    PC/Desktop
    CPU
    i5-8400
    Motherboard
    gigabyte b365m ds3h
    Memory
    2x8gb 3200mhz
    Monitor(s) Displays
    benq gw2480
    PSU
    bequiet pure power 11 400CM
    Cooling
    cryorig m9i
  • Operating System
    win7,win11
    Computer type
    PC/Desktop
    CPU
    pentium g5400
    Motherboard
    gigabyte b365m ds3h
    Memory
    1x8gb 2400
    PSU
    xfx pro 450
Unless you have another shadowcopy.
No unfortuantely not..

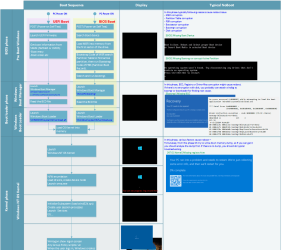
I found this image from Microsoft
1728682619224.png
where it explains what causes are of a boot issues for Windows.

For now i managed to fix the Recovery Blue Screen Error.

I well did i something no one should do but i got an VM from the same build of windows. Extracted the msscore.sys file and placed it inside my windows partition.
Well after restart it complained with "Unknown Error". I thought well crap i need to do something. So i booted up to the ISO with Build number 10.0.22621.4249.

I thought i might try Startup Repair.. At first it did something and said repairing system files. Then it unfortunately it aborted and said it couldn't finish the repair. I then restart and well now i dont get the blue recovery screen anymore. I loads and shows the MSI (bios_logo) then goes black and comes up with the white loading circle.

For now its been going for 5 minutes i dont think it wont go any further but im going to keep looking if something get this machine back in Windows.

Edit:
The original doc from microsoft:
 

My Computer

System One

  • OS
    Windows 11
    Computer type
    PC/Desktop
    Manufacturer/Model
    MSI
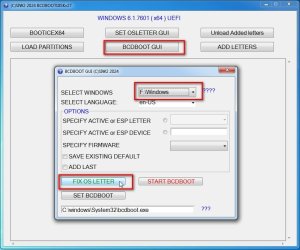
You could try fixing the osletter, it can get stuck like that if it doesnt know where it is. I am not too hopeful that is the problem but it wont hurt to try.

fixosletter1.jpg

Otherwise you could try to construct a source as described by ms. Get the rtm media ( whatever that means )and update with the latest cumulative.

Or you could skip the limitaccess switch and hope the matching files will be downloaded


Last edited:

My Computers

System One System Two

  • OS
    Win7,Win11
    Computer type
    PC/Desktop
    CPU
    i5-8400
    Motherboard
    gigabyte b365m ds3h
    Memory
    2x8gb 3200mhz
    Monitor(s) Displays
    benq gw2480
    PSU
    bequiet pure power 11 400CM
    Cooling
    cryorig m9i
  • Operating System
    win7,win11
    Computer type
    PC/Desktop
    CPU
    pentium g5400
    Motherboard
    gigabyte b365m ds3h
    Memory
    1x8gb 2400
    PSU
    xfx pro 450
This is a trick I used years ago when I couldn't boot into Windows because the boot partition was on a drive I removed. I was dual booting two different Windows version on different drives. I tried all of the suggestions I found and nothing work. I used a bootable Macrium flash drive to make an image of my drive. After that I did a clean install of Windows. I made sure Windows booted OK. Once I knew it was working I booted Macrium from the flash drive and restored the image of the old C: partion over the new C: partition. I can't say it will work for you but it did work for me.
 

My Computers

System One System Two

  • OS
    Windows 11 Canary Channel
    Computer type
    PC/Desktop
    Manufacturer/Model
    PowerSpec B746
    CPU
    Intel Core i7-10700K
    Motherboard
    ASRock Z490 Phantom Gaming 4/ax
    Memory
    16GB (8GB PC4-19200 DDR4 SDRAM x2)
    Graphics Card(s)
    NVIDIA GeForce GTX 1050 TI
    Sound Card
    Realtek Audio
    Monitor(s) Displays
    Samsung SAM0A87 Samsung SAM0D32
    Screen Resolution
    1920 x 1080
    Hard Drives
    NVMe WDC WDS100T2B0C-00PXH0 1TB
    Samsung SSD 860 EVO 1TB
    PSU
    750 Watts (62.5A)
    Case
    PowerSpec/Lian Li ATX 205
    Keyboard
    Logitech K270
    Mouse
    Logitech M185
    Browser
    Microsoft Edge and Firefox
    Antivirus
    ESET Internet Security
  • Operating System
    Windows 11 Canary Channel
    Computer type
    PC/Desktop
    Manufacturer/Model
    PowerSpec G156
    CPU
    Intel Core i5-8400 CPU @ 2.80GHz
    Motherboard
    AsusTeK Prime B360M-S
    Memory
    16 MB DDR 4-2666
    Monitor(s) Displays
    23" Speptre HDMI 75Hz
    Screen Resolution
    1920x1080
    Hard Drives
    Samsung 970 EVO 500GB NVMe
    Mouse
    Logitek M185
    Keyboard
    Logitek K270
    Browser
    Firefox, Edge and Edge Canary
    Antivirus
    Windows Defender
Your BCD is corrupt! You need to fix it with the following commands:
Code:
bootrec /rebuildbcd
 

My Computers

System One System Two

  • OS
    ChromeOS; Windows Vista (VM/BSOD testing)
    Computer type
    Laptop
    Manufacturer/Model
    Hewlett-Packard
  • Operating System
    Windows
    Computer type
    PC/Desktop
    Manufacturer/Model
    Intel
    CPU
    Core Duo
    Motherboard
    Emulated
    Graphics card(s)
    SVGA
    Sound Card
    None
    Monitor(s) Displays
    1
    Screen Resolution
    800x600x32
    Hard Drives
    None
    PSU
    None
    Case
    None
    Cooling
    None
    Mouse
    PS/2
    Keyboard
    IBM AT 84-key
    Internet Speed
    None
    Browser
    None
    Antivirus
    Default (Windows Defender)
    Other Info
    --- My Windows PE testing environment lies here, (because I like retro), but I CAN and HAVE run beta versions of Windows 11. 21996 was the version. Also, I have lots of experience of Win11 and 10, and know how to deploy the OS. ---
Wrecking your WinRE isn't cool. Use this link to get a fresh copy WinRE (FRESH) so you don't get errors attempting to run commands. Your WinPE .wim file is probably corrupted since that drive isn't very healthy.
Boot into that but remove the
Code:
/LimitAccess
parameter when running that DISM command, it makes it readonly
 

My Computers

System One System Two

  • OS
    ChromeOS; Windows Vista (VM/BSOD testing)
    Computer type
    Laptop
    Manufacturer/Model
    Hewlett-Packard
  • Operating System
    Windows
    Computer type
    PC/Desktop
    Manufacturer/Model
    Intel
    CPU
    Core Duo
    Motherboard
    Emulated
    Graphics card(s)
    SVGA
    Sound Card
    None
    Monitor(s) Displays
    1
    Screen Resolution
    800x600x32
    Hard Drives
    None
    PSU
    None
    Case
    None
    Cooling
    None
    Mouse
    PS/2
    Keyboard
    IBM AT 84-key
    Internet Speed
    None
    Browser
    None
    Antivirus
    Default (Windows Defender)
    Other Info
    --- My Windows PE testing environment lies here, (because I like retro), but I CAN and HAVE run beta versions of Windows 11. 21996 was the version. Also, I have lots of experience of Win11 and 10, and know how to deploy the OS. ---
That also contains PowerShell and internet access (which you NEED to get the install.wim file)
Go to Microsoft's website and download a fresh ISO: here
and select x64 and Download.
Open the ISO file and then use DISM to install from the ISO [CD]:\Sources\Install.wim (after burning it)
 

My Computers

System One System Two

  • OS
    ChromeOS; Windows Vista (VM/BSOD testing)
    Computer type
    Laptop
    Manufacturer/Model
    Hewlett-Packard
  • Operating System
    Windows
    Computer type
    PC/Desktop
    Manufacturer/Model
    Intel
    CPU
    Core Duo
    Motherboard
    Emulated
    Graphics card(s)
    SVGA
    Sound Card
    None
    Monitor(s) Displays
    1
    Screen Resolution
    800x600x32
    Hard Drives
    None
    PSU
    None
    Case
    None
    Cooling
    None
    Mouse
    PS/2
    Keyboard
    IBM AT 84-key
    Internet Speed
    None
    Browser
    None
    Antivirus
    Default (Windows Defender)
    Other Info
    --- My Windows PE testing environment lies here, (because I like retro), but I CAN and HAVE run beta versions of Windows 11. 21996 was the version. Also, I have lots of experience of Win11 and 10, and know how to deploy the OS. ---

Latest Support Threads

Back
Top Bottom