How to Perform an Unattended Installation of Windows 11 on Unsupported Hardware


hsehestedt

Well-known member
Guru
VIP
Local time
5:17 PM
Posts
3,527
Location
Texas, USA
Visit site
OS
Win11 Pro 24H2
Most of you are no doubt aware by now that there are several workarounds to installing Windows 11 on unsupported hardware, if you are willing to take that risk.

If you want to go "whole hog" for example, and install on a non-UEFI based system with no TPM and an unsupported CPU you could do this:

1) Create a registry file that looks like this:

Code:
Windows Registry Editor Version 5.00

[HKEY_LOCAL_MACHINE\SYSTEM\Setup\LabConfig]
"BypassTPMCheck"=dword:00000001
"BypassSecureBootCheck"=dword:00000001
"BypassRAMCheck"=dword:00000001
"BypassStorageCheck"=dword:00000001
"BypassCPUCheck"=dword:00000001

Let's say you save it as "RegUpdates.reg".

2) Place the file on your install media.

3) Boot from the install media. At the first static screen, press SHIFT + F10 to open a command prompt. Run this command:

regedit /s D:\RegUpdates.reg (assumes D: is your boot media)

4) Close the command prompt.

You will now be able to install Win 11 on your unsupported hardware.

But, what if you want to perform an unattended install of Windows 11 on unsupported hardware? Simple. Create your autounattend in the same manner as always.

Add Windows-Setup > RunSynchronous > RunSynchronousCommand to Pass 1 windowsPE in your answer file and set the following values:

Order: 1
Path: regedit /S X:\RegUpdates.reg

NOTE: Don't change the X: in the above path. This is the RAMDrive drive letter Windows uses during setup.

Save the changes to the answer file and save to the root of your Windows install media.

NOTE: The steps below involve editing the BOOT.WIM file. I don't spell out every command to do this because I don't know if anyone other than some nerds like @Kari or myself will even be interested enough to do this. Most likely, if you have read this far, you already know how to do this. If you need detailed steps, let me know and I would be happy to provide those.

Mount the \sources\boot.wim file from the Windows image file. Note that you want to target index 2.
Drop the RegUpdates.reg file in the root of the mounted image.
Save and unmount the boot.wim.
Replace the boot.wim in the original image with the updated boot.wim.

Re-burn your ISO image or create your boot media. The registry change will automatically be applied within Windows PE and Windows 11 should be able to install on your unsupported hardware.

NOTE: Because this registry change takes place only in the running instance of Windows PE, it won't make any changes to your actual Windows installation. No change is needed there anyway. It is only setup (run within WinPE) that cares about this.
 

My Computers

System One System Two

  • OS
    Win11 Pro 24H2
    Computer type
    PC/Desktop
    Manufacturer/Model
    Kamrui Mini PC, Model CK10
    CPU
    Intel i5-12450H
    Memory
    32GB
    Graphics Card(s)
    No GPU - Built-in Intel Graphics
    Sound Card
    Integrated
    Monitor(s) Displays
    HP Envy 32
    Screen Resolution
    2560 x 1440
    Hard Drives
    1 x 2TB NVMe SSD
    1 x 4TB NVMe SSD
    1 x 4TB 2.5" SSD
    PSU
    120W "Brick"
    Keyboard
    Corsair K70 Mechanical Keyboard
    Mouse
    Logitech MX Master 3
    Internet Speed
    1Gb Up / 1 Gb Down
    Browser
    Edge
    Antivirus
    Windows Defender
  • Operating System
    Win11 Pro 23H2
    Computer type
    Laptop
    Manufacturer/Model
    Lenovo ThinkBook 13x Gen 2
    CPU
    Intel i7-1255U
    Memory
    16 GB
    Graphics card(s)
    Intel Iris Xe Graphics
    Sound Card
    Realtek® ALC3306-CG codec
    Monitor(s) Displays
    13.3-inch IPS Display
    Screen Resolution
    WQXGA (2560 x 1600)
    Hard Drives
    2 TB 4 x 4 NVMe SSD
    PSU
    USB-C / Thunderbolt 4 Power / Charging
    Mouse
    Buttonless Glass Precision Touchpad
    Keyboard
    Backlit, spill resistant keyboard
    Internet Speed
    1Gb Up / 1Gb Down
    Browser
    Edge
    Antivirus
    Windows Defender
    Other Info
    WiFi 6e / Bluetooth 5.1 / Facial Recognition / Fingerprint Sensor / ToF (Time of Flight) Human Presence Sensor
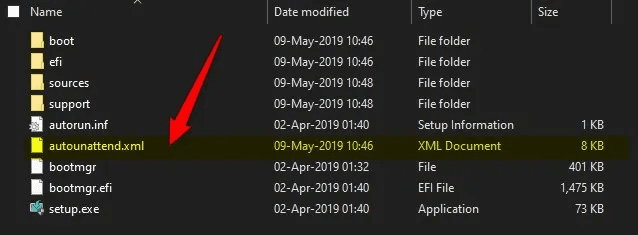
Can you show me how the autounattend.xml look likes than?
I know where to put it. I think here?

1649753819556.png

like this?

<?xml version="1.0" encoding="utf-8"?>
<unattend xmlns="urn:schemas-microsoft-com:unattend">
<settings pass="windowsPE">
<component name="Microsoft-Windows-Setup" processorArchitecture="amd64" publicKeyToken="31bf3856ad364e35" language="neutral" versionScope="nonSxS" xmlns:wcm="http://schemas.microsoft.com/WMIConfig/2002/State" xmlns:xsi="http://www.w3.org/2001/XMLSchema-instance">
<RunSynchronous>
<RunSynchronousCommand wcm:action="add">
<Order>1</Order>
<Path>reg add HKLM\System\Setup\LabConfig /v BypassTPMCheck /t reg_dword /d 0x00000001 /f</Path>
</RunSynchronousCommand>
<RunSynchronousCommand wcm:action="add">
<Order>2</Order>
<Path>reg add HKLM\System\Setup\LabConfig /v BypassSecureBootCheck /t reg_dword /d 0x00000001 /f</Path>
</RunSynchronousCommand>
<RunSynchronousCommand wcm:action="add">
<Order>3</Order>
<Path>reg add HKLM\System\Setup\LabConfig /v BypassRAMCheck /t reg_dword /d 0x00000001 /f</Path>
</RunSynchronousCommand>
<RunSynchronousCommand wcm:action="add">
<Order>5</Order>
<Path>reg add HKLM\System\Setup\LabConfig /v BypassCPUCheck /t reg_dword /d 0x00000001 /f</Path>
</RunSynchronousCommand>
<RunSynchronousCommand wcm:action="add">
<Order>4</Order>
<Path>reg add HKLM\System\Setup\LabConfig /v BypassStorageCheck /t reg_dword /d 0x00000001 /f</Path>
</RunSynchronousCommand>
</RunSynchronous>
</component>
</settings>
</unattend>
 
Last edited:

My Computer

System One

  • OS
    Windows 11
Bit of an effort when Rufus has an option to do it all for you.
 

My Computers

System One System Two

  • OS
    Windows 11 2xH2 (latest update ... forever anal)
    Computer type
    PC/Desktop
    Manufacturer/Model
    HP Slim S01
    CPU
    Intel i5-12400
    Memory
    8GB
    Graphics Card(s)
    NVIDIA GeForce GT730
    Sound Card
    OOBE
    Monitor(s) Displays
    Acer 32"
    Screen Resolution
    1920x1080
    Hard Drives
    512GB KIOXIA NVMe
    1TB SATA SSD
    PSU
    OOBE
    Case
    OOBE
    Cooling
    OOBE
    Keyboard
    BT
    Mouse
    BT
    Browser
    Brave FFox Chrome Opera
    Antivirus
    KIS
  • Operating System
    Windows 11 Pro 2xH2 (latest update ... 4ever anal)
    Computer type
    Laptop
    Manufacturer/Model
    HP Pavillion 15
    CPU
    i7-1165G7 @ 2.80GHz
    Graphics card(s)
    Intel Iris Xe Graphics
    Hard Drives
    Samsung NVMe 512GB
    + numerous/multiple SSD Type C USB enclosures
    Internet Speed
    NBN FTTN 50
    Browser
    Brave
    Antivirus
    KIS
EDIT: There are two things I forgot to mention about my sample answer file.

1) If you are skipping the disk configuration section in the answer file as I do (this is described below), make sure to add the following block as you see in the sample answer file:

<ImageInstall>
<OSImage>
<InstallFrom>
<Path>\install.wim</Path>
</InstallFrom>
</OSImage>
</ImageInstall>

2) This sample answer file is set to use a US Central Time time zone and assume US English for the locale.

End of Edit


Falcon, welcome to ElevenForum!

Let me provide two parts to you here. First are simply a copy of my personal notes on how to perform a clean install on unsupported hardware. Method 1 outlines the entries needed in the answer file.

Second, I'll provide a sample answer file that I use along with a little explanation.


* How to Bypass Windows 11 Installation Requirements with a Clean Install *

Note: All methods below have the same goal, which is to set registry entries in Windows PE to bypass the Windows setup requirements. This will NOT affect the final installation of Windows. It only affects the registry entries of Windows PE which is loaded in memory during setup.


* Method 1 - Using an Autounattend.xml Answer File *

Note: This answer file DOES NOT automate Windows installation. It ONLY sets the registry entries needed to bypass Win 11 requirements.

Create a new answer file or modify an existing answer file with the following entries:

Add the component Microsoft Windows Setup\RunSynchronos\RunSynchronousCommand to Pass 1 windowsPE

Set the following values:

Order: 1
Path: reg add HKLM\System\Setup\LabConfig /v BypassTPMCheck /t reg_dword /d 0x00000001 /f

Repeat the above steps 4 more times (for a total of 5 "RunSynchronousCommand" entries) with the following entries:

Order: 2
Path: reg add HKLM\System\Setup\LabConfig /v BypassSecureBootCheck /t reg_dword /d 0x00000001 /f

Order: 3
Path: reg add HKLM\System\Setup\LabConfig /v BypassRAMCheck /t reg_dword /d 0x00000001 /f

Order: 4
Path: reg add HKLM\System\Setup\LabConfig /v BypassStorageCheck /t reg_dword /d 0x00000001 /f

Order: 5
Path: reg add HKLM\System\Setup\LabConfig /v BypassCPUCheck /t reg_dword /d 0x00000001 /f


* Method 2 - Manually Modify the Registry for Windows Setup *

At the first static screen where Windows setup requests information from you during setup, press SHIFT + F10 to open a command prompt.

Type regedit and hit ENTER. Add the following entries:

HKLM\System\Setup\LabConfig BypassTPMCheck reg_dword 0x00000001
HKLM\System\Setup\LabConfig BypassSecureBootCheck reg_dword 0x00000001
HKLM\System\Setup\LabConfig BypassRAMCheck reg_dword 0x00000001
HKLM\System\Setup\LabConfig BypassStorageCheck reg_dword 0x00000001
HKLM\System\Setup\LabConfig BypassCPUCheck reg_dword 0x00000001

Close Registry Editor and the command prompt. Continue installation normally.


* Method 3 - Using a .reg file *

Create a test file with the extension .reg. Place the following in that file:

Windows Registry Editor Version 5.00

[HKEY_LOCAL_MACHINE\SYSTEM\Setup\LabConfig]
"BypassTPMCheck"=dword:00000001
"BypassSecureBootCheck"=dword:00000001
"BypassRAMCheck"=dword:00000001
"BypassStorageCheck"=dword:00000001
"BypassCPUCheck"=dword:00000001

Drop this registry file onto your install media. After starting setup, when you reach the first static screen where information is requested by setup, press Shift + F10 to open a command prompt. Navigate to the drive letter where the .reg file is located and then run it. Close the command prompt and continue installation of Windows as usual.

* Method 4 - Using a Batch File *

Create a text file with the extension .bat. Place the following in that file:

@echo off
reg add HKLM\System\Setup\LabConfig /v BypassTPMCheck /t reg_dword /d 0x00000001 /f > NUL
reg add HKLM\System\Setup\LabConfig /v BypassSecureBootCheck /t reg_dword /d 0x00000001 /f > NUL
reg add HKLM\System\Setup\LabConfig /v BypassRAMCheck /t reg_dword /d 0x00000001 /f > NUL
reg add HKLM\System\Setup\LabConfig /v BypassStorageCheck /t reg_dword /d 0x00000001 /f > NUL
reg add HKLM\System\Setup\LabConfig /v BypassCPUCheck /t reg_dword /d 0x00000001 /f > NUL

NOTE: The "> NUL" simply suppresses the output from being displayed for "silent" operation.

Drop this file onto your install media. After starting setup, when you reach the first static screen where information is requested by setup, press Shift + F10 to open a command prompt. Navigate to the drive letter where the .bat file is located and then run it. Close the command prompt and continue installation of Windows as usual.

* End of document "How to Bypass Windows 11 Installation Requirements with a Clean Install" *


Below is a sample autounattend.xml answer file that I use. Some notes about this answer file:

1) The disk section is removed from this answer file. This will result in setup asking for the location to which Windows should be installed after which the remainder of setup will proceed unattended. I do this because not all my systems use disk 0 for Windows.

2) This answer file creates one admin level user by the name of WinUser with a full name of "Windows User" and a password of "Password1". Please modify as you see fit.

3) The main section of interest in this answer file is the <RunSynchronous> section as this is where the entries to bypass unsupported hardware are located.

4) The key used in this answer file will install Windows 11 PRO. Note that this same answer file can still be used with Win 10. The settings have no effect on Win 10 setup.

TIP: For a VM, you do not need to add the answer file to you Windows ISO image if you don't wish to modify it. You can simply create a new ISO image with nothing in it but the answer file and mount it as if it was a second DVD drive. This works because setup looks for an answer file on all accessible drives at startup.

Code:
<?xml version="1.0" encoding="utf-8"?>
<unattend xmlns="urn:schemas-microsoft-com:unattend">
    <settings pass="windowsPE">
        <component name="Microsoft-Windows-International-Core-WinPE" processorArchitecture="amd64" publicKeyToken="31bf3856ad364e35" language="neutral" versionScope="nonSxS" xmlns:wcm="http://schemas.microsoft.com/WMIConfig/2002/State" xmlns:xsi="http://www.w3.org/2001/XMLSchema-instance">
            <SetupUILanguage>
                <UILanguage>en-US</UILanguage>
            </SetupUILanguage>
            <InputLocale>en-US</InputLocale>
            <SystemLocale>en-US</SystemLocale>
            <UILanguage>en-US</UILanguage>
            <UILanguageFallback>en-US</UILanguageFallback>
            <UserLocale>en-US</UserLocale>
        </component>
        <component name="Microsoft-Windows-Setup" processorArchitecture="amd64" publicKeyToken="31bf3856ad364e35" language="neutral" versionScope="nonSxS" xmlns:wcm="http://schemas.microsoft.com/WMIConfig/2002/State" xmlns:xsi="http://www.w3.org/2001/XMLSchema-instance">
            <ImageInstall>
                <OSImage>
                    <InstallFrom>
                        <Path>\install.wim</Path>
                    </InstallFrom>
                </OSImage>
            </ImageInstall>
            <UserData>
                <ProductKey>
                    <Key>VK7JG-NPHTM-C97JM-9MPGT-3V66T</Key>
                </ProductKey>
                <AcceptEula>true</AcceptEula>
            </UserData>
            <RunSynchronous>
                <RunSynchronousCommand wcm:action="add">
                    <Order>1</Order>
                    <Path>reg add HKLM\System\Setup\LabConfig /v BypassTPMCheck /t reg_dword /d 0x00000001 /f</Path>
                </RunSynchronousCommand>
                <RunSynchronousCommand wcm:action="add">
                    <Order>2</Order>
                    <Path>reg add HKLM\System\Setup\LabConfig /v BypassSecureBootCheck /t reg_dword /d 0x00000001 /f</Path>
                </RunSynchronousCommand>
                <RunSynchronousCommand wcm:action="add">
                    <Order>3</Order>
                    <Path>reg add HKLM\System\Setup\LabConfig /v BypassRAMCheck /t reg_dword /d 0x00000001 /f</Path>
                </RunSynchronousCommand>
                <RunSynchronousCommand wcm:action="add">
                    <Order>5</Order>
                    <Path>reg add HKLM\System\Setup\LabConfig /v BypassCPUCheck /t reg_dword /d 0x00000001 /f</Path>
                </RunSynchronousCommand>
                <RunSynchronousCommand wcm:action="add">
                    <Order>4</Order>
                    <Path>reg add HKLM\System\Setup\LabConfig /v BypassStorageCheck /t reg_dword /d 0x00000001 /f</Path>
                </RunSynchronousCommand>
            </RunSynchronous>
        </component>
    </settings>
    <settings pass="oobeSystem">
        <component name="Microsoft-Windows-International-Core" processorArchitecture="amd64" publicKeyToken="31bf3856ad364e35" language="neutral" versionScope="nonSxS" xmlns:wcm="http://schemas.microsoft.com/WMIConfig/2002/State" xmlns:xsi="http://www.w3.org/2001/XMLSchema-instance">
            <InputLocale>en-US</InputLocale>
            <SystemLocale>en-US</SystemLocale>
            <UILanguage>en-US</UILanguage>
            <UILanguageFallback>en-US</UILanguageFallback>
            <UserLocale>en-US</UserLocale>
        </component>
        <component name="Microsoft-Windows-Shell-Setup" processorArchitecture="amd64" publicKeyToken="31bf3856ad364e35" language="neutral" versionScope="nonSxS" xmlns:wcm="http://schemas.microsoft.com/WMIConfig/2002/State" xmlns:xsi="http://www.w3.org/2001/XMLSchema-instance">
            <OOBE>
                <HideEULAPage>true</HideEULAPage>
                <HideOEMRegistrationScreen>true</HideOEMRegistrationScreen>
                <HideOnlineAccountScreens>true</HideOnlineAccountScreens>
                <HideWirelessSetupInOOBE>true</HideWirelessSetupInOOBE>
                <ProtectYourPC>1</ProtectYourPC>
                <UnattendEnableRetailDemo>false</UnattendEnableRetailDemo>
            </OOBE>
            <UserAccounts>
                <LocalAccounts>
                    <LocalAccount wcm:action="add">
                        <Password>
                            <Value>UABhAHMAcwB3AG8AcgBkADEAUABhAHMAcwB3AG8AcgBkAA==</Value>
                            <PlainText>false</PlainText>
                        </Password>
                        <DisplayName>Windows User</DisplayName>
                        <Group>Administrators</Group>
                        <Name>WinUser</Name>
                    </LocalAccount>
                </LocalAccounts>
            </UserAccounts>
            <TimeZone>Central Standard Time</TimeZone>
            <AutoLogon>
                <Password>
                    <Value>UABhAHMAcwB3AG8AcgBkADEAUABhAHMAcwB3AG8AcgBkAA==</Value>
                    <PlainText>false</PlainText>
                </Password>
                <Enabled>true</Enabled>
                <LogonCount>1</LogonCount>
                <Username>WinUser</Username>
            </AutoLogon>
            <FirstLogonCommands>
                <SynchronousCommand wcm:action="add">
                    <CommandLine>reg add &quot;HKLM\SOFTWARE\Microsoft\Windows NT\CurrentVersion\Winlogon&quot; /v AutoLogonCount /t REG_DWORD /d 0 /f</CommandLine>
                    <Order>1</Order>
                </SynchronousCommand>
            </FirstLogonCommands>
        </component>
    </settings>
    <settings pass="specialize">
        <component name="Microsoft-Windows-Shell-Setup" processorArchitecture="amd64" publicKeyToken="31bf3856ad364e35" language="neutral" versionScope="nonSxS" xmlns:wcm="http://schemas.microsoft.com/WMIConfig/2002/State" xmlns:xsi="http://www.w3.org/2001/XMLSchema-instance">
            <OEMInformation>
                <Manufacturer></Manufacturer>
                <SupportHours></SupportHours>
                <SupportPhone></SupportPhone>
                <SupportURL></SupportURL>
            </OEMInformation>
            <OEMName></OEMName>
            <TimeZone>Central Standard Time</TimeZone>
        </component>
    </settings>
    <cpi:offlineImage cpi:source="wim://pyromania/windrive$iso_files/sources/install.wim#Windows 10 Pro" xmlns:cpi="urn:schemas-microsoft-com:cpi" />
</unattend>
 
Last edited:

My Computers

System One System Two

  • OS
    Win11 Pro 24H2
    Computer type
    PC/Desktop
    Manufacturer/Model
    Kamrui Mini PC, Model CK10
    CPU
    Intel i5-12450H
    Memory
    32GB
    Graphics Card(s)
    No GPU - Built-in Intel Graphics
    Sound Card
    Integrated
    Monitor(s) Displays
    HP Envy 32
    Screen Resolution
    2560 x 1440
    Hard Drives
    1 x 2TB NVMe SSD
    1 x 4TB NVMe SSD
    1 x 4TB 2.5" SSD
    PSU
    120W "Brick"
    Keyboard
    Corsair K70 Mechanical Keyboard
    Mouse
    Logitech MX Master 3
    Internet Speed
    1Gb Up / 1 Gb Down
    Browser
    Edge
    Antivirus
    Windows Defender
  • Operating System
    Win11 Pro 23H2
    Computer type
    Laptop
    Manufacturer/Model
    Lenovo ThinkBook 13x Gen 2
    CPU
    Intel i7-1255U
    Memory
    16 GB
    Graphics card(s)
    Intel Iris Xe Graphics
    Sound Card
    Realtek® ALC3306-CG codec
    Monitor(s) Displays
    13.3-inch IPS Display
    Screen Resolution
    WQXGA (2560 x 1600)
    Hard Drives
    2 TB 4 x 4 NVMe SSD
    PSU
    USB-C / Thunderbolt 4 Power / Charging
    Mouse
    Buttonless Glass Precision Touchpad
    Keyboard
    Backlit, spill resistant keyboard
    Internet Speed
    1Gb Up / 1Gb Down
    Browser
    Edge
    Antivirus
    Windows Defender
    Other Info
    WiFi 6e / Bluetooth 5.1 / Facial Recognition / Fingerprint Sensor / ToF (Time of Flight) Human Presence Sensor
Bit of an effort when Rufus has an option to do it all for you.
If you are doing an unattended installation anyway, then it's really no effort at all. Besides, some people, like me, like to know how to do this with no third-party utilities at all.
 

My Computers

System One System Two

  • OS
    Win11 Pro 24H2
    Computer type
    PC/Desktop
    Manufacturer/Model
    Kamrui Mini PC, Model CK10
    CPU
    Intel i5-12450H
    Memory
    32GB
    Graphics Card(s)
    No GPU - Built-in Intel Graphics
    Sound Card
    Integrated
    Monitor(s) Displays
    HP Envy 32
    Screen Resolution
    2560 x 1440
    Hard Drives
    1 x 2TB NVMe SSD
    1 x 4TB NVMe SSD
    1 x 4TB 2.5" SSD
    PSU
    120W "Brick"
    Keyboard
    Corsair K70 Mechanical Keyboard
    Mouse
    Logitech MX Master 3
    Internet Speed
    1Gb Up / 1 Gb Down
    Browser
    Edge
    Antivirus
    Windows Defender
  • Operating System
    Win11 Pro 23H2
    Computer type
    Laptop
    Manufacturer/Model
    Lenovo ThinkBook 13x Gen 2
    CPU
    Intel i7-1255U
    Memory
    16 GB
    Graphics card(s)
    Intel Iris Xe Graphics
    Sound Card
    Realtek® ALC3306-CG codec
    Monitor(s) Displays
    13.3-inch IPS Display
    Screen Resolution
    WQXGA (2560 x 1600)
    Hard Drives
    2 TB 4 x 4 NVMe SSD
    PSU
    USB-C / Thunderbolt 4 Power / Charging
    Mouse
    Buttonless Glass Precision Touchpad
    Keyboard
    Backlit, spill resistant keyboard
    Internet Speed
    1Gb Up / 1Gb Down
    Browser
    Edge
    Antivirus
    Windows Defender
    Other Info
    WiFi 6e / Bluetooth 5.1 / Facial Recognition / Fingerprint Sensor / ToF (Time of Flight) Human Presence Sensor
Falcon, if you have already read my post, please recheck the start of the post. I edited it to add two items I forgot to mention when I first posted it.
 

My Computers

System One System Two

  • OS
    Win11 Pro 24H2
    Computer type
    PC/Desktop
    Manufacturer/Model
    Kamrui Mini PC, Model CK10
    CPU
    Intel i5-12450H
    Memory
    32GB
    Graphics Card(s)
    No GPU - Built-in Intel Graphics
    Sound Card
    Integrated
    Monitor(s) Displays
    HP Envy 32
    Screen Resolution
    2560 x 1440
    Hard Drives
    1 x 2TB NVMe SSD
    1 x 4TB NVMe SSD
    1 x 4TB 2.5" SSD
    PSU
    120W "Brick"
    Keyboard
    Corsair K70 Mechanical Keyboard
    Mouse
    Logitech MX Master 3
    Internet Speed
    1Gb Up / 1 Gb Down
    Browser
    Edge
    Antivirus
    Windows Defender
  • Operating System
    Win11 Pro 23H2
    Computer type
    Laptop
    Manufacturer/Model
    Lenovo ThinkBook 13x Gen 2
    CPU
    Intel i7-1255U
    Memory
    16 GB
    Graphics card(s)
    Intel Iris Xe Graphics
    Sound Card
    Realtek® ALC3306-CG codec
    Monitor(s) Displays
    13.3-inch IPS Display
    Screen Resolution
    WQXGA (2560 x 1600)
    Hard Drives
    2 TB 4 x 4 NVMe SSD
    PSU
    USB-C / Thunderbolt 4 Power / Charging
    Mouse
    Buttonless Glass Precision Touchpad
    Keyboard
    Backlit, spill resistant keyboard
    Internet Speed
    1Gb Up / 1Gb Down
    Browser
    Edge
    Antivirus
    Windows Defender
    Other Info
    WiFi 6e / Bluetooth 5.1 / Facial Recognition / Fingerprint Sensor / ToF (Time of Flight) Human Presence Sensor
I saw it thanks.

I live in the Netherlands.
Must i edit a few lines to make it standaard dutch?

Like timezone and language?
<InputLocale>nl-nl</InputLocale>
 

My Computer

System One

  • OS
    Windows 11
can someone share an attachment of the Autounattend.xml file (for a clean install)

I am a newbie in XML :(
Falcon, that's what I attached. It's a copy for a clean install. However, let me also make a suggestion:

You can create your own answer file completely customized to your needs. If you want to do that, let me know. I'll have some questions then to determine exactly what you wish to do and can then provide you with some very detailed guidance.

NOTE: I'll be offline for a few hours now as I get some sleep, but I'll respond as soon as I can.
 

My Computers

System One System Two

  • OS
    Win11 Pro 24H2
    Computer type
    PC/Desktop
    Manufacturer/Model
    Kamrui Mini PC, Model CK10
    CPU
    Intel i5-12450H
    Memory
    32GB
    Graphics Card(s)
    No GPU - Built-in Intel Graphics
    Sound Card
    Integrated
    Monitor(s) Displays
    HP Envy 32
    Screen Resolution
    2560 x 1440
    Hard Drives
    1 x 2TB NVMe SSD
    1 x 4TB NVMe SSD
    1 x 4TB 2.5" SSD
    PSU
    120W "Brick"
    Keyboard
    Corsair K70 Mechanical Keyboard
    Mouse
    Logitech MX Master 3
    Internet Speed
    1Gb Up / 1 Gb Down
    Browser
    Edge
    Antivirus
    Windows Defender
  • Operating System
    Win11 Pro 23H2
    Computer type
    Laptop
    Manufacturer/Model
    Lenovo ThinkBook 13x Gen 2
    CPU
    Intel i7-1255U
    Memory
    16 GB
    Graphics card(s)
    Intel Iris Xe Graphics
    Sound Card
    Realtek® ALC3306-CG codec
    Monitor(s) Displays
    13.3-inch IPS Display
    Screen Resolution
    WQXGA (2560 x 1600)
    Hard Drives
    2 TB 4 x 4 NVMe SSD
    PSU
    USB-C / Thunderbolt 4 Power / Charging
    Mouse
    Buttonless Glass Precision Touchpad
    Keyboard
    Backlit, spill resistant keyboard
    Internet Speed
    1Gb Up / 1Gb Down
    Browser
    Edge
    Antivirus
    Windows Defender
    Other Info
    WiFi 6e / Bluetooth 5.1 / Facial Recognition / Fingerprint Sensor / ToF (Time of Flight) Human Presence Sensor
I saw it thanks.

I live in the Netherlands.
Must i edit a few lines to make it standaard dutch?

Like timezone and language?
<InputLocale>nl-nl</InputLocale>
Yes - you will need to make some modifications. My suggestion is that you install the Windows ADK (only the deployment tools option is needed) as it has a graphical tool called "Windows System Image Manager" specifically for the purpose of making these modifications easy.

However, I'm going to give you even more customized guidance :-).

In the meantime, please look at this fantastic tutorial:


You need only glance at it for now, because depending upon what your goals are we will likely modify some steps in that tutorial to actually make it easier for you.

However, as I noted, I'm going to get a bit of sleep. I should be responding back in approximately 4 hours. I hope that's okay :-).
 

My Computers

System One System Two

  • OS
    Win11 Pro 24H2
    Computer type
    PC/Desktop
    Manufacturer/Model
    Kamrui Mini PC, Model CK10
    CPU
    Intel i5-12450H
    Memory
    32GB
    Graphics Card(s)
    No GPU - Built-in Intel Graphics
    Sound Card
    Integrated
    Monitor(s) Displays
    HP Envy 32
    Screen Resolution
    2560 x 1440
    Hard Drives
    1 x 2TB NVMe SSD
    1 x 4TB NVMe SSD
    1 x 4TB 2.5" SSD
    PSU
    120W "Brick"
    Keyboard
    Corsair K70 Mechanical Keyboard
    Mouse
    Logitech MX Master 3
    Internet Speed
    1Gb Up / 1 Gb Down
    Browser
    Edge
    Antivirus
    Windows Defender
  • Operating System
    Win11 Pro 23H2
    Computer type
    Laptop
    Manufacturer/Model
    Lenovo ThinkBook 13x Gen 2
    CPU
    Intel i7-1255U
    Memory
    16 GB
    Graphics card(s)
    Intel Iris Xe Graphics
    Sound Card
    Realtek® ALC3306-CG codec
    Monitor(s) Displays
    13.3-inch IPS Display
    Screen Resolution
    WQXGA (2560 x 1600)
    Hard Drives
    2 TB 4 x 4 NVMe SSD
    PSU
    USB-C / Thunderbolt 4 Power / Charging
    Mouse
    Buttonless Glass Precision Touchpad
    Keyboard
    Backlit, spill resistant keyboard
    Internet Speed
    1Gb Up / 1Gb Down
    Browser
    Edge
    Antivirus
    Windows Defender
    Other Info
    WiFi 6e / Bluetooth 5.1 / Facial Recognition / Fingerprint Sensor / ToF (Time of Flight) Human Presence Sensor
Which one of these two options do you want to use?

1) Just an unattended setup of Windows

This is the easier option. It will install Windows automatically for you. All the questions that you would normally answer during Windows setup such as the language to use, the time zone, etc. will be automatically answered by the autounattend answer file that you are creating. However, this option will not customize Windows beyond that.

2) Fully customized Windows

This option will also install Windows for you automatically, but it will also allow you to install a completely customized version of Windows. This option requires a lot more work because you will need to first install Windows on another computer or a VM. This installation is known as the "reference system". Once Windows is installed on the reference system you modify it by making any changes to settings within Windows that you want. For example, personalization settings, light or dark mode themes, and any other settings that you want. You can also install applications. You just cannot install Modern UI apps from the Microsoft store.

You then create an image of that reference machine and save that image.

In addition, rather than having one answer file, you will create two answer files (autounattend.xml and unattend.xml).

End of Option Number 2
------------

The tutorial that I linked to before, and that I have also linked to at the end of this post, is designed to step you through option number 2 above. Below, I am going to tell you what you need to do if you want option number 1. For option number 2 you would simply follow the tutorial exactly as it is except that you will need to add a few items to your answer file if you plan to install Windows 11 on hardware that is not supported by Windows 11.

Go to either Option Number 1 or Option Number 2 below now.

Option Number 1
---------------

For this option, begin by following the steps in the tutorial. You can ignore any references to the reference machine because you will not need it.

Continue following the steps in the tutorial up to and including step 3.18.

Once you have completed step 3.18, skip to Part Four. This section will tell you to create a new answer file. DO NOT DO THIS! Instead, just keep adding the items listed there to the autounattend.xml answer file you have already been working on.

When you get to step 4.3 set all the items as shown in that step but DO NOT SET COPYPROFILE. Leave CopyProfile blank.

Continue following the steps up to and including step 4.8.

Go back to step 3.19 and continue to the end of section 3 to validate and save your answer file.

If you want to add the items necessary to install Windows 11 on unsupported hardware, skip to "Bypass Windows 11 Hardware Requirements" below. Otherwise, go to "Finishing Up".


Option Number 2
---------------

For this option, simply follow the tutorial as it is since that is what the tutorial is designed for.

When done, before you install Windows from this new image, if you want to add the items necessary to install Windows 11 on unsupported hardware, skip to "Bypass Windows 11 Hardware Requirements" below. Otherwise, go to "Finishing Up".

Bypass Windows 11 Hardware Requirements
---------------------------------------

If your answer file will be used to install Windows 11 on systems that do not meet the Windows 11 requirements, you can bypass the requirement checks by adding the following entries.

NOTE: It's okay to add these settings even if you use hardware that meets requirements and for Windows 10, it just won't have any effect for Windows 10 or systems meeting requirements. By adding these settings, the same answer file can be used for many different deployments.

Start by opening your autounattend.xml answer file in the Windows System Image Manager if you have already closed it.

In the Windows Image pane expand Setup > RunSynchronous. Right click on RunSynchronousCommand and add to Pass 1 windowsPE.

Add another 4 RunSynchronousCommand entries (for a total of 5).

In the Answer File pane, select the Setup > RunSynchronous > RunSynchronousCommand entries one at a time and set the following values:

NOTE: The path entries are long, and they may wrap to a second line below.

Order: 1
Path: reg add HKLM\System\Setup\LabConfig /v BypassTPMCheck /t reg_dword /d 0x00000001 /f

Order: 2
Path: reg add HKLM\System\Setup\LabConfig /v BypassSecureBootCheck /t reg_dword /d 0x00000001 /f

Order: 3
Path: reg add HKLM\System\Setup\LabConfig /v BypassRAMCheck /t reg_dword /d 0x00000001 /f

Order: 4
Path: reg add HKLM\System\Setup\LabConfig /v BypassStorageCheck /t reg_dword /d 0x00000001 /f

Order: 5
Path: reg add HKLM\System\Setup\LabConfig /v BypassCPUCheck /t reg_dword /d 0x00000001 /f

As you did before, remove any unused blocks (if there are any), validate the answer file, and save it.

Continue with "Finishing Up" below.


Finishing Up
------------

If you were following Option Number 2, it should have already told you everything that you need to do to install your customized Windows. If you are installing Windows 11 on unsupported hardware, just make sure that you are using the autounattend.xml modified to bypass the hardware checks.

For Option Number 1, make sure to copy that autounattend.xml to the root of your boot media, or your ISO image file.

Questions? If you have any questions at all, please do let me know and I'll be happy to help.

Once you have gone through this process successfully, let me know as I have a few more tips to share, I just didn't want to throw it all at you at once because it's a lot of information.

For your reference, here is a link to that tutorial:

 
Last edited:

My Computers

System One System Two

  • OS
    Win11 Pro 24H2
    Computer type
    PC/Desktop
    Manufacturer/Model
    Kamrui Mini PC, Model CK10
    CPU
    Intel i5-12450H
    Memory
    32GB
    Graphics Card(s)
    No GPU - Built-in Intel Graphics
    Sound Card
    Integrated
    Monitor(s) Displays
    HP Envy 32
    Screen Resolution
    2560 x 1440
    Hard Drives
    1 x 2TB NVMe SSD
    1 x 4TB NVMe SSD
    1 x 4TB 2.5" SSD
    PSU
    120W "Brick"
    Keyboard
    Corsair K70 Mechanical Keyboard
    Mouse
    Logitech MX Master 3
    Internet Speed
    1Gb Up / 1 Gb Down
    Browser
    Edge
    Antivirus
    Windows Defender
  • Operating System
    Win11 Pro 23H2
    Computer type
    Laptop
    Manufacturer/Model
    Lenovo ThinkBook 13x Gen 2
    CPU
    Intel i7-1255U
    Memory
    16 GB
    Graphics card(s)
    Intel Iris Xe Graphics
    Sound Card
    Realtek® ALC3306-CG codec
    Monitor(s) Displays
    13.3-inch IPS Display
    Screen Resolution
    WQXGA (2560 x 1600)
    Hard Drives
    2 TB 4 x 4 NVMe SSD
    PSU
    USB-C / Thunderbolt 4 Power / Charging
    Mouse
    Buttonless Glass Precision Touchpad
    Keyboard
    Backlit, spill resistant keyboard
    Internet Speed
    1Gb Up / 1Gb Down
    Browser
    Edge
    Antivirus
    Windows Defender
    Other Info
    WiFi 6e / Bluetooth 5.1 / Facial Recognition / Fingerprint Sensor / ToF (Time of Flight) Human Presence Sensor
last question:
Where must i put Cab-files for an up to date version?
I have putted for example KB5012604 in folder \sources\sxs\
but it gives an error when finalising the setup

Must i put it in folder \updates\ ?

or can i only add it with a tool like DISM GUI?
 
Last edited:

My Computer

System One

  • OS
    Windows 11
I looked up the KB that you referenced and that is the April Cumulative Update. Just for clarification, that is not a .CAB file, it bears the extension of .MSU.

You cannot simply drop the file into a folder. The cumulative update needs to be applied using DISM. After applying the update a cleanup process and finally an export should be performed.

I have a LOT of experience with this so that's something I can guide you through, but I also have a lot of resources available.

Tell me which of the following you would be interested in (you can pick more than one!).

1) Instructions on how to manually run the commands to apply the cumulative update to your Windows image.

2) A batch file that I created that will automate the whole process for you.

3) A program I wrote that can automate the process but can also do WAY more. For example, with the batch file, it can update only a single edition of Windows. So, say you have an ISO image with Windows Home, Pro, Education, etc. The batch file will update only one edition. The program can automatically update any number of Windows editions and do just about everything else you could ever want to do with a Windows image.

BTW, I noticed that you said "last question". This is a pretty advanced topic and there is a lot to it. It took me a couple of years to get all the processes for unattended installation and injecting updates into Windows images, etc. down to a science. So, if you have more questions please do not hesitate to ask. I don't care if you have 500 questions! I'll answer each and every one as best as I can.
 

My Computers

System One System Two

  • OS
    Win11 Pro 24H2
    Computer type
    PC/Desktop
    Manufacturer/Model
    Kamrui Mini PC, Model CK10
    CPU
    Intel i5-12450H
    Memory
    32GB
    Graphics Card(s)
    No GPU - Built-in Intel Graphics
    Sound Card
    Integrated
    Monitor(s) Displays
    HP Envy 32
    Screen Resolution
    2560 x 1440
    Hard Drives
    1 x 2TB NVMe SSD
    1 x 4TB NVMe SSD
    1 x 4TB 2.5" SSD
    PSU
    120W "Brick"
    Keyboard
    Corsair K70 Mechanical Keyboard
    Mouse
    Logitech MX Master 3
    Internet Speed
    1Gb Up / 1 Gb Down
    Browser
    Edge
    Antivirus
    Windows Defender
  • Operating System
    Win11 Pro 23H2
    Computer type
    Laptop
    Manufacturer/Model
    Lenovo ThinkBook 13x Gen 2
    CPU
    Intel i7-1255U
    Memory
    16 GB
    Graphics card(s)
    Intel Iris Xe Graphics
    Sound Card
    Realtek® ALC3306-CG codec
    Monitor(s) Displays
    13.3-inch IPS Display
    Screen Resolution
    WQXGA (2560 x 1600)
    Hard Drives
    2 TB 4 x 4 NVMe SSD
    PSU
    USB-C / Thunderbolt 4 Power / Charging
    Mouse
    Buttonless Glass Precision Touchpad
    Keyboard
    Backlit, spill resistant keyboard
    Internet Speed
    1Gb Up / 1Gb Down
    Browser
    Edge
    Antivirus
    Windows Defender
    Other Info
    WiFi 6e / Bluetooth 5.1 / Facial Recognition / Fingerprint Sensor / ToF (Time of Flight) Human Presence Sensor
me again :)

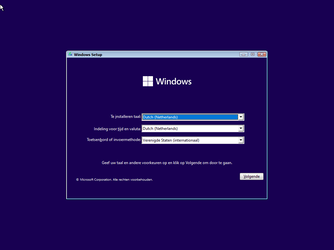
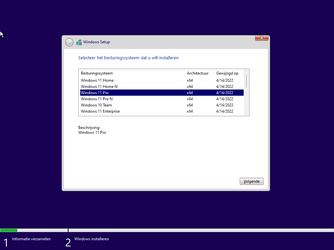
How can i make a multiple setup screen like this and where is this option in a file stored?

i need only English and dutch language in the opening screen
Windows 10 (2)-2022-04-17-11-23-50.png
 

Attachments

  • Windows 10 (2)-2022-04-17-11-24-38.png
    Windows 10 (2)-2022-04-17-11-24-38.png
    8.5 KB · Views: 2

My Computer

System One

  • OS
    Windows 11
Falcon, I've really only worked with the US English language editions of Windows, I have to admit that I've not worked with other languages, but I'll try my best to see if I can figure this out.

To start, could you tell me exactly how you get to that screen in your screenshot (The one that has the option "My language is English, etc.)? I assume that this must be from an international edition of Windows, is that correct? Does that screen come up before the screen in your other screenshot?

So again, I'll try my best to get you an answer. I think that I know what needs to be done, but it will take me some time to experiment and verify that what I am thinking is correct.
 

My Computers

System One System Two

  • OS
    Win11 Pro 24H2
    Computer type
    PC/Desktop
    Manufacturer/Model
    Kamrui Mini PC, Model CK10
    CPU
    Intel i5-12450H
    Memory
    32GB
    Graphics Card(s)
    No GPU - Built-in Intel Graphics
    Sound Card
    Integrated
    Monitor(s) Displays
    HP Envy 32
    Screen Resolution
    2560 x 1440
    Hard Drives
    1 x 2TB NVMe SSD
    1 x 4TB NVMe SSD
    1 x 4TB 2.5" SSD
    PSU
    120W "Brick"
    Keyboard
    Corsair K70 Mechanical Keyboard
    Mouse
    Logitech MX Master 3
    Internet Speed
    1Gb Up / 1 Gb Down
    Browser
    Edge
    Antivirus
    Windows Defender
  • Operating System
    Win11 Pro 23H2
    Computer type
    Laptop
    Manufacturer/Model
    Lenovo ThinkBook 13x Gen 2
    CPU
    Intel i7-1255U
    Memory
    16 GB
    Graphics card(s)
    Intel Iris Xe Graphics
    Sound Card
    Realtek® ALC3306-CG codec
    Monitor(s) Displays
    13.3-inch IPS Display
    Screen Resolution
    WQXGA (2560 x 1600)
    Hard Drives
    2 TB 4 x 4 NVMe SSD
    PSU
    USB-C / Thunderbolt 4 Power / Charging
    Mouse
    Buttonless Glass Precision Touchpad
    Keyboard
    Backlit, spill resistant keyboard
    Internet Speed
    1Gb Up / 1Gb Down
    Browser
    Edge
    Antivirus
    Windows Defender
    Other Info
    WiFi 6e / Bluetooth 5.1 / Facial Recognition / Fingerprint Sensor / ToF (Time of Flight) Human Presence Sensor
Falcon, I've really only worked with the US English language editions of Windows, I have to admit that I've not worked with other languages, but I'll try my best to see if I can figure this out.

To start, could you tell me exactly how you get to that screen in your screenshot (The one that has the option "My language is English, etc.)? I assume that this must be from an international edition of Windows, is that correct? Does that screen come up before the screen in your other screenshot?

So again, I'll try my best to get you an answer. I think that I know what needs to be done, but it will take me some time to experiment and verify that what I am thinking is correct.
1) I want a selection so i can only see : my language is english and mijn taal is Nederlands
This is the opening screen when i start the setup (LanguageFallback??)
2) The selection screen for default keyboard or language UI can i also make with this (i think)

And yes this is a special edition of windows 11
 

Attachments

  • Windows 11-2022-04-17-14-27-39.png
    Windows 11-2022-04-17-14-27-39.png
    9.9 KB · Views: 3

My Computer

System One

  • OS
    Windows 11
When you say that this is a special edition of Windows, could you please clarify? Is this an official Microsoft download of Windows or an image of Windows that someone has modified that gives you the screen with options such as "my language is english and mijn taal is Nederlands"?

If this is something that someone else has customized, I wouldn't be able to tell you how to change the language options displayed by that screen because I don't know what they did to display it :-)

If your goal is to remove specific languages from your image, you need to follow the steps in this article under the section called "Remove languages, LIPs, LXPs, and Features on Demand":


However, this thread started as a discussion of unattended setup. If your goal is simply to install Windows with settings for the Netherlands using unattended setup, then the tutorial I've previously linked to specifically states how to accomplish this when you create your answer file.
 

My Computers

System One System Two

  • OS
    Win11 Pro 24H2
    Computer type
    PC/Desktop
    Manufacturer/Model
    Kamrui Mini PC, Model CK10
    CPU
    Intel i5-12450H
    Memory
    32GB
    Graphics Card(s)
    No GPU - Built-in Intel Graphics
    Sound Card
    Integrated
    Monitor(s) Displays
    HP Envy 32
    Screen Resolution
    2560 x 1440
    Hard Drives
    1 x 2TB NVMe SSD
    1 x 4TB NVMe SSD
    1 x 4TB 2.5" SSD
    PSU
    120W "Brick"
    Keyboard
    Corsair K70 Mechanical Keyboard
    Mouse
    Logitech MX Master 3
    Internet Speed
    1Gb Up / 1 Gb Down
    Browser
    Edge
    Antivirus
    Windows Defender
  • Operating System
    Win11 Pro 23H2
    Computer type
    Laptop
    Manufacturer/Model
    Lenovo ThinkBook 13x Gen 2
    CPU
    Intel i7-1255U
    Memory
    16 GB
    Graphics card(s)
    Intel Iris Xe Graphics
    Sound Card
    Realtek® ALC3306-CG codec
    Monitor(s) Displays
    13.3-inch IPS Display
    Screen Resolution
    WQXGA (2560 x 1600)
    Hard Drives
    2 TB 4 x 4 NVMe SSD
    PSU
    USB-C / Thunderbolt 4 Power / Charging
    Mouse
    Buttonless Glass Precision Touchpad
    Keyboard
    Backlit, spill resistant keyboard
    Internet Speed
    1Gb Up / 1Gb Down
    Browser
    Edge
    Antivirus
    Windows Defender
    Other Info
    WiFi 6e / Bluetooth 5.1 / Facial Recognition / Fingerprint Sensor / ToF (Time of Flight) Human Presence Sensor

Latest Support Threads

Back
Top Bottom