This tutorial will show you how to calibrate the color, brightness, and contrast of a display in Windows 10 and Windows 11.
You can improve the color on your display by using Display Color Calibration to make sure that colors appear accurately on your display.
You must be signed in as an administrator to use Display Color Calibration.
Contents
- Option One: Calibrate Display Color, Brightness, and Contrast from Color Management
- Option Two: Calibrate Display Color, Brightness, and Contrast from Settings
- Option Three: Calibrate Display Color, Brightness, and Contrast using Display Color Calibration
1 Perform one of the following actions to open Color Management.
- Run (Win+R) colorcpl.exe.
- Open the Control Panel (icons view), and click/tap on the Color Management icon.
3 Under Display Calibration, click/tap on the Calibrate display button.
4 Continue at option 3 step 2.
This option is only available starting with Windows 11 build 26052 (Canary and Dev).
1 Open Settings (Win+I).
2 Click/tap on System on the left side, and click/tap on Display on the right side. (see screenshot below)
3 Click/tap Color profile. (see screenshot below)
4 Under Color calibration, click/tap on the Calibrate display button.
5 Continue at option 3 step 2.
1 Open Display Color Calibration (dccw.exe).
2 If you have more than one display, move the Display Color Calibration window onto the display you want to calibrate, and click/tap on Next. (see screenshot below)
If you only have one display, then you would just click/tap on Next.
3 If your display has a menu option, then return your display to the factory default color settings before you click/tap on Next. If your display (ex: on laptop) doesn't have a menu option, then you can just click/tap on Next. (see screenshot below)
4 Look at the gamma examples, and click/tap on Next to adjust gamma in the next step. (see screenshot below)
5 Move the slider to adjust gamma to minimize the visibility of the small dots in the middle of each circle, and click/tap on Next when it looks like the good example in step 4. (see screenshot below)
6 Find the brightness and contrast controls for your display, and click/tap on Next to continue. (see screenshot below)
If you don't have brightness and contrast controls for your display (ex: laptop), then click/tap on the Skip brightness and contrast adjustment button, and go to step 11 below.
7 Look at the brightness examples, and click/tap on Next to adjust brightness in the next step. (see screenshot below)
8 Adjust the brightness control on your display until you can distinguish the shirt from the suit with the X barely visible, and click/tap on Next when it looks like the good example in step 7. (see screenshot below)
9 Look at the contrast examples, and click/tap on Next to adjust contrast in the next step. (see screenshot below)
10 Adjust the contrast control on your display to set the contrast as high as possible without losing the ability to see wrinkles and buttons on the shirt, and click/tap on Next when it looks like the good example in step 9. (see screenshot below)
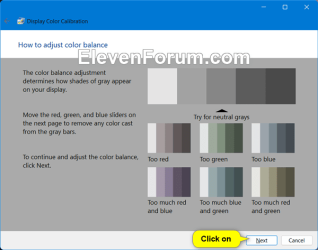
11 Look at the color balance examples, and click/tap on Next to adjust color balance in the next step. (see screenshot below)
12 Move the red, green, and blue sliders to remove any color cast from the gray bars, and click/tap on Next when it looks like the top good example in step 11. (see screenshot below)
13 Check or uncheck the Start ClearType Tuner when I click Finish to ensure that text appears correctly box for what you want, and click/tap on Finish to save and use this new calibration for this specific display. (see screenshot below)
That's it,
Shawn Brink
Related Tutorials
- Calibrate Built-in Display for HDR Video in Windows 11
- Calibrate HDR display using Windows HDR Calibration app in Windows 11
- Change HDR or SDR Content Brightness for HDR Display in Windows 11
- Enable or Disable Auto Color Management for Apps in Windows 11
- Change Display Color Profile in Windows 11
- Enable or Disable Adaptive Color in Windows 11
Attachments
Last edited: