- Local time
- 9:55 AM
- Posts
- 41
- OS
- Windows 11
You can still use the Microsoft's Devices and Printers Metadata Authoring Wizard even today.
Here is the link and also included inside a folder is computerhardwareids.exe which will be required to change the icon for This PC
Works on Windows 7, 8, 8.1, 10 & 11.
Download:
Metadata for Devices
Requirements:
1. Install the Devices and Printers Metadata Authoring Wizard and
2. Enable .Net 3.5
3. Icon converter with 32-bit, 8-bit and 4-bit sizes Icon Converter - Create ICO from Image Online | RedKetchup
4. Icollator which combines the above 3 types of icons into 1 single file accepted by the Authoring wizard IcollatorForever
5. Image Cropping tool like Fastone Image Viewer portable or even newer Paint in Windows 11 does well with PNG transparency. You can even fill transparency by resizing the image and moving around the device image to better fit a square. Default Paint app is now more competent. But you are always welcome to use any image software of your own choice.
Process:
1. For icons which you don't have, start with the device pic with white background. Then you can go to any AI based Background Removal website and remove the background and make it a transparent .png file. Crop it to your liking. It should be 1:1 square aspect ratio. PNG file should be higher res than 256x256.
2. Once you are satisfied with png file, upload it to Icon Converter - Create ICO from Image Online | RedKetchup and select all icon sizes upto 256 and select BMP (32-bit) and click on Download button. Then again download button. Once it has completed downloading the ico, go back and select BMP (8-bit) and again Download the ico file, repeat the process for BMP (4-bit). Now you should have 3 ico files.
3. Go to IcollatorForever and add the above 3 ico files and click on save to ico button. This downloaded ico file will be accepted by Devices and Printers Metadata Authoring Wizard
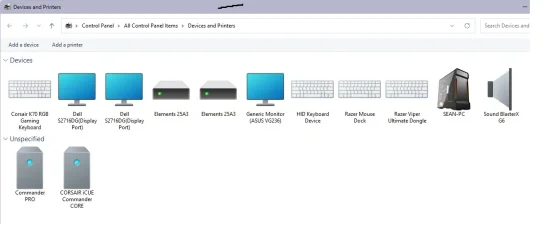
4. Go to Settings -> Bluetooth & Devices -> Devices -> More Devices and Printer Settings
5. Right click on the device you want to change it's icon -> Create Metadata Package (Ignore .Net error, it still works)
6. Drag-drop the combined icon you created in step 3. Don't worry if it shows up blurry there.
7. Click next, Enter the device details, hit next
8. Select the correct category of your device.
9. In associations, you need to know the device's HWID. You can find it from device manager.
10. Hit next and before you hit finish, make sure you have ticked "Copy package to your system's local metadata store"
11. The icon should change in few seconds.
Bonus tip:
To change This PC icon, run computerhardwareids.exe in elevated cmd
It will show you a bunch of HWIDs
The most important ones are Required 3 HWIDs
Format:
ComputerMetadata\{HWID}
Enter these 3 HWIDs in above format in the Hardware ID box of Authoring wizard of This PC. So you should have 3 entries there.
This pretty thing is now deprecated but I still had fun figuring out how to change This PC icon.
You can also have some fun too.
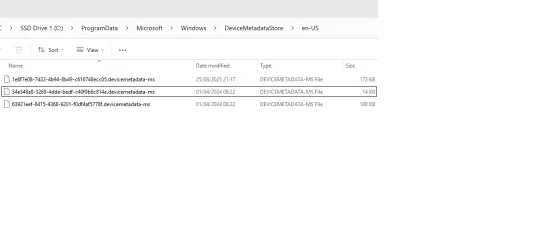
You can backup the randomly numbered files from this location: C:\ProgramData\Microsoft\Windows\DeviceMetadataStore\en-US to a safe folder. If you reinstall Windows, copy back the backed up metadata files to get the icons to show up again. The files can also be used on another PC provided it has the same Device ID. Works well for USB drives.
Another Bonus tip: I would recommend renaming the combined ico file to device name before using it in Authoring Wizard. Because the metadata files can be opened up in notepad to see which ico file name it is using. To determine which file is for what device.


Here is the link and also included inside a folder is computerhardwareids.exe which will be required to change the icon for This PC
Works on Windows 7, 8, 8.1, 10 & 11.
Download:
Metadata for Devices
Requirements:
1. Install the Devices and Printers Metadata Authoring Wizard and
2. Enable .Net 3.5
3. Icon converter with 32-bit, 8-bit and 4-bit sizes Icon Converter - Create ICO from Image Online | RedKetchup
4. Icollator which combines the above 3 types of icons into 1 single file accepted by the Authoring wizard IcollatorForever
5. Image Cropping tool like Fastone Image Viewer portable or even newer Paint in Windows 11 does well with PNG transparency. You can even fill transparency by resizing the image and moving around the device image to better fit a square. Default Paint app is now more competent. But you are always welcome to use any image software of your own choice.
Process:
1. For icons which you don't have, start with the device pic with white background. Then you can go to any AI based Background Removal website and remove the background and make it a transparent .png file. Crop it to your liking. It should be 1:1 square aspect ratio. PNG file should be higher res than 256x256.
2. Once you are satisfied with png file, upload it to Icon Converter - Create ICO from Image Online | RedKetchup and select all icon sizes upto 256 and select BMP (32-bit) and click on Download button. Then again download button. Once it has completed downloading the ico, go back and select BMP (8-bit) and again Download the ico file, repeat the process for BMP (4-bit). Now you should have 3 ico files.
3. Go to IcollatorForever and add the above 3 ico files and click on save to ico button. This downloaded ico file will be accepted by Devices and Printers Metadata Authoring Wizard
4. Go to Settings -> Bluetooth & Devices -> Devices -> More Devices and Printer Settings
5. Right click on the device you want to change it's icon -> Create Metadata Package (Ignore .Net error, it still works)
6. Drag-drop the combined icon you created in step 3. Don't worry if it shows up blurry there.
7. Click next, Enter the device details, hit next
8. Select the correct category of your device.
9. In associations, you need to know the device's HWID. You can find it from device manager.
10. Hit next and before you hit finish, make sure you have ticked "Copy package to your system's local metadata store"
11. The icon should change in few seconds.
Bonus tip:
To change This PC icon, run computerhardwareids.exe in elevated cmd
It will show you a bunch of HWIDs
The most important ones are Required 3 HWIDs
- Manufacturer + Family + Product Name
- Manufacturer + SKUNumber
- Manufacturer
Format:
ComputerMetadata\{HWID}
Enter these 3 HWIDs in above format in the Hardware ID box of Authoring wizard of This PC. So you should have 3 entries there.
This pretty thing is now deprecated but I still had fun figuring out how to change This PC icon.
You can also have some fun too.
You can backup the randomly numbered files from this location: C:\ProgramData\Microsoft\Windows\DeviceMetadataStore\en-US to a safe folder. If you reinstall Windows, copy back the backed up metadata files to get the icons to show up again. The files can also be used on another PC provided it has the same Device ID. Works well for USB drives.
Another Bonus tip: I would recommend renaming the combined ico file to device name before using it in Authoring Wizard. Because the metadata files can be opened up in notepad to see which ico file name it is using. To determine which file is for what device.
My Computer
At a glance
Windows 119800X3DPatriot 8200MTs DDR5 CL38Galax RTX 4090ST
- OS
- Windows 11
- Computer type
- PC/Desktop
- Manufacturer/Model
- Asus
- CPU
- 9800X3D
- Motherboard
- Asus X870E ProArt
- Memory
- Patriot 8200MTs DDR5 CL38
- Graphics Card(s)
- Galax RTX 4090ST
- PSU
- Asus Strix 1000W
- Case
- Lian Li O11 Vision