Solved MY CPU Doesn't Support Windows 11 HELP


PvtJohnTowle

Well-known member
Member
Local time
3:34 AM
Posts
123
Location
Sydney Australia
OS
Windows 11 23H2 (OS Build 22631.3085)
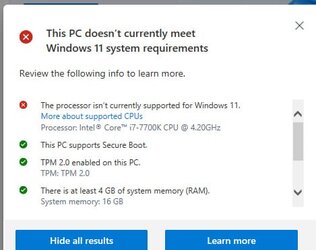
Surely there must be a workaround on this. Windows 11 21H2 is already installed. I just want to upgrade to the latest version 22H2....
 

Attachments

  • bandicam 2023-03-26 12-02-08-234.jpg
    bandicam 2023-03-26 12-02-08-234.jpg
    21.5 KB · Views: 2

My Computers

System One System Two

  • OS
    Windows 11 23H2 (OS Build 22631.3085)
    Computer type
    PC/Desktop
    Manufacturer/Model
    Gigabyte Z270X Gaming 7
    CPU
    i7-7700k OC'd 4800 Mhz
    Motherboard
    Gigabyte Z270X Gaming 7
    Memory
    16GB
    Graphics Card(s)
    Gigabyte GeForce RTX 2060 Super OC GV-N206SWF2OC-8GD
    Sound Card
    Steel Series Arctis 1 Gaming Head phones
    Monitor(s) Displays
    Asus ROG PG279Q Asus VE278 & Phillips 272V8
    Screen Resolution
    2560 X1440 27 Inch 165HZ Asus
    PSU
    Corsair RM750i (CP-9020082-AU) 750Watt 80Plus Gold Full Modular ATX Power Supply Unit
    Case
    Corsair CC750D (CC-9011078) Obsidian 750D Airflow Edition Black Full Tower ATX Case
    Cooling
    Corsair H100i V2 (CW-9060025-WW) Universal Hydro High Performance Liquid CPU Cooler
    Antivirus
    Kaspersky Internet Security 21.3.10.391 [j]
  • Operating System
    Windows 11 23H2 22631.2715
    Computer type
    Laptop
    Manufacturer/Model
    Dell XPS EVO 13.3" RNX9305C01AUSB
    CPU
    Intel i5-1135G7
    Motherboard
    Dell
    Memory
    8 GB
    Graphics card(s)
    Intel Iris Xe Graphics
    Monitor(s) Displays
    LED
    Screen Resolution
    1920 x 1080
    Hard Drives
    256GB SSD
    Other Info
    https://www.thegoodguys.com.au/dell-xps-evo-133-inches-win-11-laptop-rnx9305c01ausb
Download 22H2 iso, mount it as a drive and run setup.exe.

I recommend you make an image backup first
 

My Computer

System One

  • OS
    Windows 10 Pro + others in VHDs
    Computer type
    Laptop
    Manufacturer/Model
    ASUS Vivobook 14
    CPU
    I7
    Motherboard
    Yep, Laptop has one.
    Memory
    16 GB
    Graphics Card(s)
    Integrated Intel Iris XE
    Sound Card
    Realtek built in
    Monitor(s) Displays
    N/A
    Screen Resolution
    1920x1080
    Hard Drives
    1 TB Optane NVME SSD, 1 TB NVME SSD
    PSU
    Yep, got one
    Case
    Yep, got one
    Cooling
    Stella Artois
    Keyboard
    Built in
    Mouse
    Bluetooth , wired
    Internet Speed
    72 Mb/s :-(
    Browser
    Edge mostly
    Antivirus
    Defender
    Other Info
    TPM 2.0
It still says not compatible I did the PC health status before install - the setup.exe detects incompatible hardware and will not go through . I have found a video the you can delete lines from appraiserres. dll in notepad for TPM and UEFI and the install will go through.. which it is now !! 69% complete so far
The guy had the same error that his CPU was incompatible.

This guy had the file preconfigured to download in his description on YT but I decided for my own security to delete the lines save the file and copy and replace the file into the windows installation folder after I had extracted the iso. He showed how to do this in his video.
 

Attachments

  • 20230326_131459.jpg
    20230326_131459.jpg
    542.1 KB · Views: 2
Last edited:

My Computers

System One System Two

  • OS
    Windows 11 23H2 (OS Build 22631.3085)
    Computer type
    PC/Desktop
    Manufacturer/Model
    Gigabyte Z270X Gaming 7
    CPU
    i7-7700k OC'd 4800 Mhz
    Motherboard
    Gigabyte Z270X Gaming 7
    Memory
    16GB
    Graphics Card(s)
    Gigabyte GeForce RTX 2060 Super OC GV-N206SWF2OC-8GD
    Sound Card
    Steel Series Arctis 1 Gaming Head phones
    Monitor(s) Displays
    Asus ROG PG279Q Asus VE278 & Phillips 272V8
    Screen Resolution
    2560 X1440 27 Inch 165HZ Asus
    PSU
    Corsair RM750i (CP-9020082-AU) 750Watt 80Plus Gold Full Modular ATX Power Supply Unit
    Case
    Corsair CC750D (CC-9011078) Obsidian 750D Airflow Edition Black Full Tower ATX Case
    Cooling
    Corsair H100i V2 (CW-9060025-WW) Universal Hydro High Performance Liquid CPU Cooler
    Antivirus
    Kaspersky Internet Security 21.3.10.391 [j]
  • Operating System
    Windows 11 23H2 22631.2715
    Computer type
    Laptop
    Manufacturer/Model
    Dell XPS EVO 13.3" RNX9305C01AUSB
    CPU
    Intel i5-1135G7
    Motherboard
    Dell
    Memory
    8 GB
    Graphics card(s)
    Intel Iris Xe Graphics
    Monitor(s) Displays
    LED
    Screen Resolution
    1920 x 1080
    Hard Drives
    256GB SSD
    Other Info
    https://www.thegoodguys.com.au/dell-xps-evo-133-inches-win-11-laptop-rnx9305c01ausb
This is the video I followed


My Computers

System One System Two

  • OS
    Windows 11 23H2 (OS Build 22631.3085)
    Computer type
    PC/Desktop
    Manufacturer/Model
    Gigabyte Z270X Gaming 7
    CPU
    i7-7700k OC'd 4800 Mhz
    Motherboard
    Gigabyte Z270X Gaming 7
    Memory
    16GB
    Graphics Card(s)
    Gigabyte GeForce RTX 2060 Super OC GV-N206SWF2OC-8GD
    Sound Card
    Steel Series Arctis 1 Gaming Head phones
    Monitor(s) Displays
    Asus ROG PG279Q Asus VE278 & Phillips 272V8
    Screen Resolution
    2560 X1440 27 Inch 165HZ Asus
    PSU
    Corsair RM750i (CP-9020082-AU) 750Watt 80Plus Gold Full Modular ATX Power Supply Unit
    Case
    Corsair CC750D (CC-9011078) Obsidian 750D Airflow Edition Black Full Tower ATX Case
    Cooling
    Corsair H100i V2 (CW-9060025-WW) Universal Hydro High Performance Liquid CPU Cooler
    Antivirus
    Kaspersky Internet Security 21.3.10.391 [j]
  • Operating System
    Windows 11 23H2 22631.2715
    Computer type
    Laptop
    Manufacturer/Model
    Dell XPS EVO 13.3" RNX9305C01AUSB
    CPU
    Intel i5-1135G7
    Motherboard
    Dell
    Memory
    8 GB
    Graphics card(s)
    Intel Iris Xe Graphics
    Monitor(s) Displays
    LED
    Screen Resolution
    1920 x 1080
    Hard Drives
    256GB SSD
    Other Info
    https://www.thegoodguys.com.au/dell-xps-evo-133-inches-win-11-laptop-rnx9305c01ausb
I have 11 installed on an unsupported laptop. (Gen 6 CPU.) It was originally installed using the Registry key that was provided so devlopers could test with unsupoorted hardware.

I have had no trouble updating 11 from any unmodified ISO. Currently on 22621.1483. (RP version. I'm not enrolled as an Insider.)

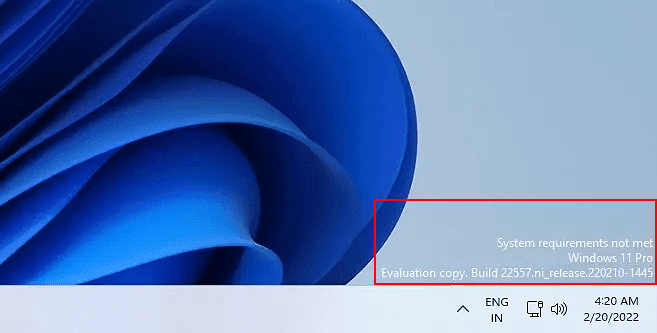
With recent builds, I've gotten the "unsupported" watermark. Simple enough to turn that off with a Registry key.
 

My Computers

System One System Two

  • OS
    Windows 11 22631.2861
    Computer type
    PC/Desktop
    Manufacturer/Model
    homebuilt
    CPU
    Amd Threadripper 7970X
    Motherboard
    Gigabyte TRX50 Aero D
    Memory
    128GB (4 X 32) Kingston DDR5 5200 (RDIMM)
    Graphics Card(s)
    Gigabyte RTX 4090 OC
    Sound Card
    none (USB to speakers), Realtek
    Monitor(s) Displays
    Philips 27E1N8900 OLED
    Screen Resolution
    3840 X 2160 @ 60Hz
    Hard Drives
    Crucial T700 2TB M.2 NVME SSD
    WD 4TB Blue SATA SSD
    Seagate 18TB IronWolf Pro
    PSU
    eVGA SuperNOVA 1600 GT
    Case
    Lian Li 011 Dynamic Evo XL
    Cooling
    Alphacool Eisbaer Pro Aurora 360, with 3 Phanteks T30 fans
    Keyboard
    Logitech K120 (wired)
    Mouse
    Logitech M500s (wired)
    Internet Speed
    1200 Mbps
  • Operating System
    windows 11 22631.2861
    Computer type
    PC/Desktop
    Manufacturer/Model
    homebuilt
    CPU
    Intel I9-13900K
    Motherboard
    Asus RoG Strix Z690-E
    Memory
    64GB G.Skill DDR5-6000
    Graphics card(s)
    Gigabyte RTX 3090 ti
    Sound Card
    built in Realtek
    Monitor(s) Displays
    Asus PA329C
    Screen Resolution
    3840 X 2160 @60Hz
    Hard Drives
    WDC SN850 1TB
    8 TB Seagate Ironwolf
    4TB Seagate Ironwolf
    PSU
    eVGA SuperNOVA 1300 GT
    Case
    Lian Li 011 Dynamic Evo
    Cooling
    Corsair iCUE H150i ELITE CAPELLIX Liquid CPU Cooler
    Mouse
    Logitech M500s (wired)
    Keyboard
    Logitech K120 (wired)
I have 11 installed on an unsupported laptop. (Gen 6 CPU.) It was originally installed using the Registry key that was provided so devlopers could test with unsupoorted hardware.

I have had no trouble updating 11 from any unmodified ISO. Currently on 22621.1483. (RP version. I'm not enrolled as an Insider.)

With recent builds, I've gotten the "unsupported" watermark. Simple enough to turn that off with a Registry key.
How did you turn off the watermark may I ask?
 

My Computers

System One System Two

  • OS
    Windows 11 23H2 (OS Build 22631.3085)
    Computer type
    PC/Desktop
    Manufacturer/Model
    Gigabyte Z270X Gaming 7
    CPU
    i7-7700k OC'd 4800 Mhz
    Motherboard
    Gigabyte Z270X Gaming 7
    Memory
    16GB
    Graphics Card(s)
    Gigabyte GeForce RTX 2060 Super OC GV-N206SWF2OC-8GD
    Sound Card
    Steel Series Arctis 1 Gaming Head phones
    Monitor(s) Displays
    Asus ROG PG279Q Asus VE278 & Phillips 272V8
    Screen Resolution
    2560 X1440 27 Inch 165HZ Asus
    PSU
    Corsair RM750i (CP-9020082-AU) 750Watt 80Plus Gold Full Modular ATX Power Supply Unit
    Case
    Corsair CC750D (CC-9011078) Obsidian 750D Airflow Edition Black Full Tower ATX Case
    Cooling
    Corsair H100i V2 (CW-9060025-WW) Universal Hydro High Performance Liquid CPU Cooler
    Antivirus
    Kaspersky Internet Security 21.3.10.391 [j]
  • Operating System
    Windows 11 23H2 22631.2715
    Computer type
    Laptop
    Manufacturer/Model
    Dell XPS EVO 13.3" RNX9305C01AUSB
    CPU
    Intel i5-1135G7
    Motherboard
    Dell
    Memory
    8 GB
    Graphics card(s)
    Intel Iris Xe Graphics
    Monitor(s) Displays
    LED
    Screen Resolution
    1920 x 1080
    Hard Drives
    256GB SSD
    Other Info
    https://www.thegoodguys.com.au/dell-xps-evo-133-inches-win-11-laptop-rnx9305c01ausb
How did you turn off the watermark may I ask?

A web search would find multiple other pages with the same information.
 

My Computers

System One System Two

  • OS
    Windows 11 22631.2861
    Computer type
    PC/Desktop
    Manufacturer/Model
    homebuilt
    CPU
    Amd Threadripper 7970X
    Motherboard
    Gigabyte TRX50 Aero D
    Memory
    128GB (4 X 32) Kingston DDR5 5200 (RDIMM)
    Graphics Card(s)
    Gigabyte RTX 4090 OC
    Sound Card
    none (USB to speakers), Realtek
    Monitor(s) Displays
    Philips 27E1N8900 OLED
    Screen Resolution
    3840 X 2160 @ 60Hz
    Hard Drives
    Crucial T700 2TB M.2 NVME SSD
    WD 4TB Blue SATA SSD
    Seagate 18TB IronWolf Pro
    PSU
    eVGA SuperNOVA 1600 GT
    Case
    Lian Li 011 Dynamic Evo XL
    Cooling
    Alphacool Eisbaer Pro Aurora 360, with 3 Phanteks T30 fans
    Keyboard
    Logitech K120 (wired)
    Mouse
    Logitech M500s (wired)
    Internet Speed
    1200 Mbps
  • Operating System
    windows 11 22631.2861
    Computer type
    PC/Desktop
    Manufacturer/Model
    homebuilt
    CPU
    Intel I9-13900K
    Motherboard
    Asus RoG Strix Z690-E
    Memory
    64GB G.Skill DDR5-6000
    Graphics card(s)
    Gigabyte RTX 3090 ti
    Sound Card
    built in Realtek
    Monitor(s) Displays
    Asus PA329C
    Screen Resolution
    3840 X 2160 @60Hz
    Hard Drives
    WDC SN850 1TB
    8 TB Seagate Ironwolf
    4TB Seagate Ironwolf
    PSU
    eVGA SuperNOVA 1300 GT
    Case
    Lian Li 011 Dynamic Evo
    Cooling
    Corsair iCUE H150i ELITE CAPELLIX Liquid CPU Cooler
    Mouse
    Logitech M500s (wired)
    Keyboard
    Logitech K120 (wired)
The document below is just what I use as my personal notes for installing Windows on unsupported hardware. Yes, there are other ways to do this, but these are tried and proven methods.

NOTE: Since you are performing an upgrade installation, be sure to follow the steps in the section "UPGRADE INSTALLATION PROCEDURE". I'm including my full document simply for the sake of completeness:

-----------------------------

This document describes how to install Windows 11 on systems that do not technically meet the Windows 11 hardware requirements. Before we even begin, I would like to point out that there are other methods not covered here to accomplish this task. For example, the "Rufus" utility can create installation media to allow for installation on unsupported hardware. However, the goal with this document is to provide methods to install Windows 11 without the need for any third-party utilities.


********************************
* CLEAN INSTALLATION PROCEDURE *
********************************

IMPORTANT: Be sure to read both PART 1 and PART 2 below. Part 1 describes how to bypass the initial Windows hardware requirements. Part 2 describes how to create a local user account and bypass the need to login with a Microsoft account later on in the installation.

***************************************************************************************************
* PART 1 - This section describes how to bypass the initial hardware requirements for Windows 11. *
***************************************************************************************************

Note: All methods below have the same goal, which is to set registry entries in Windows PE to bypass the Windows setup requirements. This will NOT affect the final installation of Windows. It only affects the registry entries of Windows PE which is loaded in memory during setup. As soon as the first reboot during installation occurs, these registry entries are lost, having already served their purpose.

****************************************************
* Method 1 - Using an Autounattend.xml Answer File *
****************************************************

Note: The answer file provided here does nothing except to bypass the Windows 11 system requirements.

If you want to create an answer file on your own, these are the steps to include the entries that bypass Windows 11 system requirements.

Create a new answer file or modify an existing answer file with the following entries:

Add the component Microsoft Windows Setup\RunSynchronos\RunSynchronousCommand to Pass 1 windowsPE.

Set the following values:

Order: 1
Path: reg add HKLM\System\Setup\LabConfig /v BypassTPMCheck /t reg_dword /d 0x00000001 /f

Repeat the above steps 4 more time (for a total of 5 "RunSynchronousCommand" entries) with the following entries:

Order: 2
Path: reg add HKLM\System\Setup\LabConfig /v BypassSecureBootCheck /t reg_dword /d 0x00000001 /f

Order: 3
Path: reg add HKLM\System\Setup\LabConfig /v BypassRAMCheck /t reg_dword /d 0x00000001 /f

Order: 4
Path: reg add HKLM\System\Setup\LabConfig /v BypassStorageCheck /t reg_dword /d 0x00000001 /f

Order: 5
Path: reg add HKLM\System\Setup\LabConfig /v BypassCPUCheck /t reg_dword /d 0x00000001 /f

*************************************************************
* Method 2 - Manually Modify the Registry for Windows Setup *
*************************************************************

Begin installation of Windows from your installation media. At the first static screen where Windows setup requests information from you during setup, press SHIFT + F10 to open a command prompt.

Type regedit and hit ENTER. Add the following entries:

HKLM\System\Setup\LabConfig BypassTPMCheck reg_dword 0x00000001
HKLM\System\Setup\LabConfig BypassSecureBootCheck reg_dword 0x00000001
HKLM\System\Setup\LabConfig BypassRAMCheck reg_dword 0x00000001
HKLM\System\Setup\LabConfig BypassStorageCheck reg_dword 0x00000001
HKLM\System\Setup\LabConfig BypassCPUCheck reg_dword 0x00000001

Close the Registry Editor and the command prompt. Continue installation normally.

********************************
* Method 3 - Using a .reg file *
********************************

Create a file with the extension .reg. Place the following text between the bars (----) into that file. Don't include the "----" lines.

----
Windows Registry Editor Version 5.00

[HKEY_LOCAL_MACHINE\SYSTEM\Setup\LabConfig]
"BypassTPMCheck"=dword:00000001
"BypassSecureBootCheck"=dword:00000001
"BypassRAMCheck"=dword:00000001
"BypassStorageCheck"=dword:00000001
"BypassCPUCheck"=dword:00000001
----

Save the file, making sure to use a ".reg" file extension. Example: Bypass.reg

Drop this registry file onto your install media. After starting setup, when you reach the first static screen where information is requested by setup, press Shift + F10 to open a command prompt. Navigate to the drive letter where the .reg file is located and then run it. You can run it by simply typing the name of the file and pressing <ENTER>. Close the command prompt and continue installation of Windows as usual.

*********************************
* Method 4 - Using a Batch File *
*********************************

Create a text file with the extension .bat. Example: Bypass.bat. Place the following six lines in that file:

@echo off
reg add HKLM\System\Setup\LabConfig /v BypassTPMCheck /t reg_dword /d 0x00000001 /f > NUL
reg add HKLM\System\Setup\LabConfig /v BypassSecureBootCheck /t reg_dword /d 0x00000001 /f > NUL
reg add HKLM\System\Setup\LabConfig /v BypassRAMCheck /t reg_dword /d 0x00000001 /f > NUL
reg add HKLM\System\Setup\LabConfig /v BypassStorageCheck /t reg_dword /d 0x00000001 /f > NUL
reg add HKLM\System\Setup\LabConfig /v BypassCPUCheck /t reg_dword /d 0x00000001 /f > NUL

NOTE: The "> NUL" simply suppresses the output from being displayed for "silent" operation.

Drop this file onto your install media. After starting setup, when you reach the first static screen where information is requested by setup, press Shift + F10 to open a command prompt. Navigate to the drive letter where the .bat file is located and then run it. You can run it by simply typing the name of the file and pressing <ENTER>. Close the command prompt and continue installation of Windows as usual.

*****************************************************************************************
* Part 2 - This section describes how to create a local account duning installation and *
* bypass the requirement to logon with a Microsoft account in Windows 11 Pro. *
*****************************************************************************************

************************************
* If you have a network connection *
************************************

When you reach the screen where you have a choice to "Set up for personal use" or "Set up for work or school", select "Set up for work or school" and click on "Next".

On the next screen, select "Sign-in options", then "Domain join instead". Don't worry, we are not joining a domain!

On the next screen, supply the local user name that you want to create and then continue through setup as normal.

*********************************************
* If you do NOT have an Internet connection *
*********************************************

When you reach the screen where Windows wants to connect you to a network to create a local user account, press SHIFT + F10 to open a command prompt, and then run "OOBE\BypassNRO". The system will reboot. After rebooting, you will start back up at the screen asking you to select the correct keyboard layout. When you get back to the "Let's connect you to a network" screen, you will have an option to select "I don't have internet". Choose that option. On the next screen, select "Continue with limited setup". Enter your local user account name, and then continue with setup as usual.

**********************************
* UPGRADE INSTALLATION PROCEDURE *
**********************************

************
* Method 1 *
************

When installing Windows 11 as an upgrade, Windows will make use of the file \sources\appraiserres.dll to determine the system requirements for installation. To bypass the system requirements, you can replace that file with a fake appraiserres.dll file.

Delete or rename the original \sources\appraiserres.dll file on your installation media. Replace the file that you deleted or renamed with a fake appraiserres.dll. You could simply create a text file and rename it to appraiserres.dll. If you prefer, you could also just grab the appraiserres.dll from a Windows 10 distribution.

You can now run setup from the root of the installation media to begin an upgrade install.

************
* Method 2 *
************

NOTE: If you follow the steps in method 1, you do not need to follow the steps outlined in method 2.

You can bypass just the TPM 2.0 and supported CPU requirements for an upgrade installation by making the following change to the registry:

[HKEY_LOCAL_MACHINE\SYSTEM\Setup\MoSetup]
"AllowUpgradesWithUnsupportedTPMOrCPU"=dword:00000001

You can make this into a .REG file if you wish. Then, simply double-click that file to merge the contents into the registry. If you want to do this, open notepad, paste in the following lines between the "----" lines (not including those lines), and save it to a file with a .REG extention, then double-click that file to make the registry change:

----
Windows Registry Editor Version 5.00

[HKEY_LOCAL_MACHINE\SYSTEM\Setup\MoSetup]
"AllowUpgradesWithUnsupportedTPMOrCPU"=dword:00000001
----

NOTE: This registry setting bypasses the need for a supported CPU and a TPM 2.0 but a TPM 1.2 would still be needed. If you still do not meet this requirement, then please follow the steps in method 1 instead.

References
==========


My Computers

System One System Two

  • OS
    Win11 Pro 23H2
    Computer type
    PC/Desktop
    Manufacturer/Model
    Home Built
    CPU
    Intel i7-11700K
    Motherboard
    ASUS Prime Z590-A
    Memory
    128GB Crucial Ballistix 3200MHz DRAM
    Graphics Card(s)
    No GPU - CPU graphics only (for now)
    Sound Card
    Realtek (on motherboard)
    Monitor(s) Displays
    HP Envy 32
    Screen Resolution
    2560 x 1440
    Hard Drives
    1 x 1TB NVMe Gen 4 x 4 SSD
    1 x 2TB NVMe Gen 3 x 4 SSD
    2 x 512GB 2.5" SSDs
    2 x 8TB HD
    PSU
    Corsair HX850i
    Case
    Corsair iCue 5000X RGB
    Cooling
    Noctua NH-D15 chromax.black cooler + 10 case fans
    Keyboard
    CODE backlit mechanical keyboard
    Mouse
    Logitech MX Master 3
    Internet Speed
    1Gb Up / 1 Gb Down
    Browser
    Edge
    Antivirus
    Windows Defender
    Other Info
    Additional options installed:
    WiFi 6E PCIe adapter
    ASUS ThunderboltEX 4 PCIe adapter
  • Operating System
    Win11 Pro 23H2
    Computer type
    Laptop
    Manufacturer/Model
    Lenovo ThinkBook 13x Gen 2
    CPU
    Intel i7-1255U
    Memory
    16 GB
    Graphics card(s)
    Intel Iris Xe Graphics
    Sound Card
    Realtek® ALC3306-CG codec
    Monitor(s) Displays
    13.3-inch IPS Display
    Screen Resolution
    WQXGA (2560 x 1600)
    Hard Drives
    2 TB 4 x 4 NVMe SSD
    PSU
    USB-C / Thunderbolt 4 Power / Charging
    Mouse
    Buttonless Glass Precision Touchpad
    Keyboard
    Backlit, spill resistant keyboard
    Internet Speed
    1Gb Up / 1Gb Down
    Browser
    Edge
    Antivirus
    Windows Defender
    Other Info
    WiFi 6e / Bluetooth 5.1 / Facial Recognition / Fingerprint Sensor / ToF (Time of Flight) Human Presence Sensor
My method seemed to work without a hitch.. I don't have any watermark about unsupported hardware either.
 

Attachments

  • bandicam 2023-03-26 13-59-38-701.jpg
    bandicam 2023-03-26 13-59-38-701.jpg
    19 KB · Views: 3

My Computers

System One System Two

  • OS
    Windows 11 23H2 (OS Build 22631.3085)
    Computer type
    PC/Desktop
    Manufacturer/Model
    Gigabyte Z270X Gaming 7
    CPU
    i7-7700k OC'd 4800 Mhz
    Motherboard
    Gigabyte Z270X Gaming 7
    Memory
    16GB
    Graphics Card(s)
    Gigabyte GeForce RTX 2060 Super OC GV-N206SWF2OC-8GD
    Sound Card
    Steel Series Arctis 1 Gaming Head phones
    Monitor(s) Displays
    Asus ROG PG279Q Asus VE278 & Phillips 272V8
    Screen Resolution
    2560 X1440 27 Inch 165HZ Asus
    PSU
    Corsair RM750i (CP-9020082-AU) 750Watt 80Plus Gold Full Modular ATX Power Supply Unit
    Case
    Corsair CC750D (CC-9011078) Obsidian 750D Airflow Edition Black Full Tower ATX Case
    Cooling
    Corsair H100i V2 (CW-9060025-WW) Universal Hydro High Performance Liquid CPU Cooler
    Antivirus
    Kaspersky Internet Security 21.3.10.391 [j]
  • Operating System
    Windows 11 23H2 22631.2715
    Computer type
    Laptop
    Manufacturer/Model
    Dell XPS EVO 13.3" RNX9305C01AUSB
    CPU
    Intel i5-1135G7
    Motherboard
    Dell
    Memory
    8 GB
    Graphics card(s)
    Intel Iris Xe Graphics
    Monitor(s) Displays
    LED
    Screen Resolution
    1920 x 1080
    Hard Drives
    256GB SSD
    Other Info
    https://www.thegoodguys.com.au/dell-xps-evo-133-inches-win-11-laptop-rnx9305c01ausb
@hsehestedt Very well put together notes. Thank you for sharing.

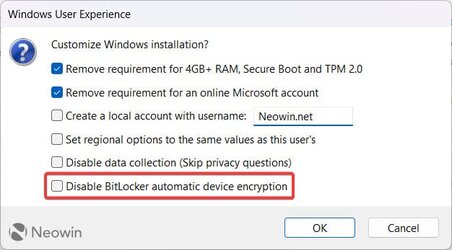
What would be the reg line to install with bitlocker turned off? I want to add it to my install media for regular installs, NOT installs on incompatible hardware.
 

My Computers

System One System Two

  • OS
    Windows 11 Pro 23H2 22631.3296
    Computer type
    PC/Desktop
    Manufacturer/Model
    Dell Optiplex 7080
    CPU
    i9-10900 10 core 20 threads
    Motherboard
    DELL 0J37VM
    Memory
    32 gb
    Graphics Card(s)
    none-Intel UHD Graphics 630
    Sound Card
    Integrated Realtek
    Monitor(s) Displays
    Benq 27
    Screen Resolution
    2560x1440
    Hard Drives
    1tb Solidigm m.2 +256gb ssd+512 gb usb m.2 sata
    PSU
    500w
    Case
    MT
    Cooling
    Dell Premium
    Keyboard
    Logitech wired
    Mouse
    Logitech wireless
    Internet Speed
    so slow I'm too embarrassed to tell
    Browser
    Firefox
    Antivirus
    Defender+MWB Premium
  • Operating System
    Windows 10 Pro 22H2 19045.3930
    Computer type
    PC/Desktop
    Manufacturer/Model
    Dell Optiplex 9020
    CPU
    i7-4770
    Memory
    24 gb
    Monitor(s) Displays
    Benq 27
    Screen Resolution
    2560x1440
    Hard Drives
    256 gb Toshiba BG4 M.2 NVE SSB and 1 tb hdd
    PSU
    500w
    Case
    MT
    Cooling
    Dell factory
    Mouse
    Logitech wireless
    Keyboard
    Logitech wired
    Internet Speed
    still not telling
    Browser
    Firefox
    Antivirus
    Defender+MWB Premium
@hsehestedt Very well put together notes. Thank you for sharing.

What would be the reg line to install with bitlocker turned off? I want to add it to my install media for regular installs, NOT installs on incompatible hardware.
I'm confused.

I have never enabled Bitlocker on my 3 systems. I've had no issues with installs.
 

My Computers

System One System Two

  • OS
    Windows 11 22631.2861
    Computer type
    PC/Desktop
    Manufacturer/Model
    homebuilt
    CPU
    Amd Threadripper 7970X
    Motherboard
    Gigabyte TRX50 Aero D
    Memory
    128GB (4 X 32) Kingston DDR5 5200 (RDIMM)
    Graphics Card(s)
    Gigabyte RTX 4090 OC
    Sound Card
    none (USB to speakers), Realtek
    Monitor(s) Displays
    Philips 27E1N8900 OLED
    Screen Resolution
    3840 X 2160 @ 60Hz
    Hard Drives
    Crucial T700 2TB M.2 NVME SSD
    WD 4TB Blue SATA SSD
    Seagate 18TB IronWolf Pro
    PSU
    eVGA SuperNOVA 1600 GT
    Case
    Lian Li 011 Dynamic Evo XL
    Cooling
    Alphacool Eisbaer Pro Aurora 360, with 3 Phanteks T30 fans
    Keyboard
    Logitech K120 (wired)
    Mouse
    Logitech M500s (wired)
    Internet Speed
    1200 Mbps
  • Operating System
    windows 11 22631.2861
    Computer type
    PC/Desktop
    Manufacturer/Model
    homebuilt
    CPU
    Intel I9-13900K
    Motherboard
    Asus RoG Strix Z690-E
    Memory
    64GB G.Skill DDR5-6000
    Graphics card(s)
    Gigabyte RTX 3090 ti
    Sound Card
    built in Realtek
    Monitor(s) Displays
    Asus PA329C
    Screen Resolution
    3840 X 2160 @60Hz
    Hard Drives
    WDC SN850 1TB
    8 TB Seagate Ironwolf
    4TB Seagate Ironwolf
    PSU
    eVGA SuperNOVA 1300 GT
    Case
    Lian Li 011 Dynamic Evo
    Cooling
    Corsair iCUE H150i ELITE CAPELLIX Liquid CPU Cooler
    Mouse
    Logitech M500s (wired)
    Keyboard
    Logitech K120 (wired)

My Computers

System One System Two

  • OS
    Windows 11 Pro 23H2 22631.3296
    Computer type
    PC/Desktop
    Manufacturer/Model
    Dell Optiplex 7080
    CPU
    i9-10900 10 core 20 threads
    Motherboard
    DELL 0J37VM
    Memory
    32 gb
    Graphics Card(s)
    none-Intel UHD Graphics 630
    Sound Card
    Integrated Realtek
    Monitor(s) Displays
    Benq 27
    Screen Resolution
    2560x1440
    Hard Drives
    1tb Solidigm m.2 +256gb ssd+512 gb usb m.2 sata
    PSU
    500w
    Case
    MT
    Cooling
    Dell Premium
    Keyboard
    Logitech wired
    Mouse
    Logitech wireless
    Internet Speed
    so slow I'm too embarrassed to tell
    Browser
    Firefox
    Antivirus
    Defender+MWB Premium
  • Operating System
    Windows 10 Pro 22H2 19045.3930
    Computer type
    PC/Desktop
    Manufacturer/Model
    Dell Optiplex 9020
    CPU
    i7-4770
    Memory
    24 gb
    Monitor(s) Displays
    Benq 27
    Screen Resolution
    2560x1440
    Hard Drives
    256 gb Toshiba BG4 M.2 NVE SSB and 1 tb hdd
    PSU
    500w
    Case
    MT
    Cooling
    Dell factory
    Mouse
    Logitech wireless
    Keyboard
    Logitech wired
    Internet Speed
    still not telling
    Browser
    Firefox
    Antivirus
    Defender+MWB Premium
Another benefit updating my Windows 11 in place to 22H2 , I no longer have the Disk Cleanup bug , windows update files would never get deleted , now I am able to delete all files under "Clean up System Files"
 

My Computers

System One System Two

  • OS
    Windows 11 23H2 (OS Build 22631.3085)
    Computer type
    PC/Desktop
    Manufacturer/Model
    Gigabyte Z270X Gaming 7
    CPU
    i7-7700k OC'd 4800 Mhz
    Motherboard
    Gigabyte Z270X Gaming 7
    Memory
    16GB
    Graphics Card(s)
    Gigabyte GeForce RTX 2060 Super OC GV-N206SWF2OC-8GD
    Sound Card
    Steel Series Arctis 1 Gaming Head phones
    Monitor(s) Displays
    Asus ROG PG279Q Asus VE278 & Phillips 272V8
    Screen Resolution
    2560 X1440 27 Inch 165HZ Asus
    PSU
    Corsair RM750i (CP-9020082-AU) 750Watt 80Plus Gold Full Modular ATX Power Supply Unit
    Case
    Corsair CC750D (CC-9011078) Obsidian 750D Airflow Edition Black Full Tower ATX Case
    Cooling
    Corsair H100i V2 (CW-9060025-WW) Universal Hydro High Performance Liquid CPU Cooler
    Antivirus
    Kaspersky Internet Security 21.3.10.391 [j]
  • Operating System
    Windows 11 23H2 22631.2715
    Computer type
    Laptop
    Manufacturer/Model
    Dell XPS EVO 13.3" RNX9305C01AUSB
    CPU
    Intel i5-1135G7
    Motherboard
    Dell
    Memory
    8 GB
    Graphics card(s)
    Intel Iris Xe Graphics
    Monitor(s) Displays
    LED
    Screen Resolution
    1920 x 1080
    Hard Drives
    256GB SSD
    Other Info
    https://www.thegoodguys.com.au/dell-xps-evo-133-inches-win-11-laptop-rnx9305c01ausb
@hsehestedt Very well put together notes. Thank you for sharing.

What would be the reg line to install with bitlocker turned off? I want to add it to my install media for regular installs, NOT installs on incompatible hardware.
You know, that's a darn good question. Not a single one of my systems supports this, so I have never had a system automatically enable BitLocker on me.

From the Dell article that you linked, it sounds like you can only disable or stop BitLocker encryption either after you get to the desktop, or by having a custom sysprep image where that registry entry has been added.

I would guess that there is likely an option to specify no device encryption in an unattended answer file but that's probably more grief than the average person wants to deal with.

I'll do a bit of research and respond back tomorrow (ok, later today, actually) with anything that I find.
 

My Computers

System One System Two

  • OS
    Win11 Pro 23H2
    Computer type
    PC/Desktop
    Manufacturer/Model
    Home Built
    CPU
    Intel i7-11700K
    Motherboard
    ASUS Prime Z590-A
    Memory
    128GB Crucial Ballistix 3200MHz DRAM
    Graphics Card(s)
    No GPU - CPU graphics only (for now)
    Sound Card
    Realtek (on motherboard)
    Monitor(s) Displays
    HP Envy 32
    Screen Resolution
    2560 x 1440
    Hard Drives
    1 x 1TB NVMe Gen 4 x 4 SSD
    1 x 2TB NVMe Gen 3 x 4 SSD
    2 x 512GB 2.5" SSDs
    2 x 8TB HD
    PSU
    Corsair HX850i
    Case
    Corsair iCue 5000X RGB
    Cooling
    Noctua NH-D15 chromax.black cooler + 10 case fans
    Keyboard
    CODE backlit mechanical keyboard
    Mouse
    Logitech MX Master 3
    Internet Speed
    1Gb Up / 1 Gb Down
    Browser
    Edge
    Antivirus
    Windows Defender
    Other Info
    Additional options installed:
    WiFi 6E PCIe adapter
    ASUS ThunderboltEX 4 PCIe adapter
  • Operating System
    Win11 Pro 23H2
    Computer type
    Laptop
    Manufacturer/Model
    Lenovo ThinkBook 13x Gen 2
    CPU
    Intel i7-1255U
    Memory
    16 GB
    Graphics card(s)
    Intel Iris Xe Graphics
    Sound Card
    Realtek® ALC3306-CG codec
    Monitor(s) Displays
    13.3-inch IPS Display
    Screen Resolution
    WQXGA (2560 x 1600)
    Hard Drives
    2 TB 4 x 4 NVMe SSD
    PSU
    USB-C / Thunderbolt 4 Power / Charging
    Mouse
    Buttonless Glass Precision Touchpad
    Keyboard
    Backlit, spill resistant keyboard
    Internet Speed
    1Gb Up / 1Gb Down
    Browser
    Edge
    Antivirus
    Windows Defender
    Other Info
    WiFi 6e / Bluetooth 5.1 / Facial Recognition / Fingerprint Sensor / ToF (Time of Flight) Human Presence Sensor
Yes! I have some answers already.

Take a look at this information from Microsoft:


Under the section called BitLocker automatic device encryption, it makes these statements:

Note: BitLocker automatic device encryption starts during Out-of-box (OOBE) experience. However, protection is enabled (armed) only after users sign in with a Microsoft Account or an Azure Active Directory account. Until that, protection is suspended and data is not protected. BitLocker automatic device encryption is not enabled with local accounts, in which case BitLocker can be manually enabled using the BitLocker Control Panel.

As a result of this, here is what I would suggest:

Install Windows initially with a local account. Use the steps previously noted to prevent encryption. Then you should be able to switch over to a Microsoft account, should you wish to do so without BitLocker getting its greedy fingers on your data.

If I find anything else, I will post back.
 

My Computers

System One System Two

  • OS
    Win11 Pro 23H2
    Computer type
    PC/Desktop
    Manufacturer/Model
    Home Built
    CPU
    Intel i7-11700K
    Motherboard
    ASUS Prime Z590-A
    Memory
    128GB Crucial Ballistix 3200MHz DRAM
    Graphics Card(s)
    No GPU - CPU graphics only (for now)
    Sound Card
    Realtek (on motherboard)
    Monitor(s) Displays
    HP Envy 32
    Screen Resolution
    2560 x 1440
    Hard Drives
    1 x 1TB NVMe Gen 4 x 4 SSD
    1 x 2TB NVMe Gen 3 x 4 SSD
    2 x 512GB 2.5" SSDs
    2 x 8TB HD
    PSU
    Corsair HX850i
    Case
    Corsair iCue 5000X RGB
    Cooling
    Noctua NH-D15 chromax.black cooler + 10 case fans
    Keyboard
    CODE backlit mechanical keyboard
    Mouse
    Logitech MX Master 3
    Internet Speed
    1Gb Up / 1 Gb Down
    Browser
    Edge
    Antivirus
    Windows Defender
    Other Info
    Additional options installed:
    WiFi 6E PCIe adapter
    ASUS ThunderboltEX 4 PCIe adapter
  • Operating System
    Win11 Pro 23H2
    Computer type
    Laptop
    Manufacturer/Model
    Lenovo ThinkBook 13x Gen 2
    CPU
    Intel i7-1255U
    Memory
    16 GB
    Graphics card(s)
    Intel Iris Xe Graphics
    Sound Card
    Realtek® ALC3306-CG codec
    Monitor(s) Displays
    13.3-inch IPS Display
    Screen Resolution
    WQXGA (2560 x 1600)
    Hard Drives
    2 TB 4 x 4 NVMe SSD
    PSU
    USB-C / Thunderbolt 4 Power / Charging
    Mouse
    Buttonless Glass Precision Touchpad
    Keyboard
    Backlit, spill resistant keyboard
    Internet Speed
    1Gb Up / 1Gb Down
    Browser
    Edge
    Antivirus
    Windows Defender
    Other Info
    WiFi 6e / Bluetooth 5.1 / Facial Recognition / Fingerprint Sensor / ToF (Time of Flight) Human Presence Sensor
I'll do a bit of research
Don't spend a lot of time on it as I found a workaround. The latest version of Rufus (3.22) can do it. I just thought I could put it in a batch file as you do your bypasses for your incompatible machines. @PvtJohnTowle sorry for hi-jacking your thread.
1679157011_rufus.jpg
 

My Computers

System One System Two

  • OS
    Windows 11 Pro 23H2 22631.3296
    Computer type
    PC/Desktop
    Manufacturer/Model
    Dell Optiplex 7080
    CPU
    i9-10900 10 core 20 threads
    Motherboard
    DELL 0J37VM
    Memory
    32 gb
    Graphics Card(s)
    none-Intel UHD Graphics 630
    Sound Card
    Integrated Realtek
    Monitor(s) Displays
    Benq 27
    Screen Resolution
    2560x1440
    Hard Drives
    1tb Solidigm m.2 +256gb ssd+512 gb usb m.2 sata
    PSU
    500w
    Case
    MT
    Cooling
    Dell Premium
    Keyboard
    Logitech wired
    Mouse
    Logitech wireless
    Internet Speed
    so slow I'm too embarrassed to tell
    Browser
    Firefox
    Antivirus
    Defender+MWB Premium
  • Operating System
    Windows 10 Pro 22H2 19045.3930
    Computer type
    PC/Desktop
    Manufacturer/Model
    Dell Optiplex 9020
    CPU
    i7-4770
    Memory
    24 gb
    Monitor(s) Displays
    Benq 27
    Screen Resolution
    2560x1440
    Hard Drives
    256 gb Toshiba BG4 M.2 NVE SSB and 1 tb hdd
    PSU
    500w
    Case
    MT
    Cooling
    Dell factory
    Mouse
    Logitech wireless
    Keyboard
    Logitech wired
    Internet Speed
    still not telling
    Browser
    Firefox
    Antivirus
    Defender+MWB Premium
Don't spend a lot of time on it as I found a workaround. The latest version of Rufus (3.22) can do it. I just thought I could put it in a batch file as you do your bypasses for your incompatible machines. @PvtJohnTowle sorry for hi-jacking your thread.
View attachment 56396
Understood. However, be aware that there is a difference here: Those batch file entries that create the registry entries apply only to Windows PE.

So, here is the flow:

You boot from the Windows installation media, setup starts by creating a RAM Drive which is always X:. It then runs Windows PE. You can then create the registry entries to bypass Windows 11 requirements, but those registry entries are only for Windows PE! So, as soon as the system is rebooted for the first time during installation, poof, those registry entries are gone. But we don't care because they have already served their purpose by then.

In this instance, we need the registry entries for BitLocker to be in the "real" Windows registry.
 

My Computers

System One System Two

  • OS
    Win11 Pro 23H2
    Computer type
    PC/Desktop
    Manufacturer/Model
    Home Built
    CPU
    Intel i7-11700K
    Motherboard
    ASUS Prime Z590-A
    Memory
    128GB Crucial Ballistix 3200MHz DRAM
    Graphics Card(s)
    No GPU - CPU graphics only (for now)
    Sound Card
    Realtek (on motherboard)
    Monitor(s) Displays
    HP Envy 32
    Screen Resolution
    2560 x 1440
    Hard Drives
    1 x 1TB NVMe Gen 4 x 4 SSD
    1 x 2TB NVMe Gen 3 x 4 SSD
    2 x 512GB 2.5" SSDs
    2 x 8TB HD
    PSU
    Corsair HX850i
    Case
    Corsair iCue 5000X RGB
    Cooling
    Noctua NH-D15 chromax.black cooler + 10 case fans
    Keyboard
    CODE backlit mechanical keyboard
    Mouse
    Logitech MX Master 3
    Internet Speed
    1Gb Up / 1 Gb Down
    Browser
    Edge
    Antivirus
    Windows Defender
    Other Info
    Additional options installed:
    WiFi 6E PCIe adapter
    ASUS ThunderboltEX 4 PCIe adapter
  • Operating System
    Win11 Pro 23H2
    Computer type
    Laptop
    Manufacturer/Model
    Lenovo ThinkBook 13x Gen 2
    CPU
    Intel i7-1255U
    Memory
    16 GB
    Graphics card(s)
    Intel Iris Xe Graphics
    Sound Card
    Realtek® ALC3306-CG codec
    Monitor(s) Displays
    13.3-inch IPS Display
    Screen Resolution
    WQXGA (2560 x 1600)
    Hard Drives
    2 TB 4 x 4 NVMe SSD
    PSU
    USB-C / Thunderbolt 4 Power / Charging
    Mouse
    Buttonless Glass Precision Touchpad
    Keyboard
    Backlit, spill resistant keyboard
    Internet Speed
    1Gb Up / 1Gb Down
    Browser
    Edge
    Antivirus
    Windows Defender
    Other Info
    WiFi 6e / Bluetooth 5.1 / Facial Recognition / Fingerprint Sensor / ToF (Time of Flight) Human Presence Sensor
For a CLEAN install then it's easy enough from an ISO (get from UUPDUMP and run the script)

Then simply create EFI partition of say 100M, other std partition for windows system and then dism /ApplyImage. After that install the bootloader to the 100M EFI partition via bcdboot.

To Update to a newer build of windows there are a few ways already posted so this is what I do

Once you've got a working VM then steps 1 - 4 don't need to be done again unless you've added new applications or updated them. I'm assuming you keep the windows OS itself small, on email you use IMAP so mail not stored on local HDD and your main user data is not stored in the OS itself but on another disk / partition.

1) create a VM with virtual (emulated) TPM, sec boot and virtual cpu that passes the W11 requirements -- most decent VM platforms allow you to change the "CPU topography" -- must though have min of 2 cores, and minimum Virtual disk size must be 48GB for a windows update.

2) copy current system to the vm via macrium stand alone or equivalent from WITHIN the GUEST.

3) Boot up the install device -whether it's a USB device or an ISO image from WITHIN the VM

4) install the boot loader (from WITHIN the Guest) using the cmd line from the Windows install iso (repair system ->command line)

If you already have a working VM --start from here

5) boot the guest install guest additions / vmware tools or whatever for video / keyboard/mouse/ network enhancements etc and run WU.

6) After updates OK etc copy system to a physical disk

7) restore to physical system

8) update bootloader via bcdboot (or it won't boot)

9) job done . !!! Q.E.D

(once you've got a VM that you can use for this process -- time on even a modest laptop with Intel Gen 6 CPU (not supported) is approx 12 mins to image the physical system, 12 mins to restore to the VM and boot guest.
WU -- depends on Ms -- could be 7 mins to infinity !!!! however WU on a decent VM takes approx as long as it would do on a physical machine -- say even at a bad case -- 35 mins. 12 mins to image the VM, 12 mins to restore to the physical system.

So time is approx 48 Mins for the P2V and V2P processes (Physical to Virtual and Virtual to Physical) plus whatever time the WU update of the VM takes.

One advantage of this is that if the process breaks at WU then you haven't hosed up your system and have to restore it. Another one is that if the process is successful you've got a backup already.

Some might find the process "complex" but if you can easily build VM's it's a doddle.

Real machine :

Screenshot 2023-03-26 104658.png

Cheers
jimbo
 
Last edited:

My Computer

System One

  • OS
    Windows XP,7,10,11 Linux Arch Linux
    Computer type
    PC/Desktop
    CPU
    2 X Intel i7

My Computers

System One System Two

  • OS
    Windows 11 22631.2861
    Computer type
    PC/Desktop
    Manufacturer/Model
    homebuilt
    CPU
    Amd Threadripper 7970X
    Motherboard
    Gigabyte TRX50 Aero D
    Memory
    128GB (4 X 32) Kingston DDR5 5200 (RDIMM)
    Graphics Card(s)
    Gigabyte RTX 4090 OC
    Sound Card
    none (USB to speakers), Realtek
    Monitor(s) Displays
    Philips 27E1N8900 OLED
    Screen Resolution
    3840 X 2160 @ 60Hz
    Hard Drives
    Crucial T700 2TB M.2 NVME SSD
    WD 4TB Blue SATA SSD
    Seagate 18TB IronWolf Pro
    PSU
    eVGA SuperNOVA 1600 GT
    Case
    Lian Li 011 Dynamic Evo XL
    Cooling
    Alphacool Eisbaer Pro Aurora 360, with 3 Phanteks T30 fans
    Keyboard
    Logitech K120 (wired)
    Mouse
    Logitech M500s (wired)
    Internet Speed
    1200 Mbps
  • Operating System
    windows 11 22631.2861
    Computer type
    PC/Desktop
    Manufacturer/Model
    homebuilt
    CPU
    Intel I9-13900K
    Motherboard
    Asus RoG Strix Z690-E
    Memory
    64GB G.Skill DDR5-6000
    Graphics card(s)
    Gigabyte RTX 3090 ti
    Sound Card
    built in Realtek
    Monitor(s) Displays
    Asus PA329C
    Screen Resolution
    3840 X 2160 @60Hz
    Hard Drives
    WDC SN850 1TB
    8 TB Seagate Ironwolf
    4TB Seagate Ironwolf
    PSU
    eVGA SuperNOVA 1300 GT
    Case
    Lian Li 011 Dynamic Evo
    Cooling
    Corsair iCUE H150i ELITE CAPELLIX Liquid CPU Cooler
    Mouse
    Logitech M500s (wired)
    Keyboard
    Logitech K120 (wired)
@bobkn
Not just Dell, any modern standby device. Other OEMs have similar pages.

Per MS

BitLocker automatic device encryption​


BitLocker automatic device encryption uses BitLocker drive encryption technology to automatically encrypt internal drives after the user completes the Out Of Box Experience (OOBE) on Modern Standby or HSTI-compliant hardware.


Note: BitLocker automatic device encryption starts during Out-of-box (OOBE) experience. However, protection is enabled (armed) only after users sign in with a Microsoft Account or an Azure Active Directory account. Until that, protection is suspended and data is not protected. BitLocker automatic device encryption is not enabled with local accounts, in which case BitLocker can be manually enabled using the BitLocker Control Panel.

source here-
 

My Computers

System One System Two

  • OS
    Windows 11 Pro 23H2 22631.3296
    Computer type
    PC/Desktop
    Manufacturer/Model
    Dell Optiplex 7080
    CPU
    i9-10900 10 core 20 threads
    Motherboard
    DELL 0J37VM
    Memory
    32 gb
    Graphics Card(s)
    none-Intel UHD Graphics 630
    Sound Card
    Integrated Realtek
    Monitor(s) Displays
    Benq 27
    Screen Resolution
    2560x1440
    Hard Drives
    1tb Solidigm m.2 +256gb ssd+512 gb usb m.2 sata
    PSU
    500w
    Case
    MT
    Cooling
    Dell Premium
    Keyboard
    Logitech wired
    Mouse
    Logitech wireless
    Internet Speed
    so slow I'm too embarrassed to tell
    Browser
    Firefox
    Antivirus
    Defender+MWB Premium
  • Operating System
    Windows 10 Pro 22H2 19045.3930
    Computer type
    PC/Desktop
    Manufacturer/Model
    Dell Optiplex 9020
    CPU
    i7-4770
    Memory
    24 gb
    Monitor(s) Displays
    Benq 27
    Screen Resolution
    2560x1440
    Hard Drives
    256 gb Toshiba BG4 M.2 NVE SSB and 1 tb hdd
    PSU
    500w
    Case
    MT
    Cooling
    Dell factory
    Mouse
    Logitech wireless
    Keyboard
    Logitech wired
    Internet Speed
    still not telling
    Browser
    Firefox
    Antivirus
    Defender+MWB Premium

Latest Support Threads

Back
Top Bottom