This post is in response to another user who specifically requested sample unattended answer files. I thought that since I was going through this effort, I would simply share these publicly for anyone who might be interested.
NOTE: YES - I know that the purpose for some of these answer files, such as creating a local user account or bypassing Windows 11 installation requirements, can be done very easily using utilities such as Rufus. I am also aware that other tasks, such as creating the Recovery Tools partition after the Windows partition can be accomplished in an unattended setup using means different from what I provide here. You DO NOT need to comment on that here. The purpose of this post is to simply provide some samples showing the versatility of these answer files and illustrate that they can be used for a lot more than a fully unattended installation of Windows.
------------------------
An answer file can be used for more than just a fully unattended installation of Windows. An answer file can be crafted to bypass the Windows 11 system requirements, and / or create a local user account without the need for creating a Microsoft account. It can do this with or without a fully unattended installation.
To use any one of these answer files, simply rename the answer file to "autounattend.xml" and place that file in the root of your Windows installation media.
You should read this text before implementing any of my answer files. It is especially important to look at the answer files to review the comments in the answer file.
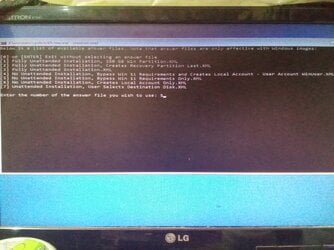
Some of these answer files will cause Windows setup to proceed with a fully unattended installation which will wipe a disk without asking! All of the answer files whose names start with "(!)" will start a fully automatic installation of Windows and will wipe a disk without asking. Use cation with these answer files and modify as needed. If you need help modifying this, just ask! As an alternative, use one of the answer files that does not automatically wipe a disk. As an example, the answer file named "Unattended Installation, User Selects Destination Disk" performs a fully unattended installation EXCEPT that it pauses right near the start of the installation to have the user select the disk to which Windows should be installed. It will then perform the rest of the Windows installation fully unattended.
A TRICK FOR A CLEANER START SCREEN AFTER INSTALLATION
I use in a trick in my answer files that results in a much cleaner Start screen.
In each answer file, you would normally set the "UserLocal" to "en-US". Outside of the United States, it will be the setting appropriate to your region in place of "en-US". However, if you set the UserLocale to "en-001", this will cause the Microsoft Store app to be disabled temporarily and prevent all the usual placeholders for apps from being added to Start. These include things like Spotify, Messenger, Amazon Prime, etc.
When installing Windows manually, without an answer file, the same thing can be accomplished by setting "Time and currency format" to "English (World)" rather than setting it to "English (United States)" on the first static screen of a manual setup.
IMPORTANT: There may be more than one section in which you will find the "UserLocal" in the answer file. Make sure to update them all.
If you implement this trick, note that in a manual setup, during installation you will see a screen that says that something went wrong. This hurts nothing and you would simply select "skip" on that screen. This does not affect unattended setup at all.
IMPORTANT: If you implement this trick, for both a manual installation and unattended setup, after Windows installation is completed, the first thing that you should do after setup finishes is to ensure that you have Internet access, then open Settings > Time & language > Language & region. Change "Country or region" to "United States" (or what is appropriate for your region) and "Regional format" to "English (United States)". Again, if not in the United States, set this to the appropriate setting for your region. Note that if you do not have Internet access when you make this change, then the placeholder icons will populate once Internet access is available so it is important to make sure you have Internet access before make this change. Put another way: If you do not provide Internet access before changing the regional settings, Windows will behave just like you never implemented this trick.
The bottom line is that by simply changing "UserLocal" to "en-001" (which is the same as selecting "English (World)" in the GUI), you get a far cleaner Start screen after installation.
To make this change, you don't have to bother using the Windows System Image Manager. Simply open the answer file in Notepad and make the change manually.
Note that if you do not wish to implement this trick, simply change each reference to "en-001" in my answer files to "en-US" (in the United States) or to the appropriate setting for your region.
END OF TRICK
* Items that apply to ALL of the answer files *
All of the answer files found here have a Windows 10 / 11 Pro key. You can change the key to Windows Home, Education, etc. if you wish.
Each answer file has comments that you should review. These comments are easiest to read if you open the answer file in a Web browser because it color codes items making comments easier to read but you can also open them in Notepad or another text reader / editor.
All of these answer files can be used with both Windows 10 and 11. The portion of any answer file that bypasses Windows 11 requirement checks won't affect Windows 10 so it is fine to leave this in place even for Windows 10 installations.
* How to use an answer file *
Select the desired answer file, save it to a text file named
1) Place it in the root of your Windows installation media.
2) As an alternative, create a second media with just the autounattend.xml answer file in the root. Make sure that this media is connected to the system or VM where Windows is to be installed in addition to the Windows installation media. This is especially helpful for installation to a VM because it means that you will not need to modify your Windows ISO image.
* A problem with unattended installation, and a solution *
Microsoft recommends that the Recovery Tools partition be created immediately AFTER the Windows partition. However, a traditional unattended installation does not do this, it creates the Recovery Tools partition BEFORE the Windows partition. If you want to know the technical reasons for this let me know and I will explain, but we won't go into that here. The Fully Unattended Installation answer file will perform a traditional unattended installation but will NOT place the Recovery Tools partition after the Windows partition as is recommended. My suggestion is to use any one of the other fully unattended installation answer files which use a workaraound that creates the Recovery Tools partition after the Windows partition.
* Brief summary of each answer file *
Read the comments in each answer file for more details.
(!) Fully Unattended Installation - Wipes disk 0 and installs Windows to it. Uses the traditional methods resulting in the Recovery Tools partition being created BEFORE the Windows partition.
(!) Fully Unattended Installation, 350 GB Win Partition - This answer file will create a Windows partition limited to 350 GB and an additional data partition that contains the remaining space of the disk. This is good for a system such as a laptop that has only one drive but where you want a separate drive letter for a data partition.
(!) Fully Unattended Installation, Creates Recovery Partition Last - This is the same as a standard fully unattended installation with the exception that it uses a workaround to create the Recovery Tools partition AFTER the Windows partition.
Unattended Installation, User Selects Destination Disk - This is a fully unattended installation EXCEPT that it pauses near the start of installation to have the user select the disk to which Windows should be installed. This is an excellent choice if you do not know ahead of time what disk to install Windows to or if you don't want to risk accidentally wiping the wrong disk.
No Unattended Installation, Bypass Win 11 Requirements and Creates Local Account - This answer file does not perform an unattended installation. It allows the user to manually install Windows but will bypass the Windows 11 System requirements and will automatically create a local user account. Other than that, the user steps through Windows installation manually.
No Unattended Installation, Bypass Win 11 Requirements Only - This answer file does not perform an unattended installation. It allows the user to manually install Windows but will bypass the Windows 11 System requirements. Other than that, the user steps through Windows installation manually.
No Unattended Installation, Creates Local Account Only - This answer file does not perform an unattended installation. It allows the user to manually install Windows but will create a local user account, bypassing Windows from forcing you to create a Microsoft account during installation.
NOTE: Comments are displayed in a different color in the below answer files. I suggest reading the comments. If you download any of these, open them in a web browser to read the comments. It's much easier to read than in notepad where everything looks the same.
(!) Fully Unattended Installation
(!) Fully Unattended Installation, 350 GB Win Partition
(!) Fully Unattended Installation, Creates Recovery Partition Last
No Unattended Installation, Bypass Win 11 Requirements and Creates Local Account - User Account WinUser
No Unattended Installation, Bypass Win 11 Requirements Only
No Unattended Installation, Creates Local Account Only
Unattended Installation, User Selects Destination Disk
NOTE: YES - I know that the purpose for some of these answer files, such as creating a local user account or bypassing Windows 11 installation requirements, can be done very easily using utilities such as Rufus. I am also aware that other tasks, such as creating the Recovery Tools partition after the Windows partition can be accomplished in an unattended setup using means different from what I provide here. You DO NOT need to comment on that here. The purpose of this post is to simply provide some samples showing the versatility of these answer files and illustrate that they can be used for a lot more than a fully unattended installation of Windows.
------------------------
An answer file can be used for more than just a fully unattended installation of Windows. An answer file can be crafted to bypass the Windows 11 system requirements, and / or create a local user account without the need for creating a Microsoft account. It can do this with or without a fully unattended installation.
To use any one of these answer files, simply rename the answer file to "autounattend.xml" and place that file in the root of your Windows installation media.
You should read this text before implementing any of my answer files. It is especially important to look at the answer files to review the comments in the answer file.
Some of these answer files will cause Windows setup to proceed with a fully unattended installation which will wipe a disk without asking! All of the answer files whose names start with "(!)" will start a fully automatic installation of Windows and will wipe a disk without asking. Use cation with these answer files and modify as needed. If you need help modifying this, just ask! As an alternative, use one of the answer files that does not automatically wipe a disk. As an example, the answer file named "Unattended Installation, User Selects Destination Disk" performs a fully unattended installation EXCEPT that it pauses right near the start of the installation to have the user select the disk to which Windows should be installed. It will then perform the rest of the Windows installation fully unattended.
A TRICK FOR A CLEANER START SCREEN AFTER INSTALLATION
I use in a trick in my answer files that results in a much cleaner Start screen.
In each answer file, you would normally set the "UserLocal" to "en-US". Outside of the United States, it will be the setting appropriate to your region in place of "en-US". However, if you set the UserLocale to "en-001", this will cause the Microsoft Store app to be disabled temporarily and prevent all the usual placeholders for apps from being added to Start. These include things like Spotify, Messenger, Amazon Prime, etc.
When installing Windows manually, without an answer file, the same thing can be accomplished by setting "Time and currency format" to "English (World)" rather than setting it to "English (United States)" on the first static screen of a manual setup.
IMPORTANT: There may be more than one section in which you will find the "UserLocal" in the answer file. Make sure to update them all.
If you implement this trick, note that in a manual setup, during installation you will see a screen that says that something went wrong. This hurts nothing and you would simply select "skip" on that screen. This does not affect unattended setup at all.
IMPORTANT: If you implement this trick, for both a manual installation and unattended setup, after Windows installation is completed, the first thing that you should do after setup finishes is to ensure that you have Internet access, then open Settings > Time & language > Language & region. Change "Country or region" to "United States" (or what is appropriate for your region) and "Regional format" to "English (United States)". Again, if not in the United States, set this to the appropriate setting for your region. Note that if you do not have Internet access when you make this change, then the placeholder icons will populate once Internet access is available so it is important to make sure you have Internet access before make this change. Put another way: If you do not provide Internet access before changing the regional settings, Windows will behave just like you never implemented this trick.
The bottom line is that by simply changing "UserLocal" to "en-001" (which is the same as selecting "English (World)" in the GUI), you get a far cleaner Start screen after installation.
To make this change, you don't have to bother using the Windows System Image Manager. Simply open the answer file in Notepad and make the change manually.
Note that if you do not wish to implement this trick, simply change each reference to "en-001" in my answer files to "en-US" (in the United States) or to the appropriate setting for your region.
END OF TRICK
* Items that apply to ALL of the answer files *
All of the answer files found here have a Windows 10 / 11 Pro key. You can change the key to Windows Home, Education, etc. if you wish.
Each answer file has comments that you should review. These comments are easiest to read if you open the answer file in a Web browser because it color codes items making comments easier to read but you can also open them in Notepad or another text reader / editor.
All of these answer files can be used with both Windows 10 and 11. The portion of any answer file that bypasses Windows 11 requirement checks won't affect Windows 10 so it is fine to leave this in place even for Windows 10 installations.
* How to use an answer file *
Select the desired answer file, save it to a text file named
autounattend.xml. Do one of the following:1) Place it in the root of your Windows installation media.
2) As an alternative, create a second media with just the autounattend.xml answer file in the root. Make sure that this media is connected to the system or VM where Windows is to be installed in addition to the Windows installation media. This is especially helpful for installation to a VM because it means that you will not need to modify your Windows ISO image.
* A problem with unattended installation, and a solution *
Microsoft recommends that the Recovery Tools partition be created immediately AFTER the Windows partition. However, a traditional unattended installation does not do this, it creates the Recovery Tools partition BEFORE the Windows partition. If you want to know the technical reasons for this let me know and I will explain, but we won't go into that here. The Fully Unattended Installation answer file will perform a traditional unattended installation but will NOT place the Recovery Tools partition after the Windows partition as is recommended. My suggestion is to use any one of the other fully unattended installation answer files which use a workaraound that creates the Recovery Tools partition after the Windows partition.
* Brief summary of each answer file *
Read the comments in each answer file for more details.
(!) Fully Unattended Installation - Wipes disk 0 and installs Windows to it. Uses the traditional methods resulting in the Recovery Tools partition being created BEFORE the Windows partition.
(!) Fully Unattended Installation, 350 GB Win Partition - This answer file will create a Windows partition limited to 350 GB and an additional data partition that contains the remaining space of the disk. This is good for a system such as a laptop that has only one drive but where you want a separate drive letter for a data partition.
(!) Fully Unattended Installation, Creates Recovery Partition Last - This is the same as a standard fully unattended installation with the exception that it uses a workaround to create the Recovery Tools partition AFTER the Windows partition.
Unattended Installation, User Selects Destination Disk - This is a fully unattended installation EXCEPT that it pauses near the start of installation to have the user select the disk to which Windows should be installed. This is an excellent choice if you do not know ahead of time what disk to install Windows to or if you don't want to risk accidentally wiping the wrong disk.
No Unattended Installation, Bypass Win 11 Requirements and Creates Local Account - This answer file does not perform an unattended installation. It allows the user to manually install Windows but will bypass the Windows 11 System requirements and will automatically create a local user account. Other than that, the user steps through Windows installation manually.
No Unattended Installation, Bypass Win 11 Requirements Only - This answer file does not perform an unattended installation. It allows the user to manually install Windows but will bypass the Windows 11 System requirements. Other than that, the user steps through Windows installation manually.
No Unattended Installation, Creates Local Account Only - This answer file does not perform an unattended installation. It allows the user to manually install Windows but will create a local user account, bypassing Windows from forcing you to create a Microsoft account during installation.
NOTE: Comments are displayed in a different color in the below answer files. I suggest reading the comments. If you download any of these, open them in a web browser to read the comments. It's much easier to read than in notepad where everything looks the same.
(!) Fully Unattended Installation
XML:
<?xml version="1.0" encoding="utf-8"?>
<!--
************
* WARNING! *
************
This answer file will cause Windows setup to WIPE disk 0 without any warning and to begin installation
to that disk. Change the disk number if installing to a disk other than disk 0.
******************
* END OF WARNING *
******************
Notes about this answer file:
It includes a Windows 10 / 11 Pro key.
It will install Windows to Disk 0.
It creates an Admin level user named "WinUser", full name "Windows User" with an initial password of "Password1".
Locale settings are set to United States English.
IMPORTANT: The "User Locale" has been changed from en-US to en-001 in both places where it appears. This is the equivalent of
"English (World)". By doing this, Windows will not believe itself to be in a location where Microsoft Store access
is available and as a result none of the "bloatware" placeholder icons will be installed to Start. After Windows is
installed you will need to do the following:
1) Make certain that Windows has Internet access BEFORE you perform step 2 below. If you perform step 2 before
Windows has had a chance to connect to the Internet, the placeholder icons will appear in Start as soon as
Internet access becomes available.
2) Open Settings > Time & language > Language & region. Under "Region" change "Country or region" to United States
(or the region appropriate to you). Also, change the "Regional format" to "English (United States)" or to the
setting appropriate for your region.
Time zone is set to US Central Time. Change this if needed.
It includes settings to bypass Windows 11 system requirements.
The size of the Recovery Tools partition created by this answer will be larger than normal at 2 GB. Change this if you are very short on space or prefer a smaller Recovery Tools partition.
This answer file can be used with both Windows 10 and 11. The settings to bypass
Windows 11 system requirement checks will have no effect on Windows 10.
END OF NOTES
-->
<unattend xmlns="urn:schemas-microsoft-com:unattend">
<settings pass="windowsPE">
<component name="Microsoft-Windows-International-Core-WinPE" processorArchitecture="amd64" publicKeyToken="31bf3856ad364e35" language="neutral" versionScope="nonSxS" xmlns:wcm="http://schemas.microsoft.com/WMIConfig/2002/State" xmlns:xsi="http://www.w3.org/2001/XMLSchema-instance">
<SetupUILanguage>
<UILanguage>en-US</UILanguage>
</SetupUILanguage>
<InputLocale>en-US</InputLocale>
<SystemLocale>en-US</SystemLocale>
<UILanguage>en-US</UILanguage>
<UILanguageFallback>en-US</UILanguageFallback>
<UserLocale>en-001</UserLocale>
</component>
<component name="Microsoft-Windows-Setup" processorArchitecture="amd64" publicKeyToken="31bf3856ad364e35" language="neutral" versionScope="nonSxS" xmlns:wcm="http://schemas.microsoft.com/WMIConfig/2002/State" xmlns:xsi="http://www.w3.org/2001/XMLSchema-instance">
<ImageInstall>
<OSImage>
<InstallTo>
<DiskID>0</DiskID>
<PartitionID>4</PartitionID>
</InstallTo>
<!--
Below you will find 6 lines that are commented out. These lines will allow you to specify a specific Windows edition to install
in those case where your Windows image has more than one of the same edition. As an example, suppose that you have more than
one Windows Pro edition. Maybe one of these is a standard Windows Pro edition, and another has Windows Pro with drivers added
for use in a specific system. If you are specifying a generic Windows Pro key for installation, setup will pause and expect
you to specify which Windows Pro edition to install since there is more than one. By uncommenting the section below, you
are telling setup exactly which one of these to install. Make sure to update the index value to the correct value for
your situation. You can ignore this if you are using a standard retail Windows installation media.
Note that you can also change the value for "key" to /IMAGE/NAME or /IMAGE/DESCRIPTION to specify the edition to be
installed by NAME or DESCRIPTION rather than by index number.
-->
<!--
<InstallFrom>
<MetaData wcm:action="add">
<Key>/IMAGE/INDEX</Key>
<Value>6</Value>
</MetaData>
</InstallFrom>
-->
</OSImage>
</ImageInstall>
<UserData>
<ProductKey>
<Key>VK7JG-NPHTM-C97JM-9MPGT-3V66T</Key>
</ProductKey>
<AcceptEula>true</AcceptEula>
</UserData>
<RunSynchronous>
<RunSynchronousCommand wcm:action="add">
<Order>1</Order>
<Path>reg add HKLM\System\Setup\LabConfig /v BypassTPMCheck /t reg_dword /d 0x00000001 /f</Path>
</RunSynchronousCommand>
<RunSynchronousCommand wcm:action="add">
<Order>2</Order>
<Path>reg add HKLM\System\Setup\LabConfig /v BypassSecureBootCheck /t reg_dword /d 0x00000001 /f</Path>
</RunSynchronousCommand>
<RunSynchronousCommand wcm:action="add">
<Order>3</Order>
<Path>reg add HKLM\System\Setup\LabConfig /v BypassRAMCheck /t reg_dword /d 0x00000001 /f</Path>
</RunSynchronousCommand>
<RunSynchronousCommand wcm:action="add">
<Order>4</Order>
<Path>reg add HKLM\System\Setup\LabConfig /v BypassCPUCheck /t reg_dword /d 0x00000001 /f</Path>
</RunSynchronousCommand>
</RunSynchronous>
<DiskConfiguration>
<Disk wcm:action="add">
<CreatePartitions>
<CreatePartition wcm:action="add">
<Order>1</Order>
<Size>2048</Size>
<Type>Primary</Type>
</CreatePartition>
<CreatePartition wcm:action="add">
<Order>2</Order>
<Size>260</Size>
<Type>EFI</Type>
</CreatePartition>
<CreatePartition wcm:action="add">
<Order>3</Order>
<Size>128</Size>
<Type>MSR</Type>
</CreatePartition>
<CreatePartition wcm:action="add">
<Extend>true</Extend>
<Order>4</Order>
<Type>Primary</Type>
</CreatePartition>
</CreatePartitions>
<ModifyPartitions>
<ModifyPartition wcm:action="add">
<Format>NTFS</Format>
<Label>WinRE</Label>
<Order>1</Order>
<PartitionID>1</PartitionID>
<TypeID>DE94BBA4-06D1-4D40-A16A-BFD50179D6AC</TypeID>
</ModifyPartition>
<ModifyPartition wcm:action="add">
<Format>FAT32</Format>
<Label>System</Label>
<Order>2</Order>
<PartitionID>2</PartitionID>
</ModifyPartition>
<ModifyPartition wcm:action="add">
<Order>3</Order>
<PartitionID>3</PartitionID>
</ModifyPartition>
<ModifyPartition wcm:action="add">
<Format>NTFS</Format>
<Label>Windows</Label>
<Letter>C</Letter>
<Order>4</Order>
<PartitionID>4</PartitionID>
</ModifyPartition>
</ModifyPartitions>
<DiskID>0</DiskID>
<WillWipeDisk>true</WillWipeDisk>
</Disk>
</DiskConfiguration>
</component>
</settings>
<settings pass="oobeSystem">
<component name="Microsoft-Windows-International-Core" processorArchitecture="amd64" publicKeyToken="31bf3856ad364e35" language="neutral" versionScope="nonSxS" xmlns:wcm="http://schemas.microsoft.com/WMIConfig/2002/State" xmlns:xsi="http://www.w3.org/2001/XMLSchema-instance">
<InputLocale>en-US</InputLocale>
<SystemLocale>en-US</SystemLocale>
<UILanguage>en-US</UILanguage>
<UILanguageFallback>en-US</UILanguageFallback>
<UserLocale>en-001</UserLocale>
</component>
<component name="Microsoft-Windows-Shell-Setup" processorArchitecture="amd64" publicKeyToken="31bf3856ad364e35" language="neutral" versionScope="nonSxS" xmlns:wcm="http://schemas.microsoft.com/WMIConfig/2002/State" xmlns:xsi="http://www.w3.org/2001/XMLSchema-instance">
<OOBE>
<HideEULAPage>true</HideEULAPage>
<HideOEMRegistrationScreen>true</HideOEMRegistrationScreen>
<HideOnlineAccountScreens>true</HideOnlineAccountScreens>
<HideWirelessSetupInOOBE>true</HideWirelessSetupInOOBE>
<ProtectYourPC>1</ProtectYourPC>
<UnattendEnableRetailDemo>false</UnattendEnableRetailDemo>
</OOBE>
<UserAccounts>
<LocalAccounts>
<LocalAccount wcm:action="add">
<Password>
<Value>UABhAHMAcwB3AG8AcgBkADEAUABhAHMAcwB3AG8AcgBkAA==</Value>
<PlainText>false</PlainText>
</Password>
<DisplayName>Windows User</DisplayName>
<Group>Administrators</Group>
<Name>WinUser</Name>
</LocalAccount>
</LocalAccounts>
</UserAccounts>
<TimeZone>Central Standard Time</TimeZone>
<AutoLogon>
<Enabled>true</Enabled>
<LogonCount>1</LogonCount>
<Username>WinUser</Username>
<Password>
<Value>UABhAHMAcwB3AG8AcgBkADEAUABhAHMAcwB3AG8AcgBkAA==</Value>
<PlainText>false</PlainText>
</Password>
</AutoLogon>
<FirstLogonCommands>
<SynchronousCommand wcm:action="add">
<CommandLine>reg add "HKLM\SOFTWARE\Microsoft\Windows NT\CurrentVersion\Winlogon" /v AutoLogonCount /t REG_DWORD /d 0 /f</CommandLine>
<Order>1</Order>
</SynchronousCommand>
</FirstLogonCommands>
</component>
</settings>
<settings pass="specialize">
<component name="Microsoft-Windows-Shell-Setup" processorArchitecture="amd64" publicKeyToken="31bf3856ad364e35" language="neutral" versionScope="nonSxS" xmlns:wcm="http://schemas.microsoft.com/WMIConfig/2002/State" xmlns:xsi="http://www.w3.org/2001/XMLSchema-instance">
<OEMName></OEMName>
<TimeZone>Central Standard Time</TimeZone>
<ComputerName></ComputerName>
</component>
</settings>
<cpi:offlineImage cpi:source="catalog://godzilla/data/windows/windows tools and deployment apps/assets and tools for deployment/catalog files for windows sim/windows 11 22h2 catalog files/install_windows 11 pro.clg" xmlns:cpi="urn:schemas-microsoft-com:cpi" />
</unattend>(!) Fully Unattended Installation, 350 GB Win Partition
XML:
<?xml version="1.0" encoding="utf-8"?>
<!--
************
* WARNING! *
************
This answer file will cause Windows setup to WIPE disk 0 without any warning and to begin installation
to that disk. Change the disk number if installing to a disk other than disk 0.
******************
* END OF WARNING *
******************
Notes about this answer file:
This answer file is for UEFI based systems only.
It includes a Windows 10 / 11 Pro key.
It creates an Admin level user named "WinUser", full name "Windows User" with an initial password of "Password1".
Locale settings are set to United States English.
IMPORTANT: The "User Locale" has been changed from en-US to en-001 in both places where it appears. This is the equivalent of
"English (World)". By doing this, Windows will not believe itself to be in a location where Microsoft Store access
is available and as a result none of the "bloatware" placeholder icons will be installed to Start. After Windows is
installed you will need to do the following:
1) Make certain that Windows has Internet access BEFORE you perform step 2 below. If you perform step 2 before
Windows has had a chance to connect to the Internet, the placeholder icons will appear in Start as soon as
Internet access becomes available.
2) Open Settings > Time & language > Language & region. Under "Region" change "Country or region" to United States
(or the region appropriate to you). Also, change the "Regional format" to "English (United States)" or to the
setting appropriate for your region. Note that "Recommended" can also be used here.
Time zone is set to US Central Time. Change this if needed.
It includes settings to bypass Windows 11 system requirements.
The size of the Recovery Tools partition created by this answer will be larger than normal at 2 GB. Change this if you are very short on space or prefer a smaller Recovery Tools partition.
It will install automatically to disk 0 and creates the recovery partition last, as Microsoft recommends. To accomplish this,
we do not use the standard method of specifying the disk configuration information, but we create a diskpart script to
configure the disk.
This answer file can be used with both Windows 10 and 11. The settings to bypass
Windows 11 system requirement checks will have no effect on Windows 10.
END OF NOTES
-->
<unattend xmlns="urn:schemas-microsoft-com:unattend">
<settings pass="windowsPE">
<component name="Microsoft-Windows-International-Core-WinPE" processorArchitecture="amd64" publicKeyToken="31bf3856ad364e35" language="neutral" versionScope="nonSxS" xmlns:wcm="http://schemas.microsoft.com/WMIConfig/2002/State" xmlns:xsi="http://www.w3.org/2001/XMLSchema-instance">
<SetupUILanguage>
<UILanguage>en-US</UILanguage>
</SetupUILanguage>
<InputLocale>en-US</InputLocale>
<SystemLocale>en-US</SystemLocale>
<UILanguage>en-US</UILanguage>
<UILanguageFallback>en-US</UILanguageFallback>
<UserLocale>en-001</UserLocale>
</component>
<component name="Microsoft-Windows-Setup" processorArchitecture="amd64" publicKeyToken="31bf3856ad364e35" language="neutral" versionScope="nonSxS" xmlns:wcm="http://schemas.microsoft.com/WMIConfig/2002/State" xmlns:xsi="http://www.w3.org/2001/XMLSchema-instance">
<ImageInstall>
<OSImage>
<InstallTo>
<DiskID>0</DiskID>
<PartitionID>3</PartitionID>
</InstallTo>
<!--
Below you will find 6 lines that are commented out. These lines will allow you to specify a specific Windows edition to install
in those case where your Windows image has more than one of the same edition. As an example, suppose that you have more than
one Windows Pro edition. Maybe one of these is a standard Windows Pro edition, and another has Windows Pro with drivers added
for use in a specific system. If you are specifying a generic Windows Pro key for installation, setup will pause and expect
you to specify which Windows Pro edition to install since there is more than one. By uncommenting the section below, you
are telling setup exactly which one of these to install. Make sure to update the index value to the correct value for
your situation. You can ignore this if you are using a standard retail Windows installation media.
Note that you can also change the value for "key" to /IMAGE/NAME or /IMAGE/DESCRIPTION to specify the edition to be
installed by NAME or DESCRIPTION rather than by index number.
-->
<!--
<InstallFrom>
<MetaData wcm:action="add">
<Key>/IMAGE/INDEX</Key>
<Value>6</Value>
</MetaData>
</InstallFrom>
-->
</OSImage>
</ImageInstall>
<UserData>
<ProductKey>
<Key>VK7JG-NPHTM-C97JM-9MPGT-3V66T</Key>
</ProductKey>
<AcceptEula>true</AcceptEula>
</UserData>
<!--
The first 4 Synchronous Commands below bypass the Windows 11 system requirement checks. The checks that are bypassed are:
TPM Check
Secure Boot Check
RAM Check
CPU Check
The remaining Synchronous Commands will partition the hard disk with the following settings:
NOTE: Synchronous Command #5 selects disk 0. If disk 0 is not the disk you need to use, change this to the correct disk number.
Partion Type | Size (in MB) | Format
===============================================
EFI | 260 | FAT32
MSR | 128 | NONE
Windows | 358,400 (350GB) | NTFS
Recovery | 2,048 | NTFS
My Software | All Remaining Space | NTFS
===============================================
-->
<RunSynchronous>
<RunSynchronousCommand wcm:action="add">
<Order>1</Order>
<Path>reg add HKLM\System\Setup\LabConfig /v BypassTPMCheck /t reg_dword /d 0x00000001 /f</Path>
</RunSynchronousCommand>
<RunSynchronousCommand wcm:action="add">
<Order>2</Order>
<Path>reg add HKLM\System\Setup\LabConfig /v BypassSecureBootCheck /t reg_dword /d 0x00000001 /f</Path>
</RunSynchronousCommand>
<RunSynchronousCommand wcm:action="add">
<Order>3</Order>
<Path>reg add HKLM\System\Setup\LabConfig /v BypassRAMCheck /t reg_dword /d 0x00000001 /f</Path>
</RunSynchronousCommand>
<RunSynchronousCommand wcm:action="add">
<Order>4</Order>
<Path>reg add HKLM\System\Setup\LabConfig /v BypassCPUCheck /t reg_dword /d 0x00000001 /f</Path>
</RunSynchronousCommand>
<RunSynchronousCommand wcm:action="add">
<Order>5</Order>
<Path>cmd.exe /c echo select disk 0 >> X:\diskpartUEFI.txt</Path>
</RunSynchronousCommand>
<RunSynchronousCommand wcm:action="add">
<Order>6</Order>
<Path>cmd.exe /c echo clean >> X:\diskpartUEFI.txt</Path>
</RunSynchronousCommand>
<RunSynchronousCommand wcm:action="add">
<Order>7</Order>
<Path>cmd.exe /c echo convert gpt >> X:\diskpartUEFI.txt</Path>
</RunSynchronousCommand>
<RunSynchronousCommand wcm:action="add">
<Order>8</Order>
<Path>cmd.exe /c echo create partition efi size=260 >> X:\diskpartUEFI.txt</Path>
</RunSynchronousCommand>
<RunSynchronousCommand wcm:action="add">
<Order>9</Order>
<Path>cmd.exe /c echo format fs=fat32 quick label="System" >> X:\diskpartUEFI.txt</Path>
</RunSynchronousCommand>
<RunSynchronousCommand wcm:action="add">
<Order>10</Order>
<Path>cmd.exe /c echo create partition msr size=128 >> X:\diskpartUEFI.txt</Path>
</RunSynchronousCommand>
<RunSynchronousCommand wcm:action="add">
<Order>11</Order>
<Path>cmd.exe /c echo create partition primary size=358400 >> X:\diskpartUEFI.txt</Path>
</RunSynchronousCommand>
<RunSynchronousCommand wcm:action="add">
<Order>12</Order>
<Path>cmd.exe /c echo format fs=ntfs quick label="Windows" >> X:\diskpartUEFI.txt</Path>
</RunSynchronousCommand>
<RunSynchronousCommand wcm:action="add">
<Order>13</Order>
<Path>cmd.exe /c echo assign letter=W >> X:\diskpartUEFI.txt</Path>
</RunSynchronousCommand>
<RunSynchronousCommand wcm:action="add">
<Order>14</Order>
<Path>cmd.exe /c echo create partition primary size=2048 >> X:\diskpartUEFI.txt</Path>
</RunSynchronousCommand>
<RunSynchronousCommand wcm:action="add">
<Order>15</Order>
<Path>cmd.exe /c echo format fs=ntfs quick label="Recovery" >> X:\diskpartUEFI.txt</Path>
</RunSynchronousCommand>
<RunSynchronousCommand wcm:action="add">
<Order>16</Order>
<Path>cmd.exe /c echo set id="de94bba4-06d1-4d40-a16a-bfd50179d6ac" >> X:\diskpartUEFI.txt</Path>
</RunSynchronousCommand>
<RunSynchronousCommand wcm:action="add">
<Order>17</Order>
<Path>cmd.exe /c echo gpt attributes=0x8000000000000001 >> X:\diskpartUEFI.txt</Path>
</RunSynchronousCommand>
<RunSynchronousCommand wcm:action="add">
<Order>18</Order>
<Path>cmd.exe /c echo create partition primary >> X:\diskpartUEFI.txt</Path>
</RunSynchronousCommand>
<RunSynchronousCommand wcm:action="add">
<Order>19</Order>
<Path>cmd.exe /c echo format fs=ntfs quick label="My Software" >> X:\diskpartUEFI.txt</Path>
</RunSynchronousCommand>
<RunSynchronousCommand wcm:action="add">
<Order>20</Order>
<Path>cmd.exe /c echo exit >> X:\diskpartUEFI.txt</Path>
</RunSynchronousCommand>
<RunSynchronousCommand wcm:action="add">
<Order>21</Order>
<Path>cmd.exe /c diskpart.exe /s X:\DiskPartUEFI.txt</Path>
</RunSynchronousCommand>
</RunSynchronous>
</component>
</settings>
<settings pass="oobeSystem">
<component name="Microsoft-Windows-International-Core" processorArchitecture="amd64" publicKeyToken="31bf3856ad364e35" language="neutral" versionScope="nonSxS" xmlns:wcm="http://schemas.microsoft.com/WMIConfig/2002/State" xmlns:xsi="http://www.w3.org/2001/XMLSchema-instance">
<InputLocale>en-US</InputLocale>
<SystemLocale>en-US</SystemLocale>
<UILanguage>en-US</UILanguage>
<UILanguageFallback>en-US</UILanguageFallback>
<UserLocale>en-001</UserLocale>
</component>
<component name="Microsoft-Windows-Shell-Setup" processorArchitecture="amd64" publicKeyToken="31bf3856ad364e35" language="neutral" versionScope="nonSxS" xmlns:wcm="http://schemas.microsoft.com/WMIConfig/2002/State" xmlns:xsi="http://www.w3.org/2001/XMLSchema-instance">
<OOBE>
<HideEULAPage>true</HideEULAPage>
<HideOEMRegistrationScreen>true</HideOEMRegistrationScreen>
<HideOnlineAccountScreens>true</HideOnlineAccountScreens>
<HideWirelessSetupInOOBE>true</HideWirelessSetupInOOBE>
<ProtectYourPC>1</ProtectYourPC>
<UnattendEnableRetailDemo>false</UnattendEnableRetailDemo>
</OOBE>
<UserAccounts>
<LocalAccounts>
<LocalAccount wcm:action="add">
<Password>
<Value>UABhAHMAcwB3AG8AcgBkADEAUABhAHMAcwB3AG8AcgBkAA==</Value>
<PlainText>false</PlainText>
</Password>
<DisplayName>Windows User</DisplayName>
<Group>Administrators</Group>
<Name>WinUser</Name>
</LocalAccount>
</LocalAccounts>
</UserAccounts>
<TimeZone>Central Standard Time</TimeZone>
<FirstLogonCommands>
<SynchronousCommand wcm:action="add">
<CommandLine>reg add "HKLM\SOFTWARE\Microsoft\Windows NT\CurrentVersion\Winlogon" /v AutoLogonCount /t REG_DWORD /d 0 /f</CommandLine>
<Order>1</Order>
</SynchronousCommand>
</FirstLogonCommands>
<AutoLogon>
<Password>
<Value>UABhAHMAcwB3AG8AcgBkADEAUABhAHMAcwB3AG8AcgBkAA==</Value>
<PlainText>false</PlainText>
</Password>
<Username>WinUser</Username>
<Enabled>true</Enabled>
<LogonCount>1</LogonCount>
</AutoLogon>
</component>
</settings>
<settings pass="specialize">
<component name="Microsoft-Windows-Shell-Setup" processorArchitecture="amd64" publicKeyToken="31bf3856ad364e35" language="neutral" versionScope="nonSxS" xmlns:wcm="http://schemas.microsoft.com/WMIConfig/2002/State" xmlns:xsi="http://www.w3.org/2001/XMLSchema-instance">
<OEMInformation>
<Manufacturer></Manufacturer>
<SupportHours></SupportHours>
<SupportPhone></SupportPhone>
<SupportURL></SupportURL>
</OEMInformation>
<OEMName></OEMName>
<TimeZone>Central Standard Time</TimeZone>
</component>
</settings>
<cpi:offlineImage cpi:source="catalog:c:/data/windows/windows tools and deployment apps/assets and tools for deployment/catalog files for windows sim/windows 11 22h2 catalog files/install_windows 11 pro.clg" xmlns:cpi="urn:schemas-microsoft-com:cpi" />
</unattend>(!) Fully Unattended Installation, Creates Recovery Partition Last
XML:
<?xml version="1.0" encoding="utf-8"?>
<!--
Notes about this answer file:
This answer file is for UEFI based systems only.
It includes a Windows 10 / 11 Pro key.
It creates an Admin level user named "WinUser", full name "Windows User" with an initial password of "Password1".
Locale settings are set to United States English.
IMPORTANT: The "User Locale" has been changed from en-US to en-001 in both places where it appears. This is the equivalent of
"English (World)". By doing this, Windows will not believe itself to be in a location where Microsoft Store access
is available and as a result none of the "bloatware" placeholder icons will be installed to Start. After Windows is
installed you will need to do the following:
1) Make certain that Windows has Internet access BEFORE you perform step 2 below. If you perform step 2 before
Windows has had a chance to connect to the Internet, the placeholder icons will appear in Start as soon as
Internet access becomes available.
2) Open Settings > Time & language > Language & region. Under "Region" change "Country or region" to United States
(or the region appropriate to you). Also, change the "Regional format" to "English (United States)" or to the
setting appropriate for your region. Note that "Recommended" can also be used here.
Time zone is set to US Central Time. Change this if needed.
It includes settings to bypass Windows 11 system requirements.
The size of the Recovery Tools partition created by this answer will be larger than normal at 2 GB. Change this if you are very short on space or prefer a smaller Recovery Tools partition.
It will install automatically to disk 0 and creates the recovery partition last, as Microsoft recommends. To accomplish this,
we do not use the standard method of specifying the disk configuration information, but we create a diskpart script to
configure the disk.
This answer file can be used with both Windows 10 and 11. The settings to bypass
Windows 11 system requirement checks will have no effect on Windows 10.
END OF NOTES
-->
<unattend xmlns="urn:schemas-microsoft-com:unattend">
<settings pass="windowsPE">
<component name="Microsoft-Windows-International-Core-WinPE" processorArchitecture="amd64" publicKeyToken="31bf3856ad364e35" language="neutral" versionScope="nonSxS" xmlns:wcm="http://schemas.microsoft.com/WMIConfig/2002/State" xmlns:xsi="http://www.w3.org/2001/XMLSchema-instance">
<SetupUILanguage>
<UILanguage>en-US</UILanguage>
</SetupUILanguage>
<InputLocale>en-US</InputLocale>
<SystemLocale>en-US</SystemLocale>
<UILanguage>en-US</UILanguage>
<UILanguageFallback>en-US</UILanguageFallback>
<UserLocale>en-001</UserLocale>
</component>
<component name="Microsoft-Windows-Setup" processorArchitecture="amd64" publicKeyToken="31bf3856ad364e35" language="neutral" versionScope="nonSxS" xmlns:wcm="http://schemas.microsoft.com/WMIConfig/2002/State" xmlns:xsi="http://www.w3.org/2001/XMLSchema-instance">
<ImageInstall>
<OSImage>
<InstallTo>
<DiskID>0</DiskID>
<PartitionID>3</PartitionID>
</InstallTo>
<!--
Below you will find 6 lines that are commented out. These lines will allow you to specify a specific Windows edition to install
in those case where your Windows image has more than one of the same edition. As an example, suppose that you have more than
one Windows Pro edition. Maybe one of these is a standard Windows Pro edition, and another has Windows Pro with drivers added
for use in a specific system. If you are specifying a generic Windows Pro key for installation, setup will pause and expect
you to specify which Windows Pro edition to install since there is more than one. By uncommenting the section below, you
are telling setup exactly which one of these to install. Make sure to update the index value to the correct value for
your situation. You can ignore this if you are using a standard retail Windows installation media.
Note that you can also change the value for "key" to /IMAGE/NAME or /IMAGE/DESCRIPTION to specify the edition to be
installed by NAME or DESCRIPTION rather than by index number.
-->
<!--
<InstallFrom>
<MetaData wcm:action="add">
<Key>/IMAGE/INDEX</Key>
<Value>6</Value>
</MetaData>
</InstallFrom>
-->
</OSImage>
</ImageInstall>
<UserData>
<ProductKey>
<Key>VK7JG-NPHTM-C97JM-9MPGT-3V66T</Key>
</ProductKey>
<AcceptEula>true</AcceptEula>
</UserData>
<!--
The first 4 Synchronous Commands below bypass the Windows 11 system requirement checks. The checks that are bypassed are:
TPM Check
Secure Boot Check
RAM Check
CPU Check
The remaining Synchronous Commands will partition the hard disk with the following settings:
NOTE: Synchronous Command #5 selects disk 0. If disk 0 is not the disk you need to use, change this to the correct disk number.
Partion Type | Size (in MB) | Format
================================================
EFI | 260 | FAT32
MSR | 128 | NONE
Windows | Remaining Space - 2 GB | NTFS
Recovery | 2,048 | NTFS
================================================
-->
<RunSynchronous>
<RunSynchronousCommand wcm:action="add">
<Order>1</Order>
<Path>reg add HKLM\System\Setup\LabConfig /v BypassTPMCheck /t reg_dword /d 0x00000001 /f</Path>
</RunSynchronousCommand>
<RunSynchronousCommand wcm:action="add">
<Order>2</Order>
<Path>reg add HKLM\System\Setup\LabConfig /v BypassSecureBootCheck /t reg_dword /d 0x00000001 /f</Path>
</RunSynchronousCommand>
<RunSynchronousCommand wcm:action="add">
<Order>3</Order>
<Path>reg add HKLM\System\Setup\LabConfig /v BypassRAMCheck /t reg_dword /d 0x00000001 /f</Path>
</RunSynchronousCommand>
<RunSynchronousCommand wcm:action="add">
<Order>4</Order>
<Path>reg add HKLM\System\Setup\LabConfig /v BypassCPUCheck /t reg_dword /d 0x00000001 /f</Path>
</RunSynchronousCommand>
<RunSynchronousCommand wcm:action="add">
<Order>5</Order>
<Path>cmd.exe /c echo select disk 0 >> X:\diskpartUEFI.txt</Path>
</RunSynchronousCommand>
<RunSynchronousCommand wcm:action="add">
<Order>6</Order>
<Path>cmd.exe /c echo clean >> X:\diskpartUEFI.txt</Path>
</RunSynchronousCommand>
<RunSynchronousCommand wcm:action="add">
<Order>7</Order>
<Path>cmd.exe /c echo convert gpt >> X:\diskpartUEFI.txt</Path>
</RunSynchronousCommand>
<RunSynchronousCommand wcm:action="add">
<Order>8</Order>
<Path>cmd.exe /c echo create partition efi size=260 >> X:\diskpartUEFI.txt</Path>
</RunSynchronousCommand>
<RunSynchronousCommand wcm:action="add">
<Order>9</Order>
<Path>cmd.exe /c echo format fs=fat32 quick label="System" >> X:\diskpartUEFI.txt</Path>
</RunSynchronousCommand>
<RunSynchronousCommand wcm:action="add">
<Order>10</Order>
<Path>cmd.exe /c echo create partition msr size=128 >> X:\diskpartUEFI.txt</Path>
</RunSynchronousCommand>
<RunSynchronousCommand wcm:action="add">
<Order>11</Order>
<Path>cmd.exe /c echo create partition primary >> X:\diskpartUEFI.txt</Path>
</RunSynchronousCommand>
<RunSynchronousCommand wcm:action="add">
<Order>12</Order>
<Path>cmd.exe /c echo shrink desired=2048 minimum=2048 >> X:\diskpartUEFI.txt</Path>
</RunSynchronousCommand>
<RunSynchronousCommand wcm:action="add">
<Order>13</Order>
<Path>cmd.exe /c echo format fs=ntfs quick label="Windows" >> X:\diskpartUEFI.txt</Path>
</RunSynchronousCommand>
<RunSynchronousCommand wcm:action="add">
<Order>14</Order>
<Path>cmd.exe /c echo assign letter=W >> X:\diskpartUEFI.txt</Path>
</RunSynchronousCommand>
<RunSynchronousCommand wcm:action="add">
<Order>15</Order>
<Path>cmd.exe /c echo create partition primary >> X:\diskpartUEFI.txt</Path>
</RunSynchronousCommand>
<RunSynchronousCommand wcm:action="add">
<Order>16</Order>
<Path>cmd.exe /c echo format fs=ntfs quick label="Recovery" >> X:\diskpartUEFI.txt</Path>
</RunSynchronousCommand>
<RunSynchronousCommand wcm:action="add">
<Order>17</Order>
<Path>cmd.exe /c echo set id="de94bba4-06d1-4d40-a16a-bfd50179d6ac" >> X:\diskpartUEFI.txt</Path>
</RunSynchronousCommand>
<RunSynchronousCommand wcm:action="add">
<Order>18</Order>
<Path>cmd.exe /c echo gpt attributes=0x8000000000000001 >> X:\diskpartUEFI.txt</Path>
</RunSynchronousCommand>
<RunSynchronousCommand wcm:action="add">
<Order>19</Order>
<Path>cmd.exe /c echo exit >> X:\diskpartUEFI.txt</Path>
</RunSynchronousCommand>
<RunSynchronousCommand wcm:action="add">
<Order>20</Order>
<Path>cmd.exe /c diskpart.exe /s X:\DiskPartUEFI.txt</Path>
</RunSynchronousCommand>
</RunSynchronous>
</component>
</settings>
<settings pass="oobeSystem">
<component name="Microsoft-Windows-International-Core" processorArchitecture="amd64" publicKeyToken="31bf3856ad364e35" language="neutral" versionScope="nonSxS" xmlns:wcm="http://schemas.microsoft.com/WMIConfig/2002/State" xmlns:xsi="http://www.w3.org/2001/XMLSchema-instance">
<InputLocale>en-US</InputLocale>
<SystemLocale>en-US</SystemLocale>
<UILanguage>en-US</UILanguage>
<UILanguageFallback>en-US</UILanguageFallback>
<UserLocale>en-001</UserLocale>
</component>
<component name="Microsoft-Windows-Shell-Setup" processorArchitecture="amd64" publicKeyToken="31bf3856ad364e35" language="neutral" versionScope="nonSxS" xmlns:wcm="http://schemas.microsoft.com/WMIConfig/2002/State" xmlns:xsi="http://www.w3.org/2001/XMLSchema-instance">
<OOBE>
<HideEULAPage>true</HideEULAPage>
<HideOEMRegistrationScreen>true</HideOEMRegistrationScreen>
<HideOnlineAccountScreens>true</HideOnlineAccountScreens>
<HideWirelessSetupInOOBE>true</HideWirelessSetupInOOBE>
<ProtectYourPC>1</ProtectYourPC>
<UnattendEnableRetailDemo>false</UnattendEnableRetailDemo>
</OOBE>
<UserAccounts>
<LocalAccounts>
<LocalAccount wcm:action="add">
<Password>
<Value>UABhAHMAcwB3AG8AcgBkADEAUABhAHMAcwB3AG8AcgBkAA==</Value>
<PlainText>false</PlainText>
</Password>
<DisplayName>Windows User</DisplayName>
<Group>Administrators</Group>
<Name>WinUser</Name>
</LocalAccount>
</LocalAccounts>
</UserAccounts>
<TimeZone>Central Standard Time</TimeZone>
<FirstLogonCommands>
<SynchronousCommand wcm:action="add">
<CommandLine>reg add "HKLM\SOFTWARE\Microsoft\Windows NT\CurrentVersion\Winlogon" /v AutoLogonCount /t REG_DWORD /d 0 /f</CommandLine>
<Order>1</Order>
</SynchronousCommand>
</FirstLogonCommands>
<AutoLogon>
<Password>
<Value>UABhAHMAcwB3AG8AcgBkADEAUABhAHMAcwB3AG8AcgBkAA==</Value>
<PlainText>false</PlainText>
</Password>
<Username>WinUser</Username>
<Enabled>true</Enabled>
<LogonCount>1</LogonCount>
</AutoLogon>
</component>
</settings>
<settings pass="specialize">
<component name="Microsoft-Windows-Shell-Setup" processorArchitecture="amd64" publicKeyToken="31bf3856ad364e35" language="neutral" versionScope="nonSxS" xmlns:wcm="http://schemas.microsoft.com/WMIConfig/2002/State" xmlns:xsi="http://www.w3.org/2001/XMLSchema-instance">
<OEMInformation>
<Manufacturer></Manufacturer>
<SupportHours></SupportHours>
<SupportPhone></SupportPhone>
<SupportURL></SupportURL>
</OEMInformation>
<OEMName></OEMName>
<TimeZone>Central Standard Time</TimeZone>
</component>
</settings>
<cpi:offlineImage cpi:source="catalog:c:/data/windows/windows tools and deployment apps/assets and tools for deployment/catalog files for windows sim/windows 11 22h2 catalog files/install_windows 11 pro.clg" xmlns:cpi="urn:schemas-microsoft-com:cpi" />
</unattend>No Unattended Installation, Bypass Win 11 Requirements and Creates Local Account - User Account WinUser
XML:
<?xml version="1.0" encoding="utf-8"?>
<!--
Notes about this answer file:

The purpose of this answer file is to bypass the Windows 11 system requirement checks, create a local user account, and
eliminate the need for an internet connection during setup. It does NOT perform an unattended installation of Windows.

It includes a Windows 10 / 11 Pro key.

It will create a local user account named "WinUser" with a full name of "Windows User" and a password of "Password1".

This answer file can also be used to setup Windows 10 since the setting to bypass Windows 11 requirement checks will
have no effect upon Windows 10 setup.

END OF NOTES
-->
<unattend xmlns="urn:schemas-microsoft-com:unattend">
    <settings pass="windowsPE">
        <component name="Microsoft-Windows-Setup" processorArchitecture="amd64" publicKeyToken="31bf3856ad364e35" language="neutral" versionScope="nonSxS" xmlns:wcm="http://schemas.microsoft.com/WMIConfig/2002/State" xmlns:xsi="http://www.w3.org/2001/XMLSchema-instance">
            <ImageInstall>
                <OSImage>
                    <InstallFrom>
                        <Path>\install.wim</Path>
                        <!--
Below you will find 4 lines that are commented out. These lines will allow you to specify a specific Windows edition to install
in those case where your Windows image has more than one of the same edition. As an example, suppose that you have more than
one Windows Pro edition. Maybe one of these is a standard Windows Pro edition, and another has Windows Pro with drivers added
for use in a specific system. If you are specifying a generic Windows Pro key for installation, setup will pause and expect
you to specify which Windows Pro edition to install since there is more than one. By uncommenting the section below, you
are telling setup exactly which one of these to install. Make sure to update the index value to the correct value for
your situation. You can ignore this if you are using a standard retail Windows installation media.

Note that you can also change the value for "key"  to /IMAGE/NAME or /IMAGE/DESCRIPTION to specify the edition to be
installed by NAME or DESCRIPTION rather than by index number.
-->
                        <!--
                        <MetaData wcm:action="add">
                            <Key>/IMAGE/INDEX</Key>
                            <Value>6</Value>
                        </MetaData>
-->
                    </InstallFrom>
                </OSImage>
            </ImageInstall>
            <UserData>
                <ProductKey>
                    <Key>VK7JG-NPHTM-C97JM-9MPGT-3V66T</Key>
                </ProductKey>
                <AcceptEula>true</AcceptEula>
            </UserData>
            <RunSynchronous>
                <RunSynchronousCommand wcm:action="add">
                    <Order>1</Order>
                    <Path>reg add HKLM\System\Setup\LabConfig /v BypassTPMCheck /t reg_dword /d 0x00000001 /f</Path>
                </RunSynchronousCommand>
                <RunSynchronousCommand wcm:action="add">
                    <Order>2</Order>
                    <Path>reg add HKLM\System\Setup\LabConfig /v BypassSecureBootCheck /t reg_dword /d 0x00000001 /f</Path>
                </RunSynchronousCommand>
                <RunSynchronousCommand wcm:action="add">
                    <Order>3</Order>
                    <Path>reg add HKLM\System\Setup\LabConfig /v BypassRAMCheck /t reg_dword /d 0x00000001 /f</Path>
                </RunSynchronousCommand>
                <RunSynchronousCommand wcm:action="add">
                    <Order>4</Order>
                    <Path>reg add HKLM\System\Setup\LabConfig /v BypassCPUCheck /t reg_dword /d 0x00000001 /f</Path>
                </RunSynchronousCommand>
            </RunSynchronous>
        </component>
    </settings>
    <settings pass="oobeSystem">
        <component name="Microsoft-Windows-Shell-Setup" processorArchitecture="amd64" publicKeyToken="31bf3856ad364e35" language="neutral" versionScope="nonSxS" xmlns:wcm="http://schemas.microsoft.com/WMIConfig/2002/State" xmlns:xsi="http://www.w3.org/2001/XMLSchema-instance">
            <UserAccounts>
                <LocalAccounts>
                    <LocalAccount wcm:action="add">
                        <Password>
                            <Value>UABhAHMAcwB3AG8AcgBkADEAUABhAHMAcwB3AG8AcgBkAA==</Value>
                            <PlainText>false</PlainText>
                        </Password>
                        <DisplayName>Windows User</DisplayName>
                        <Group>Administrators</Group>
                        <Name>WinUser</Name>
                    </LocalAccount>
                </LocalAccounts>
            </UserAccounts>
            <OOBE>
                <HideWirelessSetupInOOBE>true</HideWirelessSetupInOOBE>
                <UnattendEnableRetailDemo>false</UnattendEnableRetailDemo>
                <HideEULAPage>true</HideEULAPage>
                <HideOEMRegistrationScreen>true</HideOEMRegistrationScreen>
                <HideOnlineAccountScreens>true</HideOnlineAccountScreens>
                <ProtectYourPC>1</ProtectYourPC>
            </OOBE>
        </component>
    </settings>
</unattend>
No Unattended Installation, Bypass Win 11 Requirements Only
XML:
<?xml version="1.0" encoding="utf-8"?>
<!--
Notes about this answer file:

The purpose of this answer file is to simply bypass the Windows 11 system requirement checks. It does NOT perform
an unattended instalation of Windows.

It includes a Windows 10 / 11 Pro key.

It includes settings to bypass Windows 11 system requirements.

This answer file can be used with both Windows 10 and 11. The settings to bypass Windows 11
system requirement checks will have no effect on Windows 10.

END OF NOTES
-->
<unattend xmlns="urn:schemas-microsoft-com:unattend">
    <settings pass="windowsPE">
        <component name="Microsoft-Windows-Setup" processorArchitecture="amd64" publicKeyToken="31bf3856ad364e35" language="neutral" versionScope="nonSxS" xmlns:wcm="http://schemas.microsoft.com/WMIConfig/2002/State" xmlns:xsi="http://www.w3.org/2001/XMLSchema-instance">
            <ImageInstall>
                <OSImage>
                    <InstallFrom>
                        <Path>\install.wim</Path>
                        <!--
Below you will find 4 lines that are commented out. These lines will allow you to specify a specific Windows edition to install
in those case where your Windows image has more than one of the same edition. As an example, suppose that you have more than
one Windows Pro edition. Maybe one of these is a standard Windows Pro edition, and another has Windows Pro with drivers added
for use in a specific system. If you are specifying a generic Windows Pro key for installation, setup will pause and expect
you to specify which Windows Pro edition to install since there is more than one. By uncommenting the section below, you
are telling setup exactly which one of these to install. Make sure to update the index value to the correct value for
your situation. You can ignore this if you are using a standard retail Windows installation media.

Note that you can also change the value for "key"  to /IMAGE/NAME or /IMAGE/DESCRIPTION to specify the edition to be
installed by NAME or DESCRIPTION rather than by index number.
-->
                        <!--
                        <MetaData wcm:action="add">
                            <Key>/IMAGE/INDEX</Key>
                            <Value>6</Value>
                        </MetaData>
-->
                    </InstallFrom>
                </OSImage>
            </ImageInstall>
            <UserData>
                <ProductKey>
                    <Key>VK7JG-NPHTM-C97JM-9MPGT-3V66T</Key>
                </ProductKey>
                <AcceptEula>true</AcceptEula>
            </UserData>
            <RunSynchronous>
                <RunSynchronousCommand wcm:action="add">
                    <Order>1</Order>
                    <Path>reg add HKLM\System\Setup\LabConfig /v BypassTPMCheck /t reg_dword /d 0x00000001 /f</Path>
                </RunSynchronousCommand>
                <RunSynchronousCommand wcm:action="add">
                    <Order>2</Order>
                    <Path>reg add HKLM\System\Setup\LabConfig /v BypassSecureBootCheck /t reg_dword /d 0x00000001 /f</Path>
                </RunSynchronousCommand>
                <RunSynchronousCommand wcm:action="add">
                    <Order>3</Order>
                    <Path>reg add HKLM\System\Setup\LabConfig /v BypassRAMCheck /t reg_dword /d 0x00000001 /f</Path>
                </RunSynchronousCommand>
                <RunSynchronousCommand wcm:action="add">
                    <Order>4</Order>
                    <Path>reg add HKLM\System\Setup\LabConfig /v BypassCPUCheck /t reg_dword /d 0x00000001 /f</Path>
                </RunSynchronousCommand>
            </RunSynchronous>
        </component>
    </settings>
    <cpi:offlineImage cpi:source="catalog://godzilla/data/windows/windows tools and deployment apps/assets and tools for deployment/catalog files for windows sim/windows 11 22h2 catalog files/install_windows 11 pro.clg" xmlns:cpi="urn:schemas-microsoft-com:cpi" />
</unattend>
No Unattended Installation, Creates Local Account Only
XML:
<?xml version="1.0" encoding="utf-8"?>
<!--
Notes about this answer file:

The purpose of this answer file is to create a local user account and eliminate the need for an internet
connection during setup. It does NOT perform an unattended installation of Windows.

It includes a Windows 10 / 11 Pro key.

It will create a local user account named "WinUser" with a full name of "Windows User" and a password of "Password1".

END OF NOTES
-->
<unattend xmlns="urn:schemas-microsoft-com:unattend">
    <settings pass="windowsPE">
        <component name="Microsoft-Windows-Setup" processorArchitecture="amd64" publicKeyToken="31bf3856ad364e35" language="neutral" versionScope="nonSxS" xmlns:wcm="http://schemas.microsoft.com/WMIConfig/2002/State" xmlns:xsi="http://www.w3.org/2001/XMLSchema-instance">
            <ImageInstall>
                <OSImage>
                    <InstallFrom>
                        <Path>\install.wim</Path>
                        <!--
Below you will find 4 lines that are commented out. These lines will allow you to specify a specific Windows edition to install
in those case where your Windows image has more than one of the same edition. As an example, suppose that you have more than
one Windows Pro edition. Maybe one of these is a standard Windows Pro edition, and another has Windows Pro with drivers added
for use in a specific system. If you are specifying a generic Windows Pro key for installation, setup will pause and expect
you to specify which Windows Pro edition to install since there is more than one. By uncommenting the section below, you
are telling setup exactly which one of these to install. Make sure to update the index value to the correct value for
your situation. You can ignore this if you are using a standard retail Windows installation media.

Note that you can also change the value for "key"  to /IMAGE/NAME or /IMAGE/DESCRIPTION to specify the edition to be
installed by NAME or DESCRIPTION rather than by index number.
-->
                        <!--
                        <MetaData wcm:action="add">
                            <Key>/IMAGE/INDEX</Key>
                            <Value>6</Value>
                        </MetaData>
-->
                    </InstallFrom>
                </OSImage>
            </ImageInstall>
            <UserData>
                <ProductKey>
                    <Key>VK7JG-NPHTM-C97JM-9MPGT-3V66T</Key>
                </ProductKey>
                <AcceptEula>true</AcceptEula>
            </UserData>
        </component>
    </settings>
    <settings pass="oobeSystem">
        <component name="Microsoft-Windows-Shell-Setup" processorArchitecture="amd64" publicKeyToken="31bf3856ad364e35" language="neutral" versionScope="nonSxS" xmlns:wcm="http://schemas.microsoft.com/WMIConfig/2002/State" xmlns:xsi="http://www.w3.org/2001/XMLSchema-instance">
            <UserAccounts>
                <LocalAccounts>
                    <LocalAccount wcm:action="add">
                        <Password>
                            <Value>UABhAHMAcwB3AG8AcgBkADEAUABhAHMAcwB3AG8AcgBkAA==</Value>
                            <PlainText>false</PlainText>
                        </Password>
                        <DisplayName>Windows User</DisplayName>
                        <Group>Administrators</Group>
                        <Name>WinUser</Name>
                    </LocalAccount>
                </LocalAccounts>
            </UserAccounts>
            <OOBE>
                <HideWirelessSetupInOOBE>true</HideWirelessSetupInOOBE>
                <UnattendEnableRetailDemo>false</UnattendEnableRetailDemo>
                <HideEULAPage>true</HideEULAPage>
                <HideOEMRegistrationScreen>true</HideOEMRegistrationScreen>
                <HideOnlineAccountScreens>true</HideOnlineAccountScreens>
                <ProtectYourPC>1</ProtectYourPC>
            </OOBE>
        </component>
    </settings>
</unattend>
Unattended Installation, User Selects Destination Disk
XML:
<?xml version="1.0" encoding="utf-8"?>
<!--
Notes about this answer file:
It includes a Windows 10 / 11 Pro key.
If can be used with UEFI based systems or legacy BIOS based systems.
It creates an Admin level user named "WinUser", full name "Windows User" with an initial password of "Password1".
Locale settings are set to United States English.
IMPORTANT: The "User Locale" has been changed from en-US to en-001 in both places where it appears. This is the equivalent of
"English (World)". By doing this, Windows will not believe itself to be in a location where Microsoft Store access
is available and as a result none of the "bloatware" placeholder icons will be installed to Start. After Windows is
installed you will need to do the following:
1) Make certain that Windows has Internet access BEFORE you perform step 2 below. If you perform step 2 before
Windows has had a chance to connect to the Internet, the placeholder icons will appear in Start as soon as
Internet access becomes available.
2) Open Settings > Time & language > Language & region. Under "Region" change "Country or region" to United States
(or the region appropriate to you). Also, change the "Regional format" to "English (United States)" or to the
setting appropriate for your region. Note that "Recommended" can also be used here.
Time zone is set to US Central Time. Change this if needed.
No disk configuration section is included. This will allow the same answer file
to be used on any system no matter what disk Windows is to be installed on. As
a result of this, the user will be asked where to install Windows. After the
user specifies the location, the remainder of setup will continue unattended.
It includes settings to bypass Windows 11 system requirements.
This answer file can be used with both Windows 10 and 11. The settings to bypass
Windows 11 system requirement checks will have no effect on Windows 10.
END OF NOTES
-->
<unattend xmlns="urn:schemas-microsoft-com:unattend">
<settings pass="windowsPE">
<component name="Microsoft-Windows-International-Core-WinPE" processorArchitecture="amd64" publicKeyToken="31bf3856ad364e35" language="neutral" versionScope="nonSxS" xmlns:wcm="http://schemas.microsoft.com/WMIConfig/2002/State" xmlns:xsi="http://www.w3.org/2001/XMLSchema-instance">
<SetupUILanguage>
<UILanguage>en-US</UILanguage>
</SetupUILanguage>
<InputLocale>en-US</InputLocale>
<SystemLocale>en-US</SystemLocale>
<UILanguage>en-US</UILanguage>
<UILanguageFallback>en-US</UILanguageFallback>
<UserLocale>en-001</UserLocale>
</component>
<component name="Microsoft-Windows-Setup" processorArchitecture="amd64" publicKeyToken="31bf3856ad364e35" language="neutral" versionScope="nonSxS" xmlns:wcm="http://schemas.microsoft.com/WMIConfig/2002/State" xmlns:xsi="http://www.w3.org/2001/XMLSchema-instance">
<ImageInstall>
<OSImage>
<InstallFrom>
<Path>\install.wim</Path>
<!--
Below you will find 4 lines that are commented out. These lines will allow you to specify a specific Windows edition to install
in those case where your Windows image has more than one of the same edition. As an example, suppose that you have more than
one Windows Pro edition. Maybe one of these is a standard Windows Pro edition, and another has Windows Pro with drivers added
for use in a specific system. If you are specifying a generic Windows Pro key for installation, setup will pause and expect
you to specify which Windows Pro edition to install since there is more than one. By uncommenting the section below, you
are telling setup exactly which one of these to install. Make sure to update the index value to the correct value for
your situation. You can ignore this if you are using a standard retail Windows installation media.
Note that you can also change the value for "key" to /IMAGE/NAME or /IMAGE/DESCRIPTION to specify the edition to be
installed by NAME or DESCRIPTION rather than by index number.
-->
<!--
<MetaData wcm:action="add">
<Key>/IMAGE/INDEX</Key>
<Value>6</Value>
</MetaData>
-->
</InstallFrom>
</OSImage>
</ImageInstall>
<UserData>
<ProductKey>
<Key>VK7JG-NPHTM-C97JM-9MPGT-3V66T</Key>
</ProductKey>
<AcceptEula>true</AcceptEula>
</UserData>
<RunSynchronous>
<RunSynchronousCommand wcm:action="add">
<Order>1</Order>
<Path>reg add HKLM\System\Setup\LabConfig /v BypassTPMCheck /t reg_dword /d 0x00000001 /f</Path>
</RunSynchronousCommand>
<RunSynchronousCommand wcm:action="add">
<Order>2</Order>
<Path>reg add HKLM\System\Setup\LabConfig /v BypassSecureBootCheck /t reg_dword /d 0x00000001 /f</Path>
</RunSynchronousCommand>
<RunSynchronousCommand wcm:action="add">
<Order>3</Order>
<Path>reg add HKLM\System\Setup\LabConfig /v BypassRAMCheck /t reg_dword /d 0x00000001 /f</Path>
</RunSynchronousCommand>
<RunSynchronousCommand wcm:action="add">
<Order>4</Order>
<Path>reg add HKLM\System\Setup\LabConfig /v BypassCPUCheck /t reg_dword /d 0x00000001 /f</Path>
</RunSynchronousCommand>
</RunSynchronous>
</component>
</settings>
<settings pass="oobeSystem">
<component name="Microsoft-Windows-International-Core" processorArchitecture="amd64" publicKeyToken="31bf3856ad364e35" language="neutral" versionScope="nonSxS" xmlns:wcm="http://schemas.microsoft.com/WMIConfig/2002/State" xmlns:xsi="http://www.w3.org/2001/XMLSchema-instance">
<InputLocale>en-US</InputLocale>
<SystemLocale>en-US</SystemLocale>
<UILanguage>en-US</UILanguage>
<UILanguageFallback>en-US</UILanguageFallback>
<UserLocale>en-001</UserLocale>
</component>
<component name="Microsoft-Windows-Shell-Setup" processorArchitecture="amd64" publicKeyToken="31bf3856ad364e35" language="neutral" versionScope="nonSxS" xmlns:wcm="http://schemas.microsoft.com/WMIConfig/2002/State" xmlns:xsi="http://www.w3.org/2001/XMLSchema-instance">
<OOBE>
<HideEULAPage>true</HideEULAPage>
<HideOEMRegistrationScreen>true</HideOEMRegistrationScreen>
<HideOnlineAccountScreens>true</HideOnlineAccountScreens>
<HideWirelessSetupInOOBE>true</HideWirelessSetupInOOBE>
<ProtectYourPC>1</ProtectYourPC>
<UnattendEnableRetailDemo>false</UnattendEnableRetailDemo>
</OOBE>
<UserAccounts>
<LocalAccounts>
<LocalAccount wcm:action="add">
<DisplayName>Windows User</DisplayName>
<Group>Administrators</Group>
<Name>WinUser</Name>
<Password>
<Value>UABhAHMAcwB3AG8AcgBkADEAUABhAHMAcwB3AG8AcgBkAA==</Value>
<PlainText>false</PlainText>
</Password>
</LocalAccount>
</LocalAccounts>
</UserAccounts>
<TimeZone>Central Standard Time</TimeZone>
<AutoLogon>
<Enabled>true</Enabled>
<LogonCount>1</LogonCount>
<Username>WinUser</Username>
<Password>
<Value>UABhAHMAcwB3AG8AcgBkADEAUABhAHMAcwB3AG8AcgBkAA==</Value>
<PlainText>false</PlainText>
</Password>
</AutoLogon>
<FirstLogonCommands>
<SynchronousCommand wcm:action="add">
<CommandLine>reg add "HKLM\SOFTWARE\Microsoft\Windows NT\CurrentVersion\Winlogon" /v AutoLogonCount /t REG_DWORD /d 0 /f</CommandLine>
<Order>1</Order>
</SynchronousCommand>
</FirstLogonCommands>
</component>
</settings>
<settings pass="specialize">
<component name="Microsoft-Windows-Shell-Setup" processorArchitecture="amd64" publicKeyToken="31bf3856ad364e35" language="neutral" versionScope="nonSxS" xmlns:wcm="http://schemas.microsoft.com/WMIConfig/2002/State" xmlns:xsi="http://www.w3.org/2001/XMLSchema-instance">
<OEMInformation>
<Manufacturer></Manufacturer>
<SupportHours></SupportHours>
<SupportPhone></SupportPhone>
<SupportURL></SupportURL>
</OEMInformation>
<OEMName></OEMName>
<TimeZone>Central Standard Time</TimeZone>
</component>
</settings>
<cpi:offlineImage cpi:source="catalog://godzilla/data_diskmy data/my software/windows installation and deployment apps and tools/assets and tools for deployment/catalog files for windows sim/windows 11 22h2 catalog files/install_windows 11 pro.clg" xmlns:cpi="urn:schemas-microsoft-com:cpi" />
</unattend>My Computers
System One System Two
-
- OS
- Win11 Pro 23H2
- Computer type
- PC/Desktop
- Manufacturer/Model
- Home Built
- CPU
- Intel i7-11700K
- Motherboard
- ASUS Prime Z590-A
- Memory
- 128GB Crucial Ballistix 3200MHz DRAM
- Graphics Card(s)
- No GPU - CPU graphics only (for now)
- Sound Card
- Realtek (on motherboard)
- Monitor(s) Displays
- HP Envy 32
- Screen Resolution
- 2560 x 1440
- Hard Drives
- 1 x 1TB NVMe Gen 4 x 4 SSD
1 x 2TB NVMe Gen 3 x 4 SSD
2 x 512GB 2.5" SSDs
2 x 8TB HD
- PSU
- Corsair HX850i
- Case
- Corsair iCue 5000X RGB
- Cooling
- Noctua NH-D15 chromax.black cooler + 10 case fans
- Keyboard
- CODE backlit mechanical keyboard
- Mouse
- Logitech MX Master 3
- Internet Speed
- 1Gb Up / 1 Gb Down
- Browser
- Edge
- Antivirus
- Windows Defender
- Other Info
- Additional options installed:
WiFi 6E PCIe adapter
ASUS ThunderboltEX 4 PCIe adapter
-
- Operating System
- Win11 Pro 23H2
- Computer type
- Laptop
- Manufacturer/Model
- Lenovo ThinkBook 13x Gen 2
- CPU
- Intel i7-1255U
- Memory
- 16 GB
- Graphics card(s)
- Intel Iris Xe Graphics
- Sound Card
- Realtek® ALC3306-CG codec
- Monitor(s) Displays
- 13.3-inch IPS Display
- Screen Resolution
- WQXGA (2560 x 1600)
- Hard Drives
- 2 TB 4 x 4 NVMe SSD
- PSU
- USB-C / Thunderbolt 4 Power / Charging
- Mouse
- Buttonless Glass Precision Touchpad
- Keyboard
- Backlit, spill resistant keyboard
- Internet Speed
- 1Gb Up / 1Gb Down
- Browser
- Edge
- Antivirus
- Windows Defender
- Other Info
- WiFi 6e / Bluetooth 5.1 / Facial Recognition / Fingerprint Sensor / ToF (Time of Flight) Human Presence Sensor
") .
.