This tutorial will show you how to remove an app's uninstall entry from both "Settings > Apps > Installed Apps" and "Control Panel > Programs and Features" for your account or all users in Windows 11 and Windows 10.
If you have an invalid, duplicate, or just want to remove an uninstall entry for an app in Settings > Apps > Installed Apps and Control Panel > Programs and Features, then you can easily remove it.
Reference:
Removing Invalid Entries in the Add/Remove Programs Tool - Microsoft Support
You must be signed in as an administrator to remove uninstall entries for apps for all users.
This will only apply to uninstall entries for desktop apps/programs.
This does not apply to Microsoft Store apps.
EXAMPLE: Uninstall entries for apps in "Settings > Apps > Installed Apps" and "Control Panel > Programs and Features"
Here's How:
1 Open Registry Editor (regedit.exe).
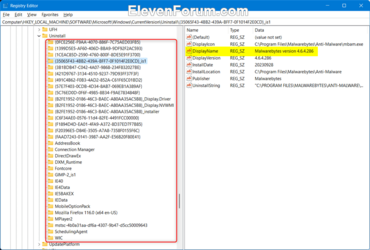
2 Navigate to the key below you want in the left pane of Registry Editor. (see screenshot below step 3)
(Only current user)
[HKEY_CURRENT_USER\Software\Microsoft\Windows\CurrentVersion\Uninstall
AND
HKEY_CURRENT_USER\Software\WOW6432Node\Microsoft\Windows\CurrentVersion\Uninstall
OR
(All users)
HKEY_LOCAL_MACHINE\SOFTWARE\Microsoft\Windows\CurrentVersion\Uninstall
AND
HKEY_LOCAL_MACHINE\SOFTWARE\WOW6432Node\Microsoft\Windows\CurrentVersion\Uninstall
3 Under the Uninstall key, right click on the subkey for the app you want, and click/tap on Delete. (see screenshot below)
You can look at the DisplayName string value (REG_SZ) of a selected subkey to know which app the subkey is for when the subkey's name is not obvious for the app's name.

4 Click/tap on Yes to confirm. (see screenshot below)
5 When finished removing uninstall entries for apps, you can close Registry Editor.
That's it,
Shawn Brink
Last edited:


