This tutorial will show you how to enable or disable Discovery of Network-designated Resolvers (DNR) support for all users in Windows 11.
Starting with Windows 11 build 25982 (Canary), client-side DNR is now supported in Windows 11. DNR support is not available on non-Insider Windows builds yet.
Discovery of Network-designated Resolvers (DNR) is an upcoming IETF standard to discover encrypted DNS servers. Before DNR, devices getting DNS server from their local network would not be able to use encrypted DNS without manually finding out the IP address of their desired encrypted DNS server and configuring it on client-side. DNR enables devices to use encrypted DNS protocols like DNS over HTTPS (DoH) and DNS over TLS (DoT) on the client-side without requiring manual endpoint configuration.
To see DNR working in action when enabled on your PC, try joining a network whose DHCPv4 or DHCPv6 server supports server-side DNR. During Microsoft's internal testing, Microsoft partnered with BT Group who prototyped server-side DNR on their DHCPv4 servers. A Windows Insiders device with DNR enabled was joined to a network provisioned by BT. The Windows Insiders device was able to use OPTION_V4_DNR to discover, validate and use BT’s trial DNS over HTTPS service.
How does client-side DNR work?
Let us look at what happens when a machine with client-side DNR enabled attempts to join a new network. First, the machine queries the local DHCP server to acquire an IP address. During that query it also requests special DNR-specific options (OPTION_V4_DNR for DHCPv4 or OPTION_V6_DNR for DHCPv6). The local DHCP server which is running server-side DNR responds to the machine with all the required information for configuring encrypted DNS such as the IP address of the encrypted DNS server, list of supported encrypted DNS protocols, their port numbers, and server authentication information. On receiving this information, the client machine sets up an encrypted DNS tunnel automatically with the server discovered through DNR.
From the user’s perspective, they joined a new network as they normally would and without any effort on their part, they are reaping the benefits of encrypted DNS!
Reference:
Introducing DNR support for Windows Insiders
Instructions for enabling DNR in Windows Insiders to seamlessly deploy encrypted DNS
techcommunity.microsoft.com
You must be signed in as an administrator to enable or disable DVR support.
Here's How:
1 Do step 2 (enable) or step 3 (disable) below for what you would like to do.
2 Enable DNR Support for All Users
A) Click/tap on the Download button below to download the file below, and go to step 4 below.
Enable_DNR_for_all_users.reg
(Contents of REG file for reference)
Code:
Windows Registry Editor Version 5.00
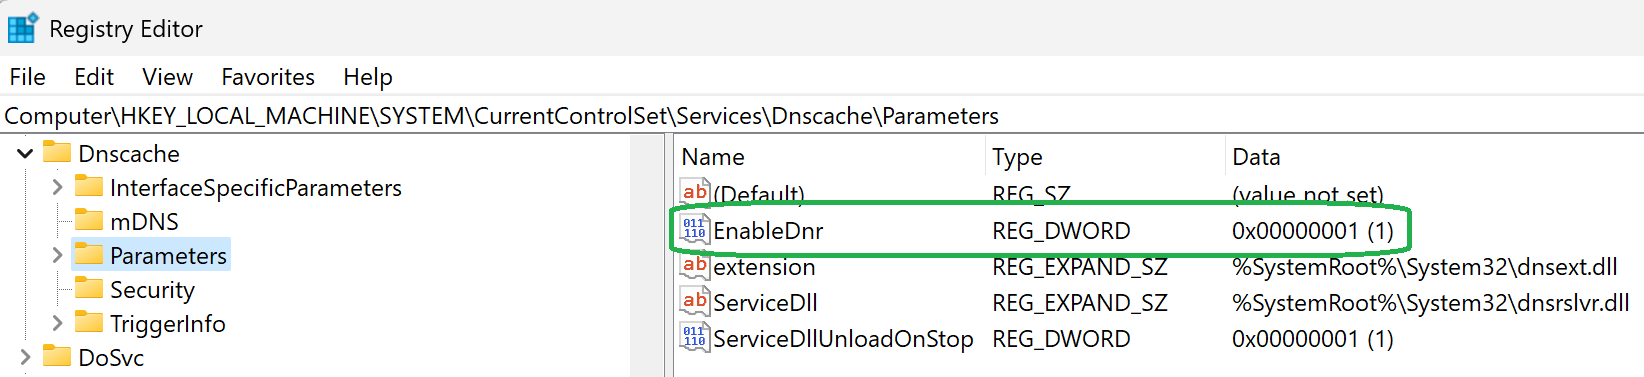
[HKEY_LOCAL_MACHINE\SYSTEM\CurrentControlSet\Services\Dnscache]
"EnableDnr"=dword:000000013 Disable DNR Support for All Users
This is the default setting
A) Click/tap on the Download button below to download the file below, and go to step 4 below.
Disable_DNR_for_all_users.reg
(Contents of REG file for reference)
Code:
Windows Registry Editor Version 5.00

[HKEY_LOCAL_MACHINE\SYSTEM\CurrentControlSet\Services\Dnscache]
"EnableDnr"=dword:00000000
4 Save the REG file to your desktop.
5 Double click/tap on the downloaded REG file to merge it.
6 When prompted, click/tap on Run, Yes (UAC), Yes, and OK to approve the merge.
7 Restart the computer to apply.
8 You can now delete the downloaded REG file if you like.
That's it,
Shawn Brink
Attachments

Last edited: