UPDATE 4/23:
 www.elevenforum.com
IMPORTANT: New dates for the end of non-security updates for Windows 11, version 22H2
The new end date is June 24, 2025 for Windows 11, version 22H2 Enterprise and Education editions. Home and Pro editions of version 22H2 will receive non-security preview updates until June, 26, 2024.
After these dates, only cumulative monthly security updates will continue for the supported editions of Windows 11, version 22H2. The initial date communicated for this change was February 27, 2024. Based on user feedback, this date has been changed so more customers can take advantage of our continuous innovations.
For information about Windows update terminology, see the article about the types of Windows updates and the monthly quality update types. For an overview of Windows 11, version 23H2, see its update history page.
Note Follow @WindowsUpdate to find out when new content is published to the Windows release health dashboard.
This security update includes quality improvements. Key changes include:
For more information about security vulnerabilities, please refer to the Security Update Guide website and the April 2024 Security Updates.
Microsoft combines the latest servicing stack update (SSU) for your operating system with the latest cumulative update (LCU). For general information about SSUs, see Servicing stack updates and Servicing Stack Updates (SSU): Frequently Asked Questions.
Install this update
If you want to remove the LCU
To remove the LCU after installing the combined SSU and LCU package, use the DISM/Remove-Package command line option with the LCU package name as the argument. You can find the package name by using this command: DISM /online /get-packages.
Running Windows Update Standalone Installer (wusa.exe) with the /uninstall switch on the combined package will not work because the combined package contains the SSU. You cannot remove the SSU from the system after installation.
File information
For a list of the files that are provided in this update, download the file information for cumulative update 5036893.
For a list of the files that are provided in the servicing stack update, download the file information for the SSU - versions 22621.3447 and 22631.3447.
 support.microsoft.com
Check Windows Updates
UUP Dump:
64-bit ISO download:


ARM64 ISO download:


 www.elevenforum.com

KB5036980 Windows 11 Cumulative Update Preview Build 22621.3527 (22H2) and 22631.3527 (23H2)
Microsoft Support: April 23, 2024 - KB5036980 (OS Builds 22621.3527 and 22631.3527) Preview IMPORTANT: New dates for the end of non-security updates for Windows 11, version 22H2 The new end date is June 24, 2025 for Windows 11, version 22H2 Enterprise and Education editions. Home and Pro...
 www.elevenforum.com
Microsoft Support:
April 9, 2024 - KB5036893 (OS Builds 22621.3447 and 22631.3447)
IMPORTANT: New dates for the end of non-security updates for Windows 11, version 22H2
The new end date is June 24, 2025 for Windows 11, version 22H2 Enterprise and Education editions. Home and Pro editions of version 22H2 will receive non-security preview updates until June, 26, 2024.
After these dates, only cumulative monthly security updates will continue for the supported editions of Windows 11, version 22H2. The initial date communicated for this change was February 27, 2024. Based on user feedback, this date has been changed so more customers can take advantage of our continuous innovations.
For information about Windows update terminology, see the article about the types of Windows updates and the monthly quality update types. For an overview of Windows 11, version 23H2, see its update history page.
Note Follow @WindowsUpdate to find out when new content is published to the Windows release health dashboard.
Highlights
Tip: The content is within collapsible sections. Click or tap the category name to expand the section.Voice access
- New! You can now use voice access with the following languages:
- French (France, Canada)
- German
- Spanish (Spain, Mexico)
When you turn on voice access for the first time, Windows will ask you to download a speech model. You might not find a speech model that matches your display language. You can still use voice access in English (US). You can always choose a different language from Settings > Language on the voice access bar.
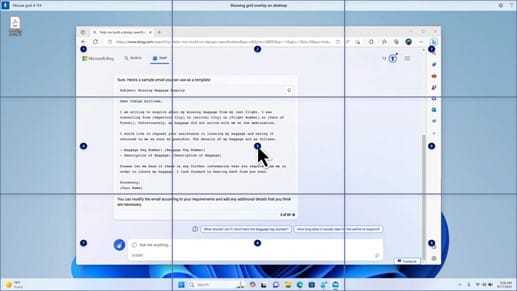
- New! You can now use all voice access features on multiple displays. These include number and grid overlays that, in the past, you could only use on the primary display. While you are using the grid overlay on a screen, you can quickly switch to another display. To do that, use the alphabet or NATO phonetic in your command. For example, “B” or “Bravo” are both valid for the display that is assigned that letter.
You can also use the “mouse grid” command to quickly move your mouse to a specific point on a display. For example, in the screenshot below, the command will be, “mouse grid A 114.” Finally, you can use the drag and drop feature to move files, apps, and documents from one display to another.

Turn On or Off Voice Access in Windows 11 Tutorial
This tutorial will show you how to turn on or off voice access for your account in Windows 11. Voice access is a new experience starting with Windows 11 build 22518 that enables everyone, including people with mobility disabilities, to control their PC and author text using only their voice and... www.elevenforum.com
- New! This update introduces voice shortcuts or custom commands. You can use them to create your own commands in the supported English dialects. To start, say “what can I say” and click the “Voice shortcuts” tab on the left panel. You can also use the command “show voice shortcuts” to open the Voice shortcuts page. Click Create new shortcut. Use your voice or other input to create a command. Give it a name and select one or more actions. After you fill in the necessary information, click Create. Your command is now ready to use. To view all the voice shortcuts you have created, go to the command help page or use the voice command, “show voice shortcuts.”

Create Voice Shortcuts for Custom Commands in Voice Access in Windows 11 Tutorial
This tutorial will show you how to create voice shortcuts for custom commands to use in voice access for your account in Windows 11. Voice access is a new experience starting with Windows 11 build 22518 that enables everyone, including people with mobility disabilities, to control their PC and... www.elevenforum.com
Narrator
- New! You can now listen to a preview of the ten natural voices before you download them. See the Narrator section of the September 2023 update for the list. These voices use modern, on-device text-to-speech. Once you download them, they work without an internet connection. However, to listen to a preview, you need an internet connection. To add and use one of the natural voices, follow the steps below.
- To open Narrator settings, press the WIN+CTRL+N hotkey.
- Under Narrator’s voice, select Add, which is next to Add natural voices.
- Select the voice you want to install. You can install all voices, but you must install them one at a time.
- The preview will play automatically as you browse the list.
- If you like the preview, click Download and Install. The new voice downloads and is ready for use in a few minutes, depending on your internet download speed.
- In Narrator settings, select your preferred voice from the menu in Narrator’s voice > Choose a voice.
- New! This update adds a new keyboard command to move between the images on a screen. Now, you can use the keys G or Shift+G to move forward or backward between images in Scan mode (Narrator key+space bar).
- New! This update improves Narrator’s detection of text in images, which includes handwriting. It also improves the descriptions of images. To use this feature, you must have an active internet connection. You must also turn on the setting to get image descriptions in Narrator settings. To try this experience, select an image and press the Narrator key+CTRL+D.
- New! In Microsoft Word, Narrator will announce the presence of bookmarks and draft or resolved comments. It also tells you if accessibility suggestions exist when it reads text in the file.
- New! You can now use voice access to open applications, dictate text, and interact with elements on the screen. You can also use your voice to command Narrator. For example, you can tell it to, “speak faster,” “read next line,” and so on. To get started, search for “voice access” in Windows search and set it up.
Windows share
- New! This update changes the apps that appear in the Windows share window. The account you use to sign in affects the apps that are in “Share using.” For example, if you use a Microsoft account (MSA) to sign in, you will see Microsoft Teams (free). When you use a Microsoft Entra ID account (formerly Azure Active Directory) to sign in, your Microsoft Teams (work or school) contacts show instead.
- New! The Windows share window now supports sharing with WhatsApp in the “Share using” section. If you do not have WhatsApp installed, you can install it from the Windows share window.

Share File with App in Windows 11 Tutorial
This tutorial will show you how to share a file with others using an app in Windows 11. The built-in Windows share window in Windows 11 allows you to directly share a file with an app or nearby devices. Reference... www.elevenforum.com
Nearby Share
- New! This update affects how Nearby Share turns on and off. You can use quick settings or the Settings app to turn on Nearby Share. If you do and Wi-Fi and Bluetooth are off, Wi-Fi and Bluetooth will turn on to make Nearby Share work as you expect. If you turn off Wi-Fi or Bluetooth, Nearby Share turns off as well.

Turn On or Off Nearby Sharing in Windows 11 Tutorial
This tutorial will show you how to turn on or off nearby sharing for your account in Windows 11. Nearby sharing in Windows lets you share documents, photos, links to websites, and more with nearby devices by using Bluetooth or Wi-Fi. You can choose to turn on nearby sharing for My devices only... www.elevenforum.com
- New! This update improves Nearby Share transfer speed for users on the same network. Before, users had to be on the same private network. Now, users must be on the same public or private network. You can use quick settings to turn on Nearby Share. Right-click a local file in File Explorer and choose “Share.” Then choose to share to a device listed in Nearby Share in the Windows share window.
- New! You can now give your device a more friendly name to identify it when sharing. Go to Settings > System > Nearby sharing. There, you can rename your device.

Change Device Friendly Name for Nearby Sharing in Windows 11 Tutorial
This tutorial will show you how to change your device's friendly name to identify sharing to and from when it's discoverable using Nearby Sharing in Windows 11. Nearby sharing in Windows lets you share documents, photos, links to websites, and more with nearby devices by using Bluetooth or... www.elevenforum.com
Casting
- New! This update helps you to learn about the Cast feature and discover when it is available; see the examples in the list below. To cast means to send content that is on your device’s screen to a nearby PC, TV, or other external displays. This happens wirelessly.
- You might often switch between windows to complete a task or use Snap Assist to organize your screen space. When you multitask like this, a notification will suggest that you use Cast.
- The Cast flyout menu in quick settings gives you more help to find nearby displays, fix connections, and more.

Connect to Wireless Display with Miracast in Windows 11 Tutorial
This tutorial will show you how to wirelessly connect your Windows 11 PC to a TV, projector, another PC, or other kind of external display that supports Miracast. Miracast is a wireless technology your PC, laptop, or tablet can use to project your screen to wireless TVs, projectors, and... www.elevenforum.com
Snap Layouts
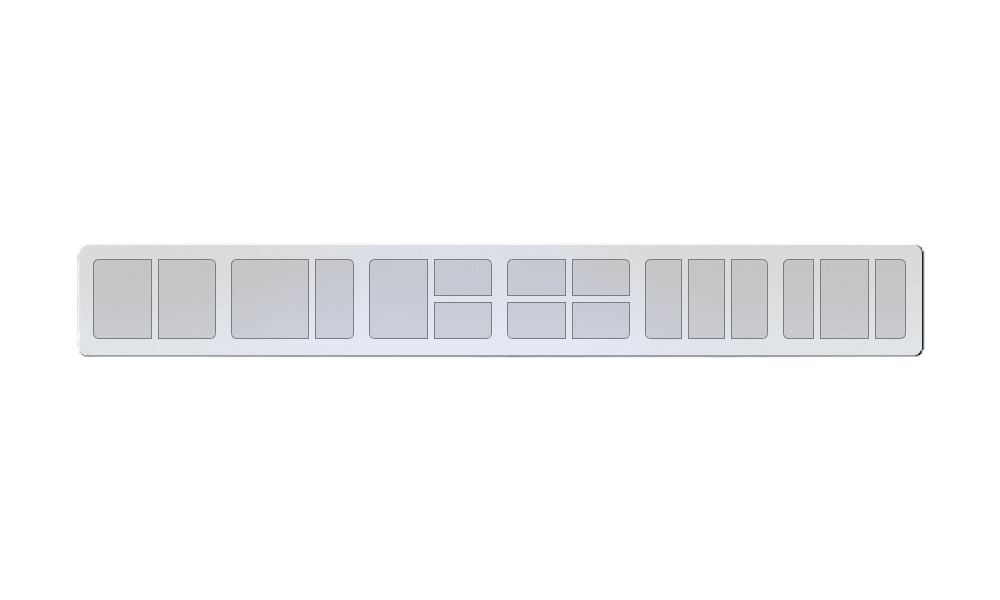
- New! This update adds suggestions to Snap Layouts. They help you to instantly snap multiple app windows together.
Enable or Disable Snap Layouts on Top of Screen in Windows 11 Tutorial
This tutorial will show you how to enable or disable showing snap layouts when dragging a window to the top of the screen for your account in Windows 11. The Snap windows feature in Windows allows you to automatically resize and arrange windows on your screen. Windows 11 includes a Snap... www.elevenforum.com
- New! You can hover over the minimize or maximize button of an app (WIN+Z) to open the layout box. When you do, app icons will display various layout options. Use them to help you to choose the best layout option.

Enable or Disable Snap Layouts for Maximize Button in Windows 11 Tutorial
This tutorial will show you how to enable or disable showing snap layouts when hovering over a maximize button for your account in Windows 11. The Snap windows feature in Windows allows you to automatically resize and arrange windows on your screen. Windows 11 includes a Snap Layouts feature... www.elevenforum.com
Windows 365 Boot
- New! This update adds dedicated mode for Windows 365 Boot. When you sign in on your company-owned device, doing that also signs you in to your Windows 365 Cloud PC. This occurs using passwordless authentication, like Windows Hello for Business.
- New! This new dedicated mode also provides the fast account switcher experience. With it, you can quickly switch profiles and sign in. You can also personalize the experience for your username and password. This includes choosing a custom display picture for the lock screen, storing your username, and more.
- New! A company can customize what users see on the screen when they sign in to Windows 365 Boot. In shared mode, you can add company branding from Microsoft Intune.
- New! This update adds a fail fast mechanism for Windows 365 Boot. It helps while you are signing in to your Cloud PC. Thesmart logic tells you to address network issues or complete app setup so that Windows 365 Boot does not fail.
- New! You can now manage the settings of your physical (local) PC from your Cloud PC. Windows 365 Boot makes it easy to directly access and manage sound, display, and other device settings.
Windows 365 Switch
- New! It is now easier for Windows 365 Switch to disconnect. You can use your local PC to disconnect from your Cloud PC. Go to Local PC > Task view. Right-click the Cloud PC button and select Disconnect. This update also adds tooltips to the Cloud PC Start menu. They appear on the options for disconnecting and signing out and help you to learn how each one works.
- New! This update adds desktop indicators for Windows 365 Switch.You will see the term “Cloud PC” and “Local PC” on the desktop indicator when you switch between them.
- New! The time to connect to Windows 365 Frontline Cloud PC from Windows 365 Switch might be long. While you wait, the screen will show you the connection status and the timeout indicator for the Cloud PC. If there is an error, use the new copy button on the error screen to copy the correlation ID. This helps to address the issue faster.
Improvements
Note: To view the list of addressed issues, click or tap the OS name to expand the collapsible section.Windows 11, version 23H2
Important: Use EKB KB5027397 to update to Windows 11, version 23H2.This security update includes quality improvements. Key changes include:
- This build includes all the improvements in Windows 11, version 22H2.
- No additional issues are documented for this release.
Windows 11, version 22H2
This security update includes improvements that were a part of update KB5035942 (released March 26, 2024). When you install this KB:- This update makes miscellaneous security improvements to internal OS functionality. No additional issues were documented for this release.
For more information about security vulnerabilities, please refer to the Security Update Guide website and the April 2024 Security Updates.
Windows 11 servicing stack update - 22621.3447 and 22631.3447
This update makes quality improvements to the servicing stack, which is the component that installs Windows updates. Servicing stack updates (SSU) ensure that you have a robust and reliable servicing stack so that your devices can receive and install Microsoft updates.Known issues in this update
| Applies to | Symptom | Workaround |
|---|---|---|
| All users | After installing this update, you might be unable to change your user account profile picture. When attempting to change a profile picture by selecting the button Start> Settings> Accounts > Your info, and then selecting Choose a file, you might receive an error message with error code 0x80070520. | We are working on a resolution and will provide an update in an upcoming release. |
How to get this update
Before installing this updateMicrosoft combines the latest servicing stack update (SSU) for your operating system with the latest cumulative update (LCU). For general information about SSUs, see Servicing stack updates and Servicing Stack Updates (SSU): Frequently Asked Questions.
Install this update
| Release Channel | Available | Next Step |
| Windows Update and Microsoft Update | Yes | None. This update will be downloaded and installed automatically from Windows Update. |
| Windows Update for Business | Yes | None. This update will be downloaded and installed automatically from Windows Update in accordance with configured policies. |
| Microsoft Update Catalog | Yes | To get the standalone package for this update, go to the Microsoft Update Catalog website. |
| Windows Server Update Services (WSUS) | Yes | This update will automatically sync with WSUS if you configure Products and Classifications as follows: Product: Windows 11 Classification: Security Updates |
If you want to remove the LCU
To remove the LCU after installing the combined SSU and LCU package, use the DISM/Remove-Package command line option with the LCU package name as the argument. You can find the package name by using this command: DISM /online /get-packages.
Running Windows Update Standalone Installer (wusa.exe) with the /uninstall switch on the combined package will not work because the combined package contains the SSU. You cannot remove the SSU from the system after installation.
File information
For a list of the files that are provided in this update, download the file information for cumulative update 5036893.
For a list of the files that are provided in the servicing stack update, download the file information for the SSU - versions 22621.3447 and 22631.3447.
Source:
April 9, 2024—KB5036893 (OS Builds 22621.3447 and 22631.3447) - Microsoft Support
Check Windows Updates
UUP Dump:
64-bit ISO download:

Select language for Windows 11, version 22H2 (22621.3447) amd64
Select language for Windows 11, version 22H2 (22621.3447) amd64 on UUP dump. UUP dump lets you download Unified Update Platform files, like Windows Insider updates, directly from Windows Update.
uupdump.net

Select language for Windows 11, version 23H2 (22631.3447) amd64
Select language for Windows 11, version 23H2 (22631.3447) amd64 on UUP dump. UUP dump lets you download Unified Update Platform files, like Windows Insider updates, directly from Windows Update.
uupdump.net
ARM64 ISO download:

Select language for Windows 11, version 22H2 (22621.3447) arm64
Select language for Windows 11, version 22H2 (22621.3447) arm64 on UUP dump. UUP dump lets you download Unified Update Platform files, like Windows Insider updates, directly from Windows Update.
uupdump.net

Select language for Windows 11, version 23H2 (22631.3447) arm64
Select language for Windows 11, version 23H2 (22631.3447) arm64 on UUP dump. UUP dump lets you download Unified Update Platform files, like Windows Insider updates, directly from Windows Update.
uupdump.net

UUP Dump - Download Windows Insider ISO Tutorial
UUP Dump is the most practical and easy way to get ISO images of any Insider Windows 10 or Windows 11 version, as soon as Microsoft has released a new build. UUP Dump creates a download configuration file according to your choices, downloads necessary files directly from Microsoft servers, and...
 www.elevenforum.com
Attachments
Last edited:


