Solved Anyone know of a way to image a VHD with DISM?


hsehestedt

Well-known member
Pro User
VIP
Local time
12:19 PM
Posts
2,574
Location
Texas, USA
OS
Win11 Pro 23H2
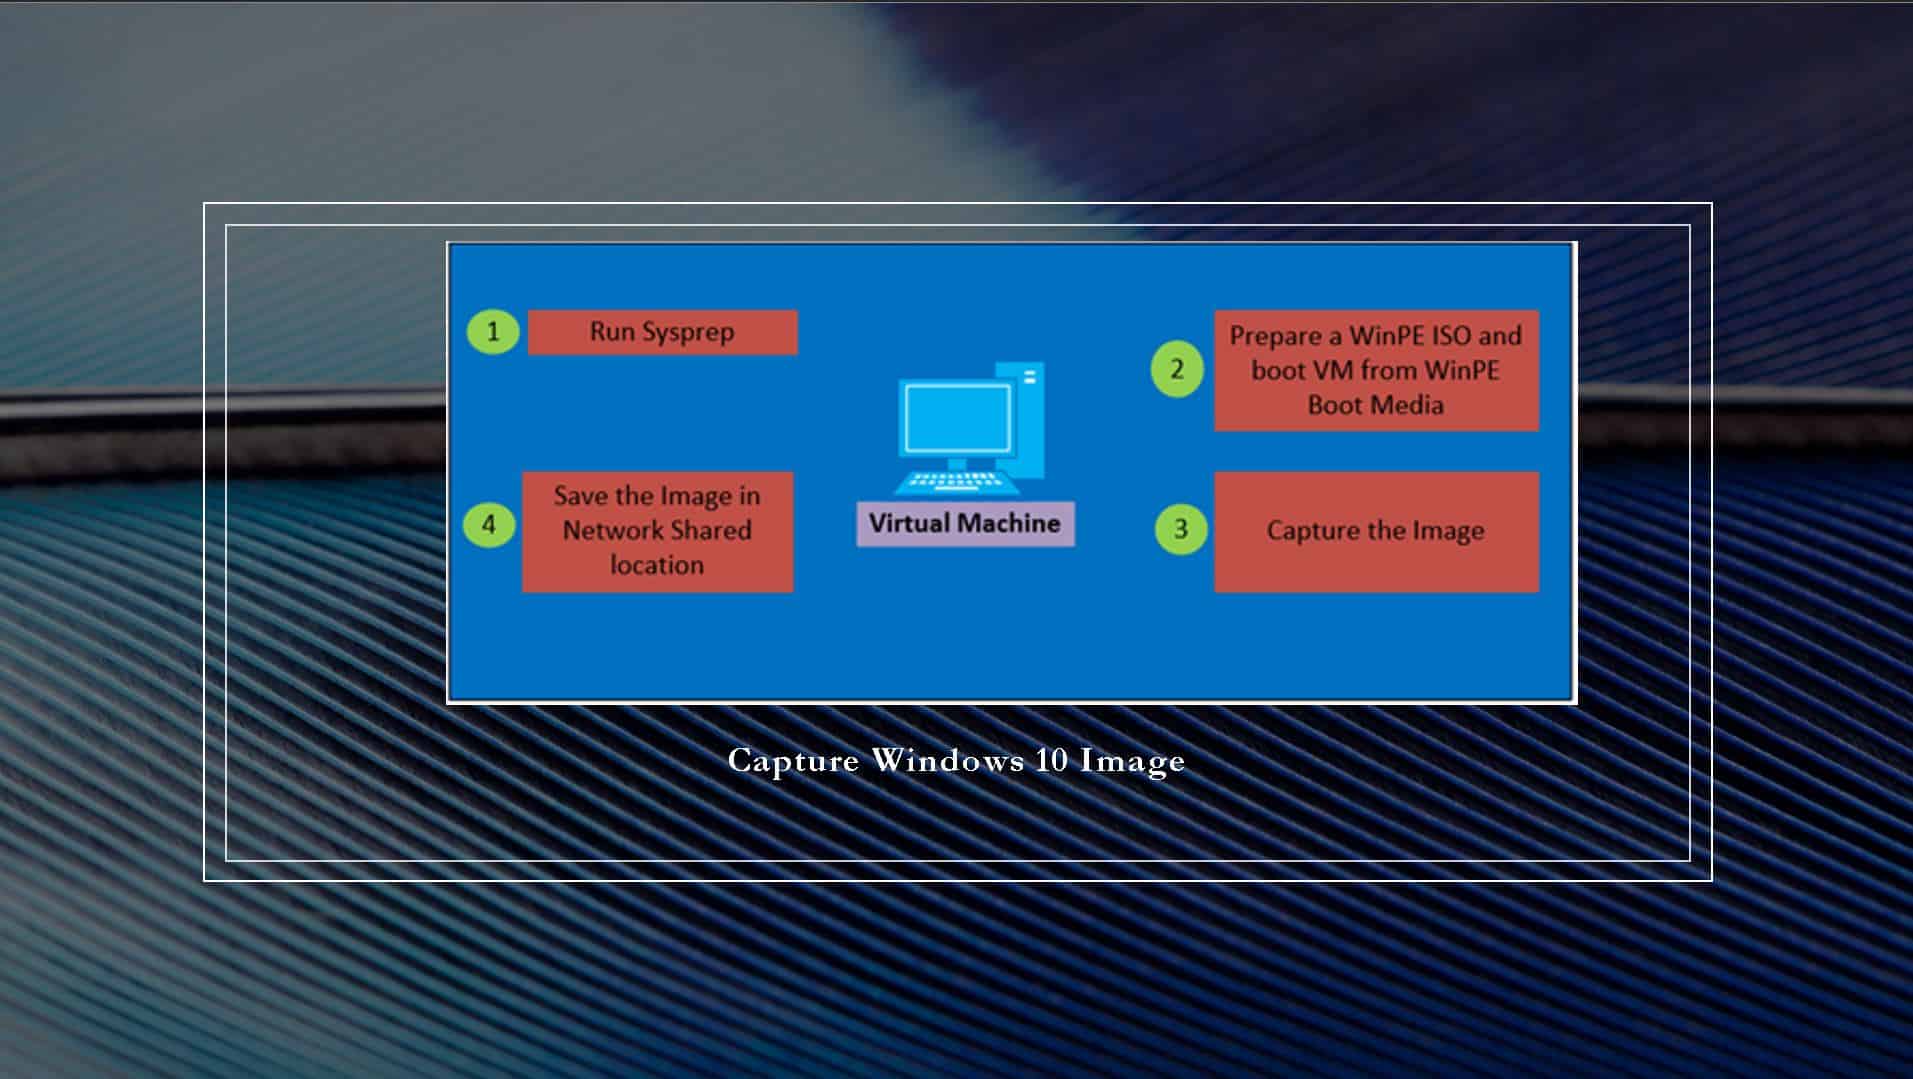
I'm sure that many of you know that I do a lot of work with unattended setup of Windows and injecting Windows updates, drivers, etc. into Windows images. But today I was experimenting with something a little bit different. I installed a secondary copy of Windows on my PC to a VHD so that I could native boot from it. The idea is that I would install all my drivers and pre-configure Windows exactly how I want it and then create an image (install.wim) of that installation. However, it seems like DISM doesn't like to image a VHD. If I boot into my primary installation of Windows, then mount the VHD and try to use DISM to image that VHD, DISM simply hangs. There is no error message, it just never seems to actually image the VHD.

Has anyone else experimented with this and found a way around this?
 

My Computers

System One System Two

  • OS
    Win11 Pro 23H2
    Computer type
    PC/Desktop
    Manufacturer/Model
    Home Built
    CPU
    Intel i7-11700K
    Motherboard
    ASUS Prime Z590-A
    Memory
    128GB Crucial Ballistix 3200MHz DRAM
    Graphics Card(s)
    No GPU - CPU graphics only (for now)
    Sound Card
    Realtek (on motherboard)
    Monitor(s) Displays
    HP Envy 32
    Screen Resolution
    2560 x 1440
    Hard Drives
    1 x 1TB NVMe Gen 4 x 4 SSD
    1 x 2TB NVMe Gen 3 x 4 SSD
    2 x 512GB 2.5" SSDs
    2 x 8TB HD
    PSU
    Corsair HX850i
    Case
    Corsair iCue 5000X RGB
    Cooling
    Noctua NH-D15 chromax.black cooler + 10 case fans
    Keyboard
    CODE backlit mechanical keyboard
    Mouse
    Logitech MX Master 3
    Internet Speed
    1Gb Up / 1 Gb Down
    Browser
    Edge
    Antivirus
    Windows Defender
    Other Info
    Additional options installed:
    WiFi 6E PCIe adapter
    ASUS ThunderboltEX 4 PCIe adapter
  • Operating System
    Win11 Pro 23H2
    Computer type
    Laptop
    Manufacturer/Model
    Lenovo ThinkBook 13x Gen 2
    CPU
    Intel i7-1255U
    Memory
    16 GB
    Graphics card(s)
    Intel Iris Xe Graphics
    Sound Card
    Realtek® ALC3306-CG codec
    Monitor(s) Displays
    13.3-inch IPS Display
    Screen Resolution
    WQXGA (2560 x 1600)
    Hard Drives
    2 TB 4 x 4 NVMe SSD
    PSU
    USB-C / Thunderbolt 4 Power / Charging
    Mouse
    Buttonless Glass Precision Touchpad
    Keyboard
    Backlit, spill resistant keyboard
    Internet Speed
    1Gb Up / 1Gb Down
    Browser
    Edge
    Antivirus
    Windows Defender
    Other Info
    WiFi 6e / Bluetooth 5.1 / Facial Recognition / Fingerprint Sensor / ToF (Time of Flight) Human Presence Sensor
Hi hsehestedt,

Just taking a stab, but have you sysprep/generalize Windows first? I believe that it is required in order to capture an install.wim from an installed (running) image.

Kind regards,

tecknot

P.S. Sorry I don't have reference(s) at this time.
 

My Computer

System One

  • OS
    Dual boot Windows 10 Pro 22H2 (b 19045.4291) & Windows 11 Pro 23H2 (b 22631.3447)
    Computer type
    Laptop
    Manufacturer/Model
    Lenovo ThinkPad Workstation P72
    CPU
    Intel i7 8750H @ 2.2 GHz
    Motherboard
    Lenovo 01YU291
    Memory
    16 GB (all Samsung) DDR4-3200 SODIMM (non-ECC) PCIe 3
    Graphics Card(s)
    Intel UHD Graphics 630 & NVIDIA Quadro P600
    Sound Card
    Realtek ALC3286
    Monitor(s) Displays
    17.3"
    Screen Resolution
    3840x2160
    Hard Drives
    1TB SSD Samsung 860 EVO SATA 3
    1TB SSD Samsung 970 EVO M.2 NVMe PCIe 3 x 4
    1TB SSD Samsung 980 M.2 NVMe PCIe 3 x 4
    PSU
    230W
    Keyboard
    UltraNav
    Mouse
    Kensington wireless Orbit
    Internet Speed
    640Mbps
    Browser
    Firefox
    Antivirus
    Defender
    Other Info
    CM246 Chipset
Have you tried wimlib
 

My Computers

System One System Two

  • OS
    Win7
    Computer type
    PC/Desktop
    CPU
    i5-8400
    Motherboard
    gigabyte b365m ds3h
    Memory
    2x8gb 3200mhz
    Monitor(s) Displays
    benq gw2480
    PSU
    bequiet pure power 11 400CM
    Cooling
    cryorig m9i
  • Operating System
    win7
    Computer type
    PC/Desktop
    CPU
    pentium g5400
    Motherboard
    gigabyte b365m ds3h
    Memory
    1x8gb 2400
    PSU
    xfx pro 450
Your wording is kinda vague. Which of the two scenarios are you trying?
1. Mounted a .vhdx file as a normal volume. Running DISM on top of the mounted filesystem.

2. DISM /mount-image /imagefile:\path\image.vhdx /index:1 /mountdir:\path\dir
 

My Computer

System One

  • OS
    Windows 7
Hi hsehestedt,

Just taking a stab, but have you sysprep/generalize Windows first? I believe that it is required in order to capture an install.wim from an installed (running) image.

Kind regards,

tecknot

P.S. Sorry I don't have reference(s) at this time.
You are mistaken it is not required.
 

My Computers

System One System Two

  • OS
    Win7
    Computer type
    PC/Desktop
    CPU
    i5-8400
    Motherboard
    gigabyte b365m ds3h
    Memory
    2x8gb 3200mhz
    Monitor(s) Displays
    benq gw2480
    PSU
    bequiet pure power 11 400CM
    Cooling
    cryorig m9i
  • Operating System
    win7
    Computer type
    PC/Desktop
    CPU
    pentium g5400
    Motherboard
    gigabyte b365m ds3h
    Memory
    1x8gb 2400
    PSU
    xfx pro 450
Apologies, I was trying to keep my post brief. Here are some specific details:

I deploy Windows to a VHD and boot the VHD. I enter Audit Mode (CTRL + SHIFT + F3) during installation just the same way as I would on a Windows installation on a physical machine.

In audit mode, I make all of my Windows configuration changes, I personalize Windows etc. Since this is a VHD on a machine that has an activated copy of Windows, the installation of Windows in this VHD is also activated.

Once everything is configured the way that I want it, I perform a sysprep.

If I were doing this on a physical machine I would now boot from Windows installation media and I would create my image using DISM. In this instance, I am not booting from Windows installation media, I am simply booting the instance of Windows that is installed on the physical machine rather than the instance in the VHD. I then mount the VHD and attempt to image it with DISM. Note that I have tried two different ways to mount the VHD.

Method 1: I double-click the image to mount it, then issue my DISM command.

Method 2: Use DISM to mount the VHD to a folder (C:\Mount) and then attempt to image that.

In either case, the result is same. DISM starts, but I never see a progress indicator. It just seems to hang with no visible activity.
 

My Computers

System One System Two

  • OS
    Win11 Pro 23H2
    Computer type
    PC/Desktop
    Manufacturer/Model
    Home Built
    CPU
    Intel i7-11700K
    Motherboard
    ASUS Prime Z590-A
    Memory
    128GB Crucial Ballistix 3200MHz DRAM
    Graphics Card(s)
    No GPU - CPU graphics only (for now)
    Sound Card
    Realtek (on motherboard)
    Monitor(s) Displays
    HP Envy 32
    Screen Resolution
    2560 x 1440
    Hard Drives
    1 x 1TB NVMe Gen 4 x 4 SSD
    1 x 2TB NVMe Gen 3 x 4 SSD
    2 x 512GB 2.5" SSDs
    2 x 8TB HD
    PSU
    Corsair HX850i
    Case
    Corsair iCue 5000X RGB
    Cooling
    Noctua NH-D15 chromax.black cooler + 10 case fans
    Keyboard
    CODE backlit mechanical keyboard
    Mouse
    Logitech MX Master 3
    Internet Speed
    1Gb Up / 1 Gb Down
    Browser
    Edge
    Antivirus
    Windows Defender
    Other Info
    Additional options installed:
    WiFi 6E PCIe adapter
    ASUS ThunderboltEX 4 PCIe adapter
  • Operating System
    Win11 Pro 23H2
    Computer type
    Laptop
    Manufacturer/Model
    Lenovo ThinkBook 13x Gen 2
    CPU
    Intel i7-1255U
    Memory
    16 GB
    Graphics card(s)
    Intel Iris Xe Graphics
    Sound Card
    Realtek® ALC3306-CG codec
    Monitor(s) Displays
    13.3-inch IPS Display
    Screen Resolution
    WQXGA (2560 x 1600)
    Hard Drives
    2 TB 4 x 4 NVMe SSD
    PSU
    USB-C / Thunderbolt 4 Power / Charging
    Mouse
    Buttonless Glass Precision Touchpad
    Keyboard
    Backlit, spill resistant keyboard
    Internet Speed
    1Gb Up / 1Gb Down
    Browser
    Edge
    Antivirus
    Windows Defender
    Other Info
    WiFi 6e / Bluetooth 5.1 / Facial Recognition / Fingerprint Sensor / ToF (Time of Flight) Human Presence Sensor
You are mistaken it is not required.
Then I am confused. Been trying to figure this out, but I guess I'll have to go back and amend my notes.

Kind regards,

tecknot
 

My Computer

System One

  • OS
    Dual boot Windows 10 Pro 22H2 (b 19045.4291) & Windows 11 Pro 23H2 (b 22631.3447)
    Computer type
    Laptop
    Manufacturer/Model
    Lenovo ThinkPad Workstation P72
    CPU
    Intel i7 8750H @ 2.2 GHz
    Motherboard
    Lenovo 01YU291
    Memory
    16 GB (all Samsung) DDR4-3200 SODIMM (non-ECC) PCIe 3
    Graphics Card(s)
    Intel UHD Graphics 630 & NVIDIA Quadro P600
    Sound Card
    Realtek ALC3286
    Monitor(s) Displays
    17.3"
    Screen Resolution
    3840x2160
    Hard Drives
    1TB SSD Samsung 860 EVO SATA 3
    1TB SSD Samsung 970 EVO M.2 NVMe PCIe 3 x 4
    1TB SSD Samsung 980 M.2 NVMe PCIe 3 x 4
    PSU
    230W
    Keyboard
    UltraNav
    Mouse
    Kensington wireless Orbit
    Internet Speed
    640Mbps
    Browser
    Firefox
    Antivirus
    Defender
    Other Info
    CM246 Chipset
I found this in one of the tutorials (Capture Windows)


Steps 4.6 through 4.13 for virtual machine users only:

4.6)
On your host machine, open Disk Management (right click Start > Disk Management)

4.7) Select Attach VHD from Action menu:
Create Windows 10 ISO image from Existing Installation-image.png


4.8) Browse to and select your reference virtual machine's VHD / VHDX file. If you have any checkpoints (AVHD / AVHDX files) created on this vm, select the one with most recent time stamp. Notice that you have to select show all files to be able to see checkpoint AVHD / AVHDX files:
Create Windows 10 ISO image from Existing Installation-image.png

4.9) Select (tick the box) Read-only (this is very important!), click OK:
Create Windows 10 ISO image from Existing Installation-image.png


Forgetting to select Read-only will especially when mounting a checkpoint AVHD / AVHDX file make it unusable for Hyper-V; you can use it for purpose of this tutorial but not boot the vm anymore in Hyper-V.

4.10) Windows mounts the virtual hard disk, all its partitions as separate disk. In case of an MBR disk it even mounts the system reserved partition. Open the Windows system partition VHD to be sure that's the one where Windows is installed, note the drive letter your host assigned to it:
Create Windows 10 ISO image from Existing Installation-image.png


In my case now the WIndows system partition on my reference vm when mounted on host got drive ID K:

4.11)
Open an elevated Command Prompt, enter the following command to create a new install.wim file:


Code:
dism /capture-image /imagefile:D:\install.wim /capturedir:K:\ /name:"AnyName" /compress:maximum /checkintegrity /verify /bootable

In case copying the code from above CODE box is difficult, here's the command also in QUOTE box for easier copy & paste:


dism /capture-image /imagefile:D:\install.wim /capturedir:K:\ /name:"AnyName" /compress:maximum /checkintegrity /verify /bootable

Replace drive letter D in imagefile switch (green highlight in above code box) with the drive letter and folder path of the target where you want install.wim be written, and drive letter K in capturedir switch (blue highlight) with the Windows system partition of your mounted VHD

Create Windows 10 ISO image from Existing Installation-image.png

The name given in /name switch in above command is irrelevant, we will name the ISO later on. Use any name you want to

4.12) Notice that this will take time, go get something to eat or a beer or whatever :wink:

On my low end laptop this takes over 40 minutes, first half of it without any whatsoever progress indicator. On a mid level desktop it took today half an hour. DISM works somewhat faster if you don't use optional switches /checkintegrity and /verify but I would not recommend you to create install.wim without checking its integrity and verifying it.

4.13) When done, detach the VHD / VHDX or AVHD / AVHDX file from host by right clicking it in Disk Management and selecting Detach VHD:
Create Windows 10 ISO image from Existing Installation-image.png


As long as the virtual hard disk remains attached to host it cannot be used in Hyper-V making vm it belongs to unbootable.
 

My Computer

System One

  • OS
    Dual boot Windows 10 Pro 22H2 (b 19045.4291) & Windows 11 Pro 23H2 (b 22631.3447)
    Computer type
    Laptop
    Manufacturer/Model
    Lenovo ThinkPad Workstation P72
    CPU
    Intel i7 8750H @ 2.2 GHz
    Motherboard
    Lenovo 01YU291
    Memory
    16 GB (all Samsung) DDR4-3200 SODIMM (non-ECC) PCIe 3
    Graphics Card(s)
    Intel UHD Graphics 630 & NVIDIA Quadro P600
    Sound Card
    Realtek ALC3286
    Monitor(s) Displays
    17.3"
    Screen Resolution
    3840x2160
    Hard Drives
    1TB SSD Samsung 860 EVO SATA 3
    1TB SSD Samsung 970 EVO M.2 NVMe PCIe 3 x 4
    1TB SSD Samsung 980 M.2 NVMe PCIe 3 x 4
    PSU
    230W
    Keyboard
    UltraNav
    Mouse
    Kensington wireless Orbit
    Internet Speed
    640Mbps
    Browser
    Firefox
    Antivirus
    Defender
    Other Info
    CM246 Chipset
@tecknot,

Thanks for the very detailed response. I'm basically doing the same thing with a few differences:

1) My VHD is not part of a VM. It is a standalone VHD with no virtualization involved.

2) I mount the VHD by simply double-clicking it, much like you would do with an ISO image to mount it.

But at the point where I run DISM, it simply hangs with no visible progress ever being made.
 

My Computers

System One System Two

  • OS
    Win11 Pro 23H2
    Computer type
    PC/Desktop
    Manufacturer/Model
    Home Built
    CPU
    Intel i7-11700K
    Motherboard
    ASUS Prime Z590-A
    Memory
    128GB Crucial Ballistix 3200MHz DRAM
    Graphics Card(s)
    No GPU - CPU graphics only (for now)
    Sound Card
    Realtek (on motherboard)
    Monitor(s) Displays
    HP Envy 32
    Screen Resolution
    2560 x 1440
    Hard Drives
    1 x 1TB NVMe Gen 4 x 4 SSD
    1 x 2TB NVMe Gen 3 x 4 SSD
    2 x 512GB 2.5" SSDs
    2 x 8TB HD
    PSU
    Corsair HX850i
    Case
    Corsair iCue 5000X RGB
    Cooling
    Noctua NH-D15 chromax.black cooler + 10 case fans
    Keyboard
    CODE backlit mechanical keyboard
    Mouse
    Logitech MX Master 3
    Internet Speed
    1Gb Up / 1 Gb Down
    Browser
    Edge
    Antivirus
    Windows Defender
    Other Info
    Additional options installed:
    WiFi 6E PCIe adapter
    ASUS ThunderboltEX 4 PCIe adapter
  • Operating System
    Win11 Pro 23H2
    Computer type
    Laptop
    Manufacturer/Model
    Lenovo ThinkBook 13x Gen 2
    CPU
    Intel i7-1255U
    Memory
    16 GB
    Graphics card(s)
    Intel Iris Xe Graphics
    Sound Card
    Realtek® ALC3306-CG codec
    Monitor(s) Displays
    13.3-inch IPS Display
    Screen Resolution
    WQXGA (2560 x 1600)
    Hard Drives
    2 TB 4 x 4 NVMe SSD
    PSU
    USB-C / Thunderbolt 4 Power / Charging
    Mouse
    Buttonless Glass Precision Touchpad
    Keyboard
    Backlit, spill resistant keyboard
    Internet Speed
    1Gb Up / 1Gb Down
    Browser
    Edge
    Antivirus
    Windows Defender
    Other Info
    WiFi 6e / Bluetooth 5.1 / Facial Recognition / Fingerprint Sensor / ToF (Time of Flight) Human Presence Sensor
But at the point where I run DISM, it simply hangs with no visible progress ever being made.

Isn’t that sometimes typical of some DISM? How long a hang are you talking?
 

My Computers

System One System Two

  • OS
    Windows 11 Pro 23H2 Build: 22631.3374
    Computer type
    PC/Desktop
    Manufacturer/Model
    Sin-built
    CPU
    Intel(R) Core(TM) i7-4770K CPU @ 3.50GHz (4th Gen?)
    Motherboard
    ASUS ROG Maximus VI Formula
    Memory
    32.0 GB of I forget and the box is in storage.
    Graphics Card(s)
    Gigabyte nVidia GeForce GTX 1660 Super OC 6GB
    Sound Card
    Onboard
    Monitor(s) Displays
    4 x LG 23MP75 1 x 24" LG M38H 1 x 32" LF6300 TV Monitor 1 x Wacom Pro 22" Tablet
    Screen Resolution
    All over the place
    Hard Drives
    2 x WD something Something 8TB HDD's / 2 x WD something Something 4TB HDD's / 1 x EVO 1TB SSD / 2 x QVO 1TB SSD's / 1 x EVO 250 GB SSD / 2 x QVO 1TB (External Hub) / 1 x EVO 1TB (Portable Backup Case)
    PSU
    Silverstone 1500
    Case
    NZXT Full Tower
    Cooling
    Noctua NH-D15 Elite Class Dual Tower CPU Cooler / 6 x EziDIY 120mm / 2 x Corsair 140mm somethings / 1 x 140mm Thermaltake something / 2 x 200mm Corsair.
    Keyboard
    Corsair K95 / Logitech diNovo Edge Wireless
    Mouse
    Logitech G402 / G502 / Mx Masters / MX Air Cordless
    Internet Speed
    100/40Mbps
    Browser
    All sorts
    Antivirus
    Kaspersky Premium
    Other Info
    I’m on a horse.
  • Operating System
    Windows 11 Pro 22621.2215
    Computer type
    Laptop
    Manufacturer/Model
    LENOVO Yoga 7i EVO OLED 14" Touchscreen i5 12 Core 16GB/512GB
    CPU
    Intel Core 12th Gen i5-1240P Processor (1.7 - 4.4GHz)
    Memory
    16GB LPDDR5 RAM
    Graphics card(s)
    Graphics processor is an Intel Iris Xe
    Sound Card
    optimized with Dolby Atmos®
    Screen Resolution
    QHD 2880 x 1800 OLED
    Hard Drives
    M.2 512GB
    Other Info
    …still on a horse.
If it is mounted as a physical disk, not sure what the problem is.

try wimlib and if that works there is something odd with your dism

wimlib-imagex capture E:\ "q:\install.wim" "somename" --compress=fast
 
Last edited:

My Computers

System One System Two

  • OS
    Win7
    Computer type
    PC/Desktop
    CPU
    i5-8400
    Motherboard
    gigabyte b365m ds3h
    Memory
    2x8gb 3200mhz
    Monitor(s) Displays
    benq gw2480
    PSU
    bequiet pure power 11 400CM
    Cooling
    cryorig m9i
  • Operating System
    win7
    Computer type
    PC/Desktop
    CPU
    pentium g5400
    Motherboard
    gigabyte b365m ds3h
    Memory
    1x8gb 2400
    PSU
    xfx pro 450
@tecknot,

Thanks for the very detailed response. I'm basically doing the same thing with a few differences:

1) My VHD is not part of a VM. It is a standalone VHD with no virtualization involved.
Hi hsehestedt,

Sorry, guess I am confused again.

Kind regards,

tecknot
 

My Computer

System One

  • OS
    Dual boot Windows 10 Pro 22H2 (b 19045.4291) & Windows 11 Pro 23H2 (b 22631.3447)
    Computer type
    Laptop
    Manufacturer/Model
    Lenovo ThinkPad Workstation P72
    CPU
    Intel i7 8750H @ 2.2 GHz
    Motherboard
    Lenovo 01YU291
    Memory
    16 GB (all Samsung) DDR4-3200 SODIMM (non-ECC) PCIe 3
    Graphics Card(s)
    Intel UHD Graphics 630 & NVIDIA Quadro P600
    Sound Card
    Realtek ALC3286
    Monitor(s) Displays
    17.3"
    Screen Resolution
    3840x2160
    Hard Drives
    1TB SSD Samsung 860 EVO SATA 3
    1TB SSD Samsung 970 EVO M.2 NVMe PCIe 3 x 4
    1TB SSD Samsung 980 M.2 NVMe PCIe 3 x 4
    PSU
    230W
    Keyboard
    UltraNav
    Mouse
    Kensington wireless Orbit
    Internet Speed
    640Mbps
    Browser
    Firefox
    Antivirus
    Defender
    Other Info
    CM246 Chipset
Okay, I seem to have figured this out.

I was making the assumption that this process would work after I sysprepped my image by booting into anything other than the sysprepped instance of Windows. As a result, I was booting into my primary copy of Windows on the system and then trying to image the VHD from there. However, I found that if I instead boot from a thumb drive with Windows installation media, then this process works fine. I'm not clear on why this is the case, but that is what I have discovered.

Now, I have to admit that I took a few shortcuts. For example, I did not configure the copy of Windows in the VHD to my personal preferences and I also did not bother to Sysprep it, but the results were the same - it still would not image with DISM when booted into my primary instance of Windows. But it did image when booted from Windows installation media.

I'm exhausted so I'm now going to get some sleep. Tomorrow, I'll take this to the full logical conclusion and set it up from scratch, perform the full customization of Windows, sysprep it, and then finally image it. I'll report back here what the results are and should then be able to mark this as resolved.

Thanks everyone for all your ideas and suggestions thus far.

BTW, there is a logical reason why I am even trying to do all this in the first place. Once I have everything working, I'll make another post that includes the whole reason for doing this.
 

My Computers

System One System Two

  • OS
    Win11 Pro 23H2
    Computer type
    PC/Desktop
    Manufacturer/Model
    Home Built
    CPU
    Intel i7-11700K
    Motherboard
    ASUS Prime Z590-A
    Memory
    128GB Crucial Ballistix 3200MHz DRAM
    Graphics Card(s)
    No GPU - CPU graphics only (for now)
    Sound Card
    Realtek (on motherboard)
    Monitor(s) Displays
    HP Envy 32
    Screen Resolution
    2560 x 1440
    Hard Drives
    1 x 1TB NVMe Gen 4 x 4 SSD
    1 x 2TB NVMe Gen 3 x 4 SSD
    2 x 512GB 2.5" SSDs
    2 x 8TB HD
    PSU
    Corsair HX850i
    Case
    Corsair iCue 5000X RGB
    Cooling
    Noctua NH-D15 chromax.black cooler + 10 case fans
    Keyboard
    CODE backlit mechanical keyboard
    Mouse
    Logitech MX Master 3
    Internet Speed
    1Gb Up / 1 Gb Down
    Browser
    Edge
    Antivirus
    Windows Defender
    Other Info
    Additional options installed:
    WiFi 6E PCIe adapter
    ASUS ThunderboltEX 4 PCIe adapter
  • Operating System
    Win11 Pro 23H2
    Computer type
    Laptop
    Manufacturer/Model
    Lenovo ThinkBook 13x Gen 2
    CPU
    Intel i7-1255U
    Memory
    16 GB
    Graphics card(s)
    Intel Iris Xe Graphics
    Sound Card
    Realtek® ALC3306-CG codec
    Monitor(s) Displays
    13.3-inch IPS Display
    Screen Resolution
    WQXGA (2560 x 1600)
    Hard Drives
    2 TB 4 x 4 NVMe SSD
    PSU
    USB-C / Thunderbolt 4 Power / Charging
    Mouse
    Buttonless Glass Precision Touchpad
    Keyboard
    Backlit, spill resistant keyboard
    Internet Speed
    1Gb Up / 1Gb Down
    Browser
    Edge
    Antivirus
    Windows Defender
    Other Info
    WiFi 6e / Bluetooth 5.1 / Facial Recognition / Fingerprint Sensor / ToF (Time of Flight) Human Presence Sensor
However, I found that if I instead boot from a thumb drive with Windows installation media, then this process works fine. I'm not clear on why this is the case, but that is what I have discovered.

See: Modify a Windows Image Using DISM
4. If DISM processes are interrupted, consider running the commands from the Windows Preinstallation Environment (WinPE) instead.​

P.S., maybe also consider booting to WinPE in a VM and running DISM in there to capture the image. A part of this blog article helps to explain the benefits of that:
 
Last edited:

My Computers

System One System Two

  • OS
    11 Home
    Computer type
    Laptop
    Manufacturer/Model
    Asus TUF Gaming (2024)
    CPU
    i7 13650HX
    Memory
    16GB DDR5
    Graphics Card(s)
    GeForce RTX 4060 Mobile
    Sound Card
    Eastern Electric MiniMax DAC Supreme; Emotiva UMC-200; Astell & Kern AK240
    Monitor(s) Displays
    Sony Bravia XR-55X90J
    Screen Resolution
    3840×2160
    Hard Drives
    512GB SSD internal
    37TB external
    PSU
    Li-ion
    Cooling
    2× Arc Flow Fans, 4× exhaust vents, 5× heatpipes
    Keyboard
    Logitech K800
    Mouse
    Logitech G402
    Internet Speed
    20Mbit/s up, 250Mbit/s down
    Browser
    FF
  • Operating System
    11 Home
    Computer type
    Laptop
    Manufacturer/Model
    Medion S15450
    CPU
    i5 1135G7
    Memory
    16GB DDR4
    Graphics card(s)
    Intel Iris Xe
    Sound Card
    Eastern Electric MiniMax DAC Supreme; Emotiva UMC-200; Astell & Kern AK240
    Monitor(s) Displays
    Sony Bravia XR-55X90J
    Screen Resolution
    3840×2160
    Hard Drives
    2TB SSD internal
    37TB external
    PSU
    Li-ion
    Mouse
    Logitech G402
    Keyboard
    Logitech K800
    Internet Speed
    20Mbit/s up, 250Mbit/s down
    Browser
    FF
Okay, I seem to have figured this out.

I was making the assumption that this process would work after I sysprepped my image by booting into anything other than the sysprepped instance of Windows. As a result, I was booting into my primary copy of Windows on the system and then trying to image the VHD from there. However, I found that if I instead boot from a thumb drive with Windows installation media, then this process works fine. I'm not clear on why this is the case, but that is what I have discovered.

Now, I have to admit that I took a few shortcuts. For example, I did not configure the copy of Windows in the VHD to my personal preferences and I also did not bother to Sysprep it, but the results were the same - it still would not image with DISM when booted into my primary instance of Windows. But it did image when booted from Windows installation media.

I'm exhausted so I'm now going to get some sleep. Tomorrow, I'll take this to the full logical conclusion and set it up from scratch, perform the full customization of Windows, sysprep it, and then finally image it. I'll report back here what the results are and should then be able to mark this as resolved.

Thanks everyone for all your ideas and suggestions thus far.

BTW, there is a logical reason why I am even trying to do all this in the first place. Once I have everything working, I'll make another post that includes the whole reason for doing this.
One thing you may need to do is to uninstall onedrive in vhdx file before imaging (can reinstall afterwards - online files are not affected) as sometimes dism imaging falls over.

I started getting this after the onedrive protected folder was introduced even though I do not use folder).

As you have found out, better to do it from a winpe environment.

I actually use the C drive from Macrium Reflect in winpe mode booting from the boot entry method.

Edit: trying it right now on my current Canary VHDX. Only slight PITA is ensuring the capture directory drive is correct in the dism command.

Using the Reflect GUI makes it a bit easier as you can check the assigned drive letters using the Reflect GUI Explorer and edit batch file with dism command (right click on batch file name in Explorer GUI and select edit).

It is only one step away from installing drivers for a new pc into install.wim, and creating a usb installation drive overwriting standard install.wim with custom install.wim, and you can install on a new pc. Works every time even if major hardware differences.

I use above instead of Macrium Reflect Deploy which only really handles key drivers to enable new pc to boot.

If you clean install windows 10/11 on new pc first, then export all the drivers, then inject them into custom install.wim, and then install using custom usb, virtually all drivers are updated and it is just the odd one that might need updating.

Worked a charm - I created an iso with custom install.wim and installed it in Hyper-V to test it.

So yeah Mein Herr H. :giggle: WinPE works fine. As I said, if you have Macrium Reflect, using its GUI in WinPE mode is easier than using Windows 11 Installation Drives.
 
Last edited:

My Computer

System One

  • OS
    Windows 10 Pro + others in VHDs
    Computer type
    Laptop
    Manufacturer/Model
    ASUS Vivobook 14
    CPU
    I7
    Motherboard
    Yep, Laptop has one.
    Memory
    16 GB
    Graphics Card(s)
    Integrated Intel Iris XE
    Sound Card
    Realtek built in
    Monitor(s) Displays
    N/A
    Screen Resolution
    1920x1080
    Hard Drives
    1 TB Optane NVME SSD, 1 TB NVME SSD
    PSU
    Yep, got one
    Case
    Yep, got one
    Cooling
    Stella Artois
    Keyboard
    Built in
    Mouse
    Bluetooth , wired
    Internet Speed
    72 Mb/s :-(
    Browser
    Edge mostly
    Antivirus
    Defender
    Other Info
    TPM 2.0
Thanks for all the suggestions.

FYI, in the past, I've always created my images in one of two ways:

1) Create a standard Windows image with all the latest Windows updates injected into and nothing more.

2) Create a Windows image with all the latest Windows updates injected into it AND inject the drivers for a particular system.

Typically, I would simply use #1 because I could always install all the drivers for a system with one single command after the initial installation.

At this point I am really just experimenting with having a completely configured sysprepped image that contains all the system drivers, Windows customizations, etc. I've done this a hundred times with a VM so I can do that in my sleep :-). It is simply that I have never done this before with a natively booted VHD so I wanted to update my 80+ pages of notes on unattended installation with a step-by-step procedure for this process.

I am in the midst of doing my final testing with this now.
 

My Computers

System One System Two

  • OS
    Win11 Pro 23H2
    Computer type
    PC/Desktop
    Manufacturer/Model
    Home Built
    CPU
    Intel i7-11700K
    Motherboard
    ASUS Prime Z590-A
    Memory
    128GB Crucial Ballistix 3200MHz DRAM
    Graphics Card(s)
    No GPU - CPU graphics only (for now)
    Sound Card
    Realtek (on motherboard)
    Monitor(s) Displays
    HP Envy 32
    Screen Resolution
    2560 x 1440
    Hard Drives
    1 x 1TB NVMe Gen 4 x 4 SSD
    1 x 2TB NVMe Gen 3 x 4 SSD
    2 x 512GB 2.5" SSDs
    2 x 8TB HD
    PSU
    Corsair HX850i
    Case
    Corsair iCue 5000X RGB
    Cooling
    Noctua NH-D15 chromax.black cooler + 10 case fans
    Keyboard
    CODE backlit mechanical keyboard
    Mouse
    Logitech MX Master 3
    Internet Speed
    1Gb Up / 1 Gb Down
    Browser
    Edge
    Antivirus
    Windows Defender
    Other Info
    Additional options installed:
    WiFi 6E PCIe adapter
    ASUS ThunderboltEX 4 PCIe adapter
  • Operating System
    Win11 Pro 23H2
    Computer type
    Laptop
    Manufacturer/Model
    Lenovo ThinkBook 13x Gen 2
    CPU
    Intel i7-1255U
    Memory
    16 GB
    Graphics card(s)
    Intel Iris Xe Graphics
    Sound Card
    Realtek® ALC3306-CG codec
    Monitor(s) Displays
    13.3-inch IPS Display
    Screen Resolution
    WQXGA (2560 x 1600)
    Hard Drives
    2 TB 4 x 4 NVMe SSD
    PSU
    USB-C / Thunderbolt 4 Power / Charging
    Mouse
    Buttonless Glass Precision Touchpad
    Keyboard
    Backlit, spill resistant keyboard
    Internet Speed
    1Gb Up / 1Gb Down
    Browser
    Edge
    Antivirus
    Windows Defender
    Other Info
    WiFi 6e / Bluetooth 5.1 / Facial Recognition / Fingerprint Sensor / ToF (Time of Flight) Human Presence Sensor
Okay, I'm tapping out. I have this fundamentally working, but it keeps interfering with BitLocker. I can still get into my system fine but I get into a state where BitLocker is suspended (not disabled completely, just suspended).

Three times now I have had to restore my C: drive from my Reflect backups to get everything sorted.

Again, thanks for the suggestions and help along the way. I'm going back to the way I have doing this for several years now. I think I'm just trying to make this way more complex than it needs to be :-).
 

My Computers

System One System Two

  • OS
    Win11 Pro 23H2
    Computer type
    PC/Desktop
    Manufacturer/Model
    Home Built
    CPU
    Intel i7-11700K
    Motherboard
    ASUS Prime Z590-A
    Memory
    128GB Crucial Ballistix 3200MHz DRAM
    Graphics Card(s)
    No GPU - CPU graphics only (for now)
    Sound Card
    Realtek (on motherboard)
    Monitor(s) Displays
    HP Envy 32
    Screen Resolution
    2560 x 1440
    Hard Drives
    1 x 1TB NVMe Gen 4 x 4 SSD
    1 x 2TB NVMe Gen 3 x 4 SSD
    2 x 512GB 2.5" SSDs
    2 x 8TB HD
    PSU
    Corsair HX850i
    Case
    Corsair iCue 5000X RGB
    Cooling
    Noctua NH-D15 chromax.black cooler + 10 case fans
    Keyboard
    CODE backlit mechanical keyboard
    Mouse
    Logitech MX Master 3
    Internet Speed
    1Gb Up / 1 Gb Down
    Browser
    Edge
    Antivirus
    Windows Defender
    Other Info
    Additional options installed:
    WiFi 6E PCIe adapter
    ASUS ThunderboltEX 4 PCIe adapter
  • Operating System
    Win11 Pro 23H2
    Computer type
    Laptop
    Manufacturer/Model
    Lenovo ThinkBook 13x Gen 2
    CPU
    Intel i7-1255U
    Memory
    16 GB
    Graphics card(s)
    Intel Iris Xe Graphics
    Sound Card
    Realtek® ALC3306-CG codec
    Monitor(s) Displays
    13.3-inch IPS Display
    Screen Resolution
    WQXGA (2560 x 1600)
    Hard Drives
    2 TB 4 x 4 NVMe SSD
    PSU
    USB-C / Thunderbolt 4 Power / Charging
    Mouse
    Buttonless Glass Precision Touchpad
    Keyboard
    Backlit, spill resistant keyboard
    Internet Speed
    1Gb Up / 1Gb Down
    Browser
    Edge
    Antivirus
    Windows Defender
    Other Info
    WiFi 6e / Bluetooth 5.1 / Facial Recognition / Fingerprint Sensor / ToF (Time of Flight) Human Presence Sensor

My Computers

System One System Two

  • OS
    11 Home
    Computer type
    Laptop
    Manufacturer/Model
    Asus TUF Gaming (2024)
    CPU
    i7 13650HX
    Memory
    16GB DDR5
    Graphics Card(s)
    GeForce RTX 4060 Mobile
    Sound Card
    Eastern Electric MiniMax DAC Supreme; Emotiva UMC-200; Astell & Kern AK240
    Monitor(s) Displays
    Sony Bravia XR-55X90J
    Screen Resolution
    3840×2160
    Hard Drives
    512GB SSD internal
    37TB external
    PSU
    Li-ion
    Cooling
    2× Arc Flow Fans, 4× exhaust vents, 5× heatpipes
    Keyboard
    Logitech K800
    Mouse
    Logitech G402
    Internet Speed
    20Mbit/s up, 250Mbit/s down
    Browser
    FF
  • Operating System
    11 Home
    Computer type
    Laptop
    Manufacturer/Model
    Medion S15450
    CPU
    i5 1135G7
    Memory
    16GB DDR4
    Graphics card(s)
    Intel Iris Xe
    Sound Card
    Eastern Electric MiniMax DAC Supreme; Emotiva UMC-200; Astell & Kern AK240
    Monitor(s) Displays
    Sony Bravia XR-55X90J
    Screen Resolution
    3840×2160
    Hard Drives
    2TB SSD internal
    37TB external
    PSU
    Li-ion
    Mouse
    Logitech G402
    Keyboard
    Logitech K800
    Internet Speed
    20Mbit/s up, 250Mbit/s down
    Browser
    FF
Do you mean that it seems to ignore the PreventDeviceEncryption registry flag? ( How to prevent automatic drive encryption in Windows 11? )
No. Let me do my best to explain my scenario and what is happening.

My computer has the following drives:

C: Windows OS Drive, BitLocker Encrypted
D: BitLocker Encrypted
E:
F:
Z: BitLocker Encrypted

I created the VHD on disk F:, deployed Windows to it and made it bootable. Everything works fine up this point. When I boot the system, I get the menu allowing me to boot either my primary Windows installation on C: or the VHD located on F:.

I should note here that I suspend BitLocker on C: after creating the VHD but before updating the BCD. This is normal and prevents Windows from asking for the BitLocker recovery key due to the changes being made to the BCD. When BitLocker is suspended, it should normally re-enable itself the next time that instance of Windows is booted.

Everything continues to operate normally right up to the point where I run Sysprep on the installation of Windows in the VHD. Once I run sysprep, when I boot the system, I am challenged for the BitLocker password on one of my drives. This could be either drive D: or Z: but the message prompting for the password gives no indication for which drive it wants the password. However, I can successfully boot into Windows just fine, but I cannot resume BitLocker encryption. It remains suspended, giving me a bizarre error when I try to resume encryption. Forgive me, I don't have that error now, but it does reference the BCD makes a vague reference to an "application" without naming any specific application.

I have resorted to restoring the C: to resolve the issue, but clearly I would need to do some further research, were I so inclined. In all honesty I'm really just planning on dropping the issue at this point because it doesn't interest me enough to pursue it further :-)
 

My Computers

System One System Two

  • OS
    Win11 Pro 23H2
    Computer type
    PC/Desktop
    Manufacturer/Model
    Home Built
    CPU
    Intel i7-11700K
    Motherboard
    ASUS Prime Z590-A
    Memory
    128GB Crucial Ballistix 3200MHz DRAM
    Graphics Card(s)
    No GPU - CPU graphics only (for now)
    Sound Card
    Realtek (on motherboard)
    Monitor(s) Displays
    HP Envy 32
    Screen Resolution
    2560 x 1440
    Hard Drives
    1 x 1TB NVMe Gen 4 x 4 SSD
    1 x 2TB NVMe Gen 3 x 4 SSD
    2 x 512GB 2.5" SSDs
    2 x 8TB HD
    PSU
    Corsair HX850i
    Case
    Corsair iCue 5000X RGB
    Cooling
    Noctua NH-D15 chromax.black cooler + 10 case fans
    Keyboard
    CODE backlit mechanical keyboard
    Mouse
    Logitech MX Master 3
    Internet Speed
    1Gb Up / 1 Gb Down
    Browser
    Edge
    Antivirus
    Windows Defender
    Other Info
    Additional options installed:
    WiFi 6E PCIe adapter
    ASUS ThunderboltEX 4 PCIe adapter
  • Operating System
    Win11 Pro 23H2
    Computer type
    Laptop
    Manufacturer/Model
    Lenovo ThinkBook 13x Gen 2
    CPU
    Intel i7-1255U
    Memory
    16 GB
    Graphics card(s)
    Intel Iris Xe Graphics
    Sound Card
    Realtek® ALC3306-CG codec
    Monitor(s) Displays
    13.3-inch IPS Display
    Screen Resolution
    WQXGA (2560 x 1600)
    Hard Drives
    2 TB 4 x 4 NVMe SSD
    PSU
    USB-C / Thunderbolt 4 Power / Charging
    Mouse
    Buttonless Glass Precision Touchpad
    Keyboard
    Backlit, spill resistant keyboard
    Internet Speed
    1Gb Up / 1Gb Down
    Browser
    Edge
    Antivirus
    Windows Defender
    Other Info
    WiFi 6e / Bluetooth 5.1 / Facial Recognition / Fingerprint Sensor / ToF (Time of Flight) Human Presence Sensor
I know that I had said that I was done with this issue, but last night as I attempted to get some shuteye, the resolution for this issue suddenly dawned on me.

After running sysprep on the natively booted VHD, the solution is as simple as booting that VHD again, allowing setup complete and to take you to the desktop, then suspend BitLocker one more time, reboot into the primary Windows installation. I tested this extensively today and it all works fine now.

There are a few other finer details, but I suspect that nobody is really interested :-).
 

My Computers

System One System Two

  • OS
    Win11 Pro 23H2
    Computer type
    PC/Desktop
    Manufacturer/Model
    Home Built
    CPU
    Intel i7-11700K
    Motherboard
    ASUS Prime Z590-A
    Memory
    128GB Crucial Ballistix 3200MHz DRAM
    Graphics Card(s)
    No GPU - CPU graphics only (for now)
    Sound Card
    Realtek (on motherboard)
    Monitor(s) Displays
    HP Envy 32
    Screen Resolution
    2560 x 1440
    Hard Drives
    1 x 1TB NVMe Gen 4 x 4 SSD
    1 x 2TB NVMe Gen 3 x 4 SSD
    2 x 512GB 2.5" SSDs
    2 x 8TB HD
    PSU
    Corsair HX850i
    Case
    Corsair iCue 5000X RGB
    Cooling
    Noctua NH-D15 chromax.black cooler + 10 case fans
    Keyboard
    CODE backlit mechanical keyboard
    Mouse
    Logitech MX Master 3
    Internet Speed
    1Gb Up / 1 Gb Down
    Browser
    Edge
    Antivirus
    Windows Defender
    Other Info
    Additional options installed:
    WiFi 6E PCIe adapter
    ASUS ThunderboltEX 4 PCIe adapter
  • Operating System
    Win11 Pro 23H2
    Computer type
    Laptop
    Manufacturer/Model
    Lenovo ThinkBook 13x Gen 2
    CPU
    Intel i7-1255U
    Memory
    16 GB
    Graphics card(s)
    Intel Iris Xe Graphics
    Sound Card
    Realtek® ALC3306-CG codec
    Monitor(s) Displays
    13.3-inch IPS Display
    Screen Resolution
    WQXGA (2560 x 1600)
    Hard Drives
    2 TB 4 x 4 NVMe SSD
    PSU
    USB-C / Thunderbolt 4 Power / Charging
    Mouse
    Buttonless Glass Precision Touchpad
    Keyboard
    Backlit, spill resistant keyboard
    Internet Speed
    1Gb Up / 1Gb Down
    Browser
    Edge
    Antivirus
    Windows Defender
    Other Info
    WiFi 6e / Bluetooth 5.1 / Facial Recognition / Fingerprint Sensor / ToF (Time of Flight) Human Presence Sensor

Latest Support Threads

Back
Top Bottom