Navigation
Install the app
How to install the app on iOS
Follow along with the video below to see how to install our site as a web app on your home screen.
Note: This feature may not be available in some browsers.
More options
You are using an out of date browser. It may not display this or other websites correctly.
You should upgrade or use an alternative browser.
You should upgrade or use an alternative browser.
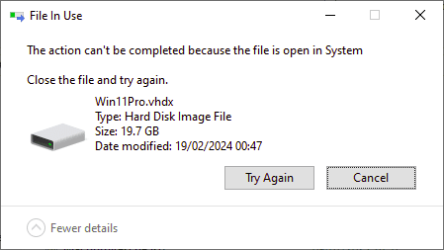
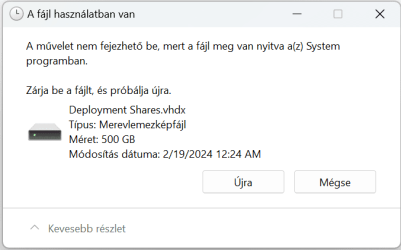
Solved Cannot delete VHDX as it's open in SYSTEM
- Thread starter CSharpDev
- Start date
If your vhdx is open in System it's almost certainly because you currently have it mounted as a virtual drive. Detach it, then you can delete it.I wanna delete this VHDX but can't. What can I do to override this and delete?

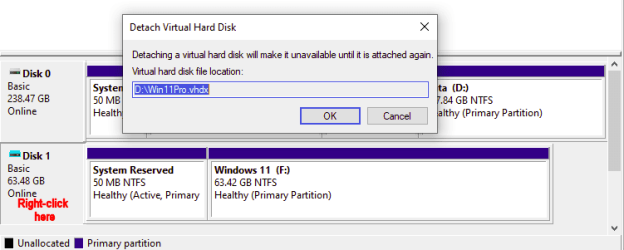
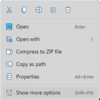
One way to dismount a virtual drive is to right-click on it in File Explorer and select Eject. Another is to right-click on the drive in Disk Management and select Detach VHD.

My Computers
System One System Two
-
- OS
- Windows 11 Home
- Computer type
- Laptop
- Manufacturer/Model
- Acer Aspire 3 A315-23
- CPU
- AMD Athlon Silver 3050U
- Memory
- 8GB
- Graphics Card(s)
- Radeon Graphics
- Monitor(s) Displays
- laptop screen
- Screen Resolution
- 1366x768 native resolution, up to 2560x1440 with Radeon Virtual Super Resolution
- Hard Drives
- 1TB Samsung EVO 870 SSD
- Internet Speed
- 50 Mbps
- Browser
- Edge, Firefox
- Antivirus
- Defender
- Other Info
- fully 'Windows 11 ready' laptop. Windows 10 C: partition migrated from my old unsupported 'main machine' then upgraded to 11. A test migration ran Insider builds for 2 months. When 11 was released on 5th October it was re-imaged back to 10 and was offered the upgrade in Windows Update on 20th October. Windows Update offered the 22H2 Feature Update on 20th September 2022. It got the 23H2 Feature Update on 4th November 2023 through Windows Update.
My SYSTEM THREE is a Dell Latitude 5410, i7-10610U, 32GB RAM, 512GB NVMe ssd, supported device running Windows 11 Pro (and all my Hyper-V VMs).
My SYSTEM FOUR is a 2-in-1 convertible Lenovo Yoga 11e 20DA, Celeron N2930, 8GB RAM, 256GB ssd. Unsupported device: currently running Win10 Pro, plus Win11 Pro RTM and Insider Beta as native boot vhdx.
My SYSTEM FIVE is a Dell Latitude 3190 2-in-1, Pentium Silver N5030, 4GB RAM, 512GB NVMe ssd, supported device running Windows 11 Pro, plus the Insider Beta, Dev, and Canary builds as a native boot .vhdx.
-
- Operating System
- Windows 11 Pro
- Computer type
- Laptop
- Manufacturer/Model
- Dell Lattitude E4310
- CPU
- Intel® Core™ i5-520M
- Motherboard
- 0T6M8G
- Memory
- 8GB
- Graphics card(s)
- (integrated graphics) Intel HD Graphics
- Screen Resolution
- 1366x768
- Hard Drives
- 500GB Crucial MX500 SSD
- Browser
- Firefox, Edge
- Antivirus
- Defender
- Other Info
- unsupported machine: Legacy bios, MBR, TPM 1.2, upgraded from W10 to W11 using W10/W11 hybrid install media workaround. In-place upgrade to 22H2 using ISO and a workaround. Feature Update to 23H2 by manually installing the Enablement Package. Also running Insider Beta, Dev, and Canary builds as a native boot .vhdx.
My SYSTEM THREE is a Dell Latitude 5410, i7-10610U, 32GB RAM, 512GB NVMe ssd, supported device running Windows 11 Pro (and all my Hyper-V VMs).
My SYSTEM FOUR is a 2-in-1 convertible Lenovo Yoga 11e 20DA, Celeron N2930, 8GB RAM, 256GB ssd. Unsupported device: currently running Win10 Pro, plus Win11 Pro RTM and Insider Beta as native boot vhdx.
My SYSTEM FIVE is a Dell Latitude 3190 2-in-1, Pentium Silver N5030, 4GB RAM, 512GB NVMe ssd, supported device running Windows 11 Pro, plus the Insider Beta, Dev, and Canary builds as a native boot .vhdx.
Hi thereIf your vhdx is open in System it's almost certainly because you currently have it mounted as a virtual drive. Detach it, then you can delete it.
View attachment 87625
One way to dismount a virtual drive is to right-click on it in File Explorer and select Eject. Another is to right-click on the drive in Disk Management and select Detach VHD.
View attachment 87626
or simply boot from a Windows install disk --->repair system-->command prompt ---> diskpart -->list disk -->select disk ccc --->list vol -->assign vol yyy letter=Q --- exit then delete q:\name.vhdx
Cheers
jimbo
My Computer
System One
-
- OS
- Windows XP,7,10,11 Linux Arch Linux
- Computer type
- PC/Desktop
- CPU
- 2 X Intel i7
- Local time
- 1:26 AM
- Posts
- 5,721
- OS
- Windows 10 Pro + others in VHDs
or just reboot pc and delete it.Hi there
or simply boot from a Windows install disk --->repair system-->command prompt ---> diskpart -->list disk -->select disk ccc --->list vol -->assign vol yyy letter=Q --- exit then delete q:\name.vhdx
Cheers
jimbo
My Computer
System One
-
- OS
- Windows 10 Pro + others in VHDs
- Computer type
- Laptop
- Manufacturer/Model
- ASUS Vivobook 14
- CPU
- I7
- Motherboard
- Yep, Laptop has one.
- Memory
- 16 GB
- Graphics Card(s)
- Integrated Intel Iris XE
- Sound Card
- Realtek built in
- Monitor(s) Displays
- N/A
- Screen Resolution
- 1920x1080
- Hard Drives
- 1 TB Optane NVME SSD, 1 TB NVME SSD
- PSU
- Yep, got one
- Case
- Yep, got one
- Cooling
- Stella Artois
- Keyboard
- Built in
- Mouse
- Bluetooth , wired
- Internet Speed
- 72 Mb/s :-(
- Browser
- Edge mostly
- Antivirus
- Defender
- Other Info
- TPM 2.0
Similar threads
- Replies
- 5
- Views
- 651
- Replies
- 40
- Views
- 2K
- Replies
- 9
- Views
- 680
- Replies
- 5
- Views
- 2K
-

Completely Disable and Remove Copilot in Windows 11
This tutorial will show you how to completely disable the Windows Copilot feature and remove Copilot from the taskbar, Windows Search, and Microsoft Edge... -

Enable or Disable Sudo Command in Windows 11
This tutorial will show you how to enable or disable the Sudo command for all users in Windows 11. Starting with Windows 11 build 26052 (Canary and Dev)... -

Enable or Disable Feeds on Widgets Board in Windows 11
This tutorial will show you how to enable or disable news feeds on the widgets board for your account in Windows 11. Widgets are small windows that display... -

Use ViVeTool to Enable or Disable Hidden Features in Windows 11
This tutorial will show you how to use ViVeTool to enable or disable hidden features in Windows 10 and Windows 11. ViVeTool is an open source tool that can... -

Always or Never Combine Taskbar buttons and Hide Labels in Windows 11
This tutorial will show you how to always, when the taskbar is full, or never combine taskbar buttons and hide labels for your account, specific users, or... -

Disable Modern Standby in Windows 10 and Windows 11
This tutorial will show you how to disable Modern Standby (S0 Low Power Idle) to enable S3 support on a Windows 10 and Windows 11 device. In Windows 10 and... -

Disable "Show more options" context menu in Windows 11
This tutorial will show you how to enable or disable having to click on "Show more options" to see the full context menu for your account or all users in... -

Download Official Windows 11 ISO file from Microsoft
This tutorial will show you how to download an official Windows 11 ISO file from Microsoft. Microsoft provides ISO files for Windows 11 to download. You... -

Restore Classic File Explorer with Ribbon in Windows 11
This tutorial will show you how to restore the classic File Explorer with Ribbon for your account or all users in Windows 11. File Explorer in Windows 10... -

Repair Install Windows 11 with an In-place Upgrade
This tutorial will show you how to do a repair install of Windows 11 by performing an in-place upgrade without losing anything. If you need to repair or... -

Enable or Disable Windows Sandbox in Windows 11
This tutorial will show you how to enable or disable the Windows Sandbox feature for all users in Windows 11 Pro, Enterprise, or Education. Windows Sandbox... -

Clean Install Windows 11
This tutorial will show you step by step on how to clean install Windows 11 at boot on your PC with or without an Internet connection and setup with a local...
Latest Support Threads
-
How to stop BIOS/UEFI from checking all usb external drives for an OS at boot?
- Started by CharlieDog
- Replies: 0
-
-
Using Windows Hello with local account (for authenticating into websites and apps)
- Started by Gonchisky
- Replies: 9
-
-
Can I charge a Dell Inspiron 15 3535 with 19V or 20V generic charger?
- Started by kelper
- Replies: 18
Latest Tutorials
-
Privacy and Security Add or Remove "Scan with Microsoft Defender" Context Menu in Windows 11
- Started by Brink
- Replies: 0
-
Privacy and Security Add Windows Security to Desktop Context Menu in Windows 11
- Started by Brink
- Replies: 0
-
-
Browsers and Mail Enable or Disable Add Profile in Microsoft Edge
- Started by Brink
- Replies: 0
-
Browsers and Mail Enable or Disable InPrivate Browsing in Microsoft Edge
- Started by Brink
- Replies: 0


