To update Windows 11 iso use WIM Tools Version 21.6.0.239 by Hannes Sehestedt (@hsehestedt)


Ramesh Sharma

Active member
Member
Local time
4:03 PM
Posts
133
OS
Window 11 v24H2 Build 26085.1
I downloaded WIM Tools by @hsehestedt from github (link in attachment) and updated Windows 11 version 22621.1702 to 22621.2070 for editions Windows 11 Home and Windows 11 Pro. Special Thanks to @hsehestedt for this very useful Tool.
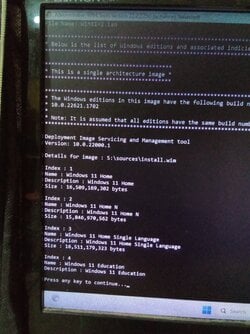
Run this tool as administrator and we get 16 different options to work with Windows Updates, Iso modification, drivers updates, and bootable iso making from folder. Use Program Help for each utility.
At the start of using this tool, I had Windows 11 iso in location I:\Windows ISO.
Now create folder x64 in this location. Then create sub folders :-
1. LCU
2. logs
3. MicroCode
4. Other
5. PE_Files
6. SafeOS_DU
7. Setup_DU
Download update files from Microsoft Update Catalog and place them in subsequent folders as given in Program Help.
Out of 16 options , I used option number 1 from tool to update Windows 11 iso which is in I:\Windows ISO .
I mentiond this path for iso and then for project to save I mentioned I;\Windows ISO\x64.
For location of windows update files I mentioned I:\Windows ISO.
{Please note that you have to mention one level up location. It should not be I:\Windows ISO\x64. It gives error "folder x64 not found"}
Also press R to save WIM_SCRIPT. We can read the whole process we have done up till now.
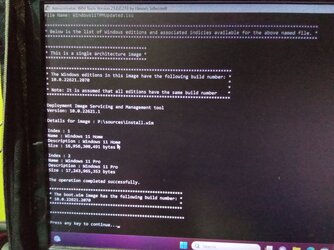
Finally I got updated iso of Windows 11 having install.wim of size 55,57,826 KB (nearly 5.6 GB) in I:\Windows ISO\x64.
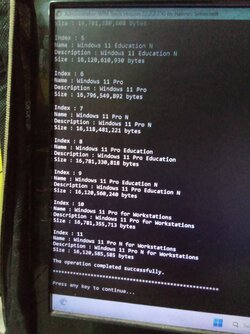
To check the version of this updated iso press 9.
Please see all the images attached herewith.
Again thanks to @hsehestedt .
Thanks for reading and sharing your valuable time.
 
Windows Build/Version
Windows 11Pro v 22H2 , 22621.2070

Attachments

  • Image_Info[1].txt
    1.7 KB · Views: 12
  • WIM_SCRIPT[2].TXT
    2 KB · Views: 10
  • IMG_20230804_202846[1].jpg
    IMG_20230804_202846[1].jpg
    574.2 KB · Views: 15
  • IMG_20230804_200838[1].jpg
    IMG_20230804_200838[1].jpg
    1 MB · Views: 12
  • IMG_20230804_200613[1].jpg
    IMG_20230804_200613[1].jpg
    972.3 KB · Views: 14
  • IMG_20230804_192714[1].jpg
    IMG_20230804_192714[1].jpg
    632.4 KB · Views: 13
  • IMG_20230804_183058[1].jpg
    IMG_20230804_183058[1].jpg
    682.3 KB · Views: 12
  • IMG_20230804_164414[1].jpg
    IMG_20230804_164414[1].jpg
    740 KB · Views: 12
  • IMG_20230804_164308[1].jpg
    IMG_20230804_164308[1].jpg
    805.2 KB · Views: 9
  • IMG_20230804_164105[1].jpg
    IMG_20230804_164105[1].jpg
    345 KB · Views: 6
  • IMG_20230804_163605[1].jpg
    IMG_20230804_163605[1].jpg
    603.5 KB · Views: 10
  • link.txt
    64 bytes · Views: 15
  • qrcode_github.com.png
    qrcode_github.com.png
    2.2 KB · Views: 10
Last edited:

My Computer

System One

  • OS
    Window 11 v24H2 Build 26085.1
    Computer type
    PC/Desktop
    Manufacturer/Model
    ASSEMMBLED
    CPU
    Intel Pentium CPU G620@ 2.60 GHz
    Motherboard
    DAICHI
    Memory
    6 GB
    Graphics Card(s)
    Onboard
    Sound Card
    Onboard
    Monitor(s) Displays
    LG
    Screen Resolution
    1366x768
    Hard Drives
    Toshiba HDD 1 TB
    Keyboard
    Mechanical
    Mouse
    Mechanical
    Internet Speed
    700 kb/s
    Browser
    Microsoft EDGE, CHROME
    Antivirus
    Microsoft Defender
Thanks for the comments! I very much appreciate it!

BTW, look for a big update coming this weekend. Should be posted by no later than midday on Sunday.
 

My Computers

System One System Two

  • OS
    Win11 Pro 23H2
    Computer type
    PC/Desktop
    Manufacturer/Model
    Home Built
    CPU
    Intel i7-11700K
    Motherboard
    ASUS Prime Z590-A
    Memory
    128GB Crucial Ballistix 3200MHz DRAM
    Graphics Card(s)
    No GPU - CPU graphics only (for now)
    Sound Card
    Realtek (on motherboard)
    Monitor(s) Displays
    HP Envy 32
    Screen Resolution
    2560 x 1440
    Hard Drives
    1 x 1TB NVMe Gen 4 x 4 SSD
    1 x 2TB NVMe Gen 3 x 4 SSD
    2 x 512GB 2.5" SSDs
    2 x 8TB HD
    PSU
    Corsair HX850i
    Case
    Corsair iCue 5000X RGB
    Cooling
    Noctua NH-D15 chromax.black cooler + 10 case fans
    Keyboard
    CODE backlit mechanical keyboard
    Mouse
    Logitech MX Master 3
    Internet Speed
    1Gb Up / 1 Gb Down
    Browser
    Edge
    Antivirus
    Windows Defender
    Other Info
    Additional options installed:
    WiFi 6E PCIe adapter
    ASUS ThunderboltEX 4 PCIe adapter
  • Operating System
    Win11 Pro 23H2
    Computer type
    Laptop
    Manufacturer/Model
    Lenovo ThinkBook 13x Gen 2
    CPU
    Intel i7-1255U
    Memory
    16 GB
    Graphics card(s)
    Intel Iris Xe Graphics
    Sound Card
    Realtek® ALC3306-CG codec
    Monitor(s) Displays
    13.3-inch IPS Display
    Screen Resolution
    WQXGA (2560 x 1600)
    Hard Drives
    2 TB 4 x 4 NVMe SSD
    PSU
    USB-C / Thunderbolt 4 Power / Charging
    Mouse
    Buttonless Glass Precision Touchpad
    Keyboard
    Backlit, spill resistant keyboard
    Internet Speed
    1Gb Up / 1Gb Down
    Browser
    Edge
    Antivirus
    Windows Defender
    Other Info
    WiFi 6e / Bluetooth 5.1 / Facial Recognition / Fingerprint Sensor / ToF (Time of Flight) Human Presence Sensor
Thanks for the comments! I very much appreciate it!

BTW, look for a big update coming this weekend. Should be posted by no later than midday on Sunday.
Warm welcome and my regards to you @hsehestedt
 

My Computer

System One

  • OS
    Window 11 v24H2 Build 26085.1
    Computer type
    PC/Desktop
    Manufacturer/Model
    ASSEMMBLED
    CPU
    Intel Pentium CPU G620@ 2.60 GHz
    Motherboard
    DAICHI
    Memory
    6 GB
    Graphics Card(s)
    Onboard
    Sound Card
    Onboard
    Monitor(s) Displays
    LG
    Screen Resolution
    1366x768
    Hard Drives
    Toshiba HDD 1 TB
    Keyboard
    Mechanical
    Mouse
    Mechanical
    Internet Speed
    700 kb/s
    Browser
    Microsoft EDGE, CHROME
    Antivirus
    Microsoft Defender
Ramesh, I have published the new version. Thanks to your suggestions I have completely revamped the help section that describes how to stage the update files. Hopefully everything is a bit clearer now.

Also added a new feature - the ability to update the BOOT.WIM file with the Windows 11 System Requirement bypass entries just as RUFUS does.

Please feel free to let me know if you have any comments or questions.

New version: 22.2.2.250


My Computers

System One System Two

  • OS
    Win11 Pro 23H2
    Computer type
    PC/Desktop
    Manufacturer/Model
    Home Built
    CPU
    Intel i7-11700K
    Motherboard
    ASUS Prime Z590-A
    Memory
    128GB Crucial Ballistix 3200MHz DRAM
    Graphics Card(s)
    No GPU - CPU graphics only (for now)
    Sound Card
    Realtek (on motherboard)
    Monitor(s) Displays
    HP Envy 32
    Screen Resolution
    2560 x 1440
    Hard Drives
    1 x 1TB NVMe Gen 4 x 4 SSD
    1 x 2TB NVMe Gen 3 x 4 SSD
    2 x 512GB 2.5" SSDs
    2 x 8TB HD
    PSU
    Corsair HX850i
    Case
    Corsair iCue 5000X RGB
    Cooling
    Noctua NH-D15 chromax.black cooler + 10 case fans
    Keyboard
    CODE backlit mechanical keyboard
    Mouse
    Logitech MX Master 3
    Internet Speed
    1Gb Up / 1 Gb Down
    Browser
    Edge
    Antivirus
    Windows Defender
    Other Info
    Additional options installed:
    WiFi 6E PCIe adapter
    ASUS ThunderboltEX 4 PCIe adapter
  • Operating System
    Win11 Pro 23H2
    Computer type
    Laptop
    Manufacturer/Model
    Lenovo ThinkBook 13x Gen 2
    CPU
    Intel i7-1255U
    Memory
    16 GB
    Graphics card(s)
    Intel Iris Xe Graphics
    Sound Card
    Realtek® ALC3306-CG codec
    Monitor(s) Displays
    13.3-inch IPS Display
    Screen Resolution
    WQXGA (2560 x 1600)
    Hard Drives
    2 TB 4 x 4 NVMe SSD
    PSU
    USB-C / Thunderbolt 4 Power / Charging
    Mouse
    Buttonless Glass Precision Touchpad
    Keyboard
    Backlit, spill resistant keyboard
    Internet Speed
    1Gb Up / 1Gb Down
    Browser
    Edge
    Antivirus
    Windows Defender
    Other Info
    WiFi 6e / Bluetooth 5.1 / Facial Recognition / Fingerprint Sensor / ToF (Time of Flight) Human Presence Sensor
Thanks @hsehestedt for new version of WIM TOOLS. Every windows enthusiast, user, technician,student should try this all in one tool.
I used option 4 to updated iso made by above explained method. It makes the modified iso but not clearing the message ' This pc can't run windows 11 '. I tried 2-3 times on freshly downloaded windows 11 build 22H2 v 1702, but the result was same.
I made multi bootable iso by this tool and working with no issue. Self explanatory tool.
Please advise if any workaround for bypassing the hardware requirements in addition to option 4.
While working with other powershell script JosephM101 from GitHub , I found that the final iso directly installs Windows 11 Home without showing list of other 11 editions. It creates local account which has to be changed to Microsoft account. This also applies to other scripts available in this forum.
Hence I decided to export both editions seperately by using Dism export command.
I exported pro and home install.wim to different locations. Also I moved modified install.wim to other location on partition.
Finally I placed the exported install.wim of Windows 11 Pro in sources folder . I again run Dism /get-wimifo /wimfile:install.wim to check the available editions . It displayed only Windows 11 Pro with index 1 of size 17,243,965,353 bytes.
But when I booted with pro edition iso , after install screen, list of all editions appeared.
Finally I have Windows 11 Pro v 1702. But WIM TOOLS shows v 2070. I now have activation having digital license linked with Microsoft account.
 

My Computer

System One

  • OS
    Window 11 v24H2 Build 26085.1
    Computer type
    PC/Desktop
    Manufacturer/Model
    ASSEMMBLED
    CPU
    Intel Pentium CPU G620@ 2.60 GHz
    Motherboard
    DAICHI
    Memory
    6 GB
    Graphics Card(s)
    Onboard
    Sound Card
    Onboard
    Monitor(s) Displays
    LG
    Screen Resolution
    1366x768
    Hard Drives
    Toshiba HDD 1 TB
    Keyboard
    Mechanical
    Mouse
    Mechanical
    Internet Speed
    700 kb/s
    Browser
    Microsoft EDGE, CHROME
    Antivirus
    Microsoft Defender
@hsehestedt:
Consider automatically creating EI.cfg when the image count > 1. New users will no idea what EI.cfg really does, you should just do it for them.
 

My Computer

System One

  • OS
    Windows 7
@Ramesh Sharma, thanks again for your comments. You had said "Please advise if any workaround for bypassing the hardware requirements in addition to option 4". I'm not quite sure that I understand what it is that you are asking here. Would you mind just clarifying this a little bit for me?

Also, "Finally I have Windows 11 Pro v 1702. But WIM TOOLS shows v 2070". Any chance you could show me a sample of the output? Again, I'm not clear what you mean by "v 1702" since there was was no version 1702 of Windows 11.

@garlin, thanks for the suggestion regarding the ei.cfg file. Note that I offer the user help explaining what the ei.cfg file is like this:

image1.jpg

Rather than simply force the ei.cfg, I prefer to give the user an option. But, would it be acceptable to you if I modified the prompt to suggest to the user that they choose "yes" if they are not certain?
 

My Computers

System One System Two

  • OS
    Win11 Pro 23H2
    Computer type
    PC/Desktop
    Manufacturer/Model
    Home Built
    CPU
    Intel i7-11700K
    Motherboard
    ASUS Prime Z590-A
    Memory
    128GB Crucial Ballistix 3200MHz DRAM
    Graphics Card(s)
    No GPU - CPU graphics only (for now)
    Sound Card
    Realtek (on motherboard)
    Monitor(s) Displays
    HP Envy 32
    Screen Resolution
    2560 x 1440
    Hard Drives
    1 x 1TB NVMe Gen 4 x 4 SSD
    1 x 2TB NVMe Gen 3 x 4 SSD
    2 x 512GB 2.5" SSDs
    2 x 8TB HD
    PSU
    Corsair HX850i
    Case
    Corsair iCue 5000X RGB
    Cooling
    Noctua NH-D15 chromax.black cooler + 10 case fans
    Keyboard
    CODE backlit mechanical keyboard
    Mouse
    Logitech MX Master 3
    Internet Speed
    1Gb Up / 1 Gb Down
    Browser
    Edge
    Antivirus
    Windows Defender
    Other Info
    Additional options installed:
    WiFi 6E PCIe adapter
    ASUS ThunderboltEX 4 PCIe adapter
  • Operating System
    Win11 Pro 23H2
    Computer type
    Laptop
    Manufacturer/Model
    Lenovo ThinkBook 13x Gen 2
    CPU
    Intel i7-1255U
    Memory
    16 GB
    Graphics card(s)
    Intel Iris Xe Graphics
    Sound Card
    Realtek® ALC3306-CG codec
    Monitor(s) Displays
    13.3-inch IPS Display
    Screen Resolution
    WQXGA (2560 x 1600)
    Hard Drives
    2 TB 4 x 4 NVMe SSD
    PSU
    USB-C / Thunderbolt 4 Power / Charging
    Mouse
    Buttonless Glass Precision Touchpad
    Keyboard
    Backlit, spill resistant keyboard
    Internet Speed
    1Gb Up / 1Gb Down
    Browser
    Edge
    Antivirus
    Windows Defender
    Other Info
    WiFi 6e / Bluetooth 5.1 / Facial Recognition / Fingerprint Sensor / ToF (Time of Flight) Human Presence Sensor
@Ramesh Sharma, thanks again for your comments. You had said "Please advise if any workaround for bypassing the hardware requirements in addition to option 4". I'm not quite sure that I understand what it is that you are asking here. Would you mind just clarifying this a little bit for me?

Also, "Finally I have Windows 11 Pro v 1702. But WIM TOOLS shows v 2070". Any chance you could show me a sample of the output? Again, I'm not clear what you mean by "v 1702" since there was was no version 1702 of Windows 11.

@garlin, thanks for the suggestion regarding the ei.cfg file. Note that I offer the user help explaining what the ei.cfg file is like this:

View attachment 67109

Rather than simply force the ei.cfg, I prefer to give the user an option. But, would it be acceptable to you if I modified the prompt to suggest to the user that they choose "yes" if they are not certain?
I apologise.I should type os build number 1702 or os build number 2070 and v 22H2.
I asked how should the message "this pc can not run windows 11" be cleared to proceed further for installation? I have used option number 4 to inject registry entries to bypass windows 11 requirements. I have posted the images in attachment which I got after using option number 10.Also I have attached the image showing os build number as 1702 on having installed Windows 11 Pro. I used the iso image updated and created by this tool , in JosephM101 script from GitHub to get iso to work on unsupported pc.
Should I type shift+F10 and type some commands, run any bat file, cmd file?
I usually type Y to inject EI.CFG.
Thank you very much.
 

Attachments

  • IMG_20230804_202846.jpg
    IMG_20230804_202846.jpg
    574.2 KB · Views: 5
  • IMG_20230808_103422.jpg
    IMG_20230808_103422.jpg
    782.7 KB · Views: 6
Last edited:

My Computer

System One

  • OS
    Window 11 v24H2 Build 26085.1
    Computer type
    PC/Desktop
    Manufacturer/Model
    ASSEMMBLED
    CPU
    Intel Pentium CPU G620@ 2.60 GHz
    Motherboard
    DAICHI
    Memory
    6 GB
    Graphics Card(s)
    Onboard
    Sound Card
    Onboard
    Monitor(s) Displays
    LG
    Screen Resolution
    1366x768
    Hard Drives
    Toshiba HDD 1 TB
    Keyboard
    Mechanical
    Mouse
    Mechanical
    Internet Speed
    700 kb/s
    Browser
    Microsoft EDGE, CHROME
    Antivirus
    Microsoft Defender
@garlin, thanks for the suggestion regarding the ei.cfg file. Note that I offer the user help explaining what the ei.cfg file is like this:

View attachment 67109

Rather than simply force the ei.cfg, I prefer to give the user an option. But, would it be acceptable to you if I modified the prompt to suggest to the user that they choose "yes" if they are not certain?
Let's be honest -- this question goes over the heads of 95% of your target users. Even if there's a valid argument for not providing a default EI.cfg on a multi-edition ISO, a normal user just expects to see it "work".

It's one of those features they don't realize is needed until it bites them.
 

My Computer

System One

  • OS
    Windows 7
Let's be honest -- this question goes over the heads of 95% of your target users. Even if there's a valid argument for not providing a default EI.cfg on a multi-edition ISO, a normal user just expects to see it "work".

It's one of those features they don't realize is needed until it bites them.
This is true - but then again this entire app is not aimed at your average user! I pretty much wrote it just for myself but thought I would share with those very few who might find it interesting.
 

My Computers

System One System Two

  • OS
    Win11 Pro 23H2
    Computer type
    PC/Desktop
    Manufacturer/Model
    Home Built
    CPU
    Intel i7-11700K
    Motherboard
    ASUS Prime Z590-A
    Memory
    128GB Crucial Ballistix 3200MHz DRAM
    Graphics Card(s)
    No GPU - CPU graphics only (for now)
    Sound Card
    Realtek (on motherboard)
    Monitor(s) Displays
    HP Envy 32
    Screen Resolution
    2560 x 1440
    Hard Drives
    1 x 1TB NVMe Gen 4 x 4 SSD
    1 x 2TB NVMe Gen 3 x 4 SSD
    2 x 512GB 2.5" SSDs
    2 x 8TB HD
    PSU
    Corsair HX850i
    Case
    Corsair iCue 5000X RGB
    Cooling
    Noctua NH-D15 chromax.black cooler + 10 case fans
    Keyboard
    CODE backlit mechanical keyboard
    Mouse
    Logitech MX Master 3
    Internet Speed
    1Gb Up / 1 Gb Down
    Browser
    Edge
    Antivirus
    Windows Defender
    Other Info
    Additional options installed:
    WiFi 6E PCIe adapter
    ASUS ThunderboltEX 4 PCIe adapter
  • Operating System
    Win11 Pro 23H2
    Computer type
    Laptop
    Manufacturer/Model
    Lenovo ThinkBook 13x Gen 2
    CPU
    Intel i7-1255U
    Memory
    16 GB
    Graphics card(s)
    Intel Iris Xe Graphics
    Sound Card
    Realtek® ALC3306-CG codec
    Monitor(s) Displays
    13.3-inch IPS Display
    Screen Resolution
    WQXGA (2560 x 1600)
    Hard Drives
    2 TB 4 x 4 NVMe SSD
    PSU
    USB-C / Thunderbolt 4 Power / Charging
    Mouse
    Buttonless Glass Precision Touchpad
    Keyboard
    Backlit, spill resistant keyboard
    Internet Speed
    1Gb Up / 1Gb Down
    Browser
    Edge
    Antivirus
    Windows Defender
    Other Info
    WiFi 6e / Bluetooth 5.1 / Facial Recognition / Fingerprint Sensor / ToF (Time of Flight) Human Presence Sensor
I apologise.I should type os build number 1702 or os build number 2070 and v 22H2.
I asked how should the message "this pc can not run windows 11" be cleared to proceed further for installation? I have used option number 4 to inject registry entries to bypass windows 11 requirements. I have posted the images in attachment which I got after using option number 10.Also I have attached the image showing os build number as 1702 on having installed Windows 11 Pro. I used the iso image updated and created by this tool , in JosephM101 script from GitHub to get iso to work on unsupported pc.
Should I type shift+F10 and type some commands, run any bat file, cmd file?
I usually type Y to inject EI.CFG.
Thank you very much.
I'll take a closer look at this later today. I'm going to be tied up with a few things this morning, but I'll respond back later.
 

My Computers

System One System Two

  • OS
    Win11 Pro 23H2
    Computer type
    PC/Desktop
    Manufacturer/Model
    Home Built
    CPU
    Intel i7-11700K
    Motherboard
    ASUS Prime Z590-A
    Memory
    128GB Crucial Ballistix 3200MHz DRAM
    Graphics Card(s)
    No GPU - CPU graphics only (for now)
    Sound Card
    Realtek (on motherboard)
    Monitor(s) Displays
    HP Envy 32
    Screen Resolution
    2560 x 1440
    Hard Drives
    1 x 1TB NVMe Gen 4 x 4 SSD
    1 x 2TB NVMe Gen 3 x 4 SSD
    2 x 512GB 2.5" SSDs
    2 x 8TB HD
    PSU
    Corsair HX850i
    Case
    Corsair iCue 5000X RGB
    Cooling
    Noctua NH-D15 chromax.black cooler + 10 case fans
    Keyboard
    CODE backlit mechanical keyboard
    Mouse
    Logitech MX Master 3
    Internet Speed
    1Gb Up / 1 Gb Down
    Browser
    Edge
    Antivirus
    Windows Defender
    Other Info
    Additional options installed:
    WiFi 6E PCIe adapter
    ASUS ThunderboltEX 4 PCIe adapter
  • Operating System
    Win11 Pro 23H2
    Computer type
    Laptop
    Manufacturer/Model
    Lenovo ThinkBook 13x Gen 2
    CPU
    Intel i7-1255U
    Memory
    16 GB
    Graphics card(s)
    Intel Iris Xe Graphics
    Sound Card
    Realtek® ALC3306-CG codec
    Monitor(s) Displays
    13.3-inch IPS Display
    Screen Resolution
    WQXGA (2560 x 1600)
    Hard Drives
    2 TB 4 x 4 NVMe SSD
    PSU
    USB-C / Thunderbolt 4 Power / Charging
    Mouse
    Buttonless Glass Precision Touchpad
    Keyboard
    Backlit, spill resistant keyboard
    Internet Speed
    1Gb Up / 1Gb Down
    Browser
    Edge
    Antivirus
    Windows Defender
    Other Info
    WiFi 6e / Bluetooth 5.1 / Facial Recognition / Fingerprint Sensor / ToF (Time of Flight) Human Presence Sensor
Ramesh, I have a couple of questions for you now...

So, in looking at the release history for Windows 11, build 1702 is the May 9, 2023 release. Build 2070 is the July 26, 2023 Preview Update.

That tells me that you must have installed Windows from media that is not updated to build 2070 yet, but the output from the program is showing a build that has been updated.

So here are a couple of tips:

What I usually do every patch Tuesday (like today!) is that I download the latest updates. Then, I run the program and select option #1 to inject the updates. I'll point the program to my windows ISO image and when it asks what indicies I should upgrade, I will specify "ALL".

If you do something like export indicies from different sources that have different builds and end up combing then all into one image, you could end up with something weird like this.

Note that when the program looks at the Windows image to determine the build, it simply looks at the first index. You may notice the message that says that we assume that all indicies have the same build number. This is because I made the program assuming that you would not create a mix of different builds all in the same image.

I don't know if any of this helps you. Do you recall all the steps that you took to create the media? Is it possible that you somehow created media with mixed builds?

If you are not certain, there are a few things that we could do:

1) If you could place your ISO image somewhere for me, I could take a look at it and see if you ended up with media that has mixed builds in it.

2) I could a quick script that will show the build for each and every edition of Windows in your image to see if you have different builds going on.
 

My Computers

System One System Two

  • OS
    Win11 Pro 23H2
    Computer type
    PC/Desktop
    Manufacturer/Model
    Home Built
    CPU
    Intel i7-11700K
    Motherboard
    ASUS Prime Z590-A
    Memory
    128GB Crucial Ballistix 3200MHz DRAM
    Graphics Card(s)
    No GPU - CPU graphics only (for now)
    Sound Card
    Realtek (on motherboard)
    Monitor(s) Displays
    HP Envy 32
    Screen Resolution
    2560 x 1440
    Hard Drives
    1 x 1TB NVMe Gen 4 x 4 SSD
    1 x 2TB NVMe Gen 3 x 4 SSD
    2 x 512GB 2.5" SSDs
    2 x 8TB HD
    PSU
    Corsair HX850i
    Case
    Corsair iCue 5000X RGB
    Cooling
    Noctua NH-D15 chromax.black cooler + 10 case fans
    Keyboard
    CODE backlit mechanical keyboard
    Mouse
    Logitech MX Master 3
    Internet Speed
    1Gb Up / 1 Gb Down
    Browser
    Edge
    Antivirus
    Windows Defender
    Other Info
    Additional options installed:
    WiFi 6E PCIe adapter
    ASUS ThunderboltEX 4 PCIe adapter
  • Operating System
    Win11 Pro 23H2
    Computer type
    Laptop
    Manufacturer/Model
    Lenovo ThinkBook 13x Gen 2
    CPU
    Intel i7-1255U
    Memory
    16 GB
    Graphics card(s)
    Intel Iris Xe Graphics
    Sound Card
    Realtek® ALC3306-CG codec
    Monitor(s) Displays
    13.3-inch IPS Display
    Screen Resolution
    WQXGA (2560 x 1600)
    Hard Drives
    2 TB 4 x 4 NVMe SSD
    PSU
    USB-C / Thunderbolt 4 Power / Charging
    Mouse
    Buttonless Glass Precision Touchpad
    Keyboard
    Backlit, spill resistant keyboard
    Internet Speed
    1Gb Up / 1Gb Down
    Browser
    Edge
    Antivirus
    Windows Defender
    Other Info
    WiFi 6e / Bluetooth 5.1 / Facial Recognition / Fingerprint Sensor / ToF (Time of Flight) Human Presence Sensor
Why should I do such an "update" if I can download Original Iso from Microsoft?
You shouldn't.

Do you have access to ISO images with every update? For example, when the Patch Tuesday updates are released today in about an hour and a half, will you have access to ISO images that have those updates already slipstreamed into them?

Again, bear in mind, this is by no means a tool for everyone! In fact, I would say it is for EXTREMELY few people, people who are true geeks and enthusiasts :-).
 

My Computers

System One System Two

  • OS
    Win11 Pro 23H2
    Computer type
    PC/Desktop
    Manufacturer/Model
    Home Built
    CPU
    Intel i7-11700K
    Motherboard
    ASUS Prime Z590-A
    Memory
    128GB Crucial Ballistix 3200MHz DRAM
    Graphics Card(s)
    No GPU - CPU graphics only (for now)
    Sound Card
    Realtek (on motherboard)
    Monitor(s) Displays
    HP Envy 32
    Screen Resolution
    2560 x 1440
    Hard Drives
    1 x 1TB NVMe Gen 4 x 4 SSD
    1 x 2TB NVMe Gen 3 x 4 SSD
    2 x 512GB 2.5" SSDs
    2 x 8TB HD
    PSU
    Corsair HX850i
    Case
    Corsair iCue 5000X RGB
    Cooling
    Noctua NH-D15 chromax.black cooler + 10 case fans
    Keyboard
    CODE backlit mechanical keyboard
    Mouse
    Logitech MX Master 3
    Internet Speed
    1Gb Up / 1 Gb Down
    Browser
    Edge
    Antivirus
    Windows Defender
    Other Info
    Additional options installed:
    WiFi 6E PCIe adapter
    ASUS ThunderboltEX 4 PCIe adapter
  • Operating System
    Win11 Pro 23H2
    Computer type
    Laptop
    Manufacturer/Model
    Lenovo ThinkBook 13x Gen 2
    CPU
    Intel i7-1255U
    Memory
    16 GB
    Graphics card(s)
    Intel Iris Xe Graphics
    Sound Card
    Realtek® ALC3306-CG codec
    Monitor(s) Displays
    13.3-inch IPS Display
    Screen Resolution
    WQXGA (2560 x 1600)
    Hard Drives
    2 TB 4 x 4 NVMe SSD
    PSU
    USB-C / Thunderbolt 4 Power / Charging
    Mouse
    Buttonless Glass Precision Touchpad
    Keyboard
    Backlit, spill resistant keyboard
    Internet Speed
    1Gb Up / 1Gb Down
    Browser
    Edge
    Antivirus
    Windows Defender
    Other Info
    WiFi 6e / Bluetooth 5.1 / Facial Recognition / Fingerprint Sensor / ToF (Time of Flight) Human Presence Sensor
You shouldn't.

Do you have access to ISO images with every update? For example, when the Patch Tuesday updates are released today in about an hour and a half, will you have access to ISO images that have those updates already slipstreamed into them? If so, no need to update. However, the program does other things like allow you to add drivers, etc. Maybe some of those features might be helpful. If not, it is not for you!

Again, bear in mind, this is by no means a tool for everyone! In fact, I would say it is for EXTREMELY few people, people who are true geeks and enthusiasts :-).
 

My Computers

System One System Two

  • OS
    Win11 Pro 23H2
    Computer type
    PC/Desktop
    Manufacturer/Model
    Home Built
    CPU
    Intel i7-11700K
    Motherboard
    ASUS Prime Z590-A
    Memory
    128GB Crucial Ballistix 3200MHz DRAM
    Graphics Card(s)
    No GPU - CPU graphics only (for now)
    Sound Card
    Realtek (on motherboard)
    Monitor(s) Displays
    HP Envy 32
    Screen Resolution
    2560 x 1440
    Hard Drives
    1 x 1TB NVMe Gen 4 x 4 SSD
    1 x 2TB NVMe Gen 3 x 4 SSD
    2 x 512GB 2.5" SSDs
    2 x 8TB HD
    PSU
    Corsair HX850i
    Case
    Corsair iCue 5000X RGB
    Cooling
    Noctua NH-D15 chromax.black cooler + 10 case fans
    Keyboard
    CODE backlit mechanical keyboard
    Mouse
    Logitech MX Master 3
    Internet Speed
    1Gb Up / 1 Gb Down
    Browser
    Edge
    Antivirus
    Windows Defender
    Other Info
    Additional options installed:
    WiFi 6E PCIe adapter
    ASUS ThunderboltEX 4 PCIe adapter
  • Operating System
    Win11 Pro 23H2
    Computer type
    Laptop
    Manufacturer/Model
    Lenovo ThinkBook 13x Gen 2
    CPU
    Intel i7-1255U
    Memory
    16 GB
    Graphics card(s)
    Intel Iris Xe Graphics
    Sound Card
    Realtek® ALC3306-CG codec
    Monitor(s) Displays
    13.3-inch IPS Display
    Screen Resolution
    WQXGA (2560 x 1600)
    Hard Drives
    2 TB 4 x 4 NVMe SSD
    PSU
    USB-C / Thunderbolt 4 Power / Charging
    Mouse
    Buttonless Glass Precision Touchpad
    Keyboard
    Backlit, spill resistant keyboard
    Internet Speed
    1Gb Up / 1Gb Down
    Browser
    Edge
    Antivirus
    Windows Defender
    Other Info
    WiFi 6e / Bluetooth 5.1 / Facial Recognition / Fingerprint Sensor / ToF (Time of Flight) Human Presence Sensor
Ramesh, I have a couple of questions for you now...

So, in looking at the release history for Windows 11, build 1702 is the May 9, 2023 release. Build 2070 is the July 26, 2023 Preview Update.

That tells me that you must have installed Windows from media that is not updated to build 2070 yet, but the output from the program is showing a build that has been updated.

So here are a couple of tips:

What I usually do every patch Tuesday (like today!) is that I download the latest updates. Then, I run the program and select option #1 to inject the updates. I'll point the program to my windows ISO image and when it asks what indicies I should upgrade, I will specify "ALL".

If you do something like export indicies from different sources that have different builds and end up combing then all into one image, you could end up with something weird like this.

Note that when the program looks at the Windows image to determine the build, it simply looks at the first index. You may notice the message that says that we assume that all indicies have the same build number. This is because I made the program assuming that you would not create a mix of different builds all in the same image.

I don't know if any of this helps you. Do you recall all the steps that you took to create the media? Is it possible that you somehow created media with mixed builds?

If you are not certain, there are a few things that we could do:

1) If you could place your ISO image somewhere for me, I could take a look at it and see if you ended up with media that has mixed builds in it.

2) I could a quick script that will show the build for each and every edition of Windows in your image to see if you have different builds going on.
Thank you very much @hsehestedt for your quick response.
1. I used the downloaded windows 11 image from Microsoft website. It is os build number 1702 , direct iso download having install.wim with multi editions.
2. I downloaded July 23 updates from windows update catalogue and tried to inject using WIM TOOLS , version 21.6.0.239.
3. Again used the tool to check os build number, and tried to work it on my unsupported pc after using option 4 from WIM TOOLS version 22.2.2.250.
I received the message "this pc can't run windows 11".
So I used JosephM101 script from GitHub to make this updated iso to run on my unsupported pc.
4. Lastly I installed Windows 11 Pro , I have posted the image showing date, os build number , edition.
5. Why option 4 did not work?
 

My Computer

System One

  • OS
    Window 11 v24H2 Build 26085.1
    Computer type
    PC/Desktop
    Manufacturer/Model
    ASSEMMBLED
    CPU
    Intel Pentium CPU G620@ 2.60 GHz
    Motherboard
    DAICHI
    Memory
    6 GB
    Graphics Card(s)
    Onboard
    Sound Card
    Onboard
    Monitor(s) Displays
    LG
    Screen Resolution
    1366x768
    Hard Drives
    Toshiba HDD 1 TB
    Keyboard
    Mechanical
    Mouse
    Mechanical
    Internet Speed
    700 kb/s
    Browser
    Microsoft EDGE, CHROME
    Antivirus
    Microsoft Defender
Let me look into that.

Here is what I am going to try:

I already have an ISO that has all the updates for build 2070 added to it. I'm going to use option 4 to update the boot.wim. Then I will try to install it on what should be an unsupported system or VM configuration.

I'll let you know how it goes!
 

My Computers

System One System Two

  • OS
    Win11 Pro 23H2
    Computer type
    PC/Desktop
    Manufacturer/Model
    Home Built
    CPU
    Intel i7-11700K
    Motherboard
    ASUS Prime Z590-A
    Memory
    128GB Crucial Ballistix 3200MHz DRAM
    Graphics Card(s)
    No GPU - CPU graphics only (for now)
    Sound Card
    Realtek (on motherboard)
    Monitor(s) Displays
    HP Envy 32
    Screen Resolution
    2560 x 1440
    Hard Drives
    1 x 1TB NVMe Gen 4 x 4 SSD
    1 x 2TB NVMe Gen 3 x 4 SSD
    2 x 512GB 2.5" SSDs
    2 x 8TB HD
    PSU
    Corsair HX850i
    Case
    Corsair iCue 5000X RGB
    Cooling
    Noctua NH-D15 chromax.black cooler + 10 case fans
    Keyboard
    CODE backlit mechanical keyboard
    Mouse
    Logitech MX Master 3
    Internet Speed
    1Gb Up / 1 Gb Down
    Browser
    Edge
    Antivirus
    Windows Defender
    Other Info
    Additional options installed:
    WiFi 6E PCIe adapter
    ASUS ThunderboltEX 4 PCIe adapter
  • Operating System
    Win11 Pro 23H2
    Computer type
    Laptop
    Manufacturer/Model
    Lenovo ThinkBook 13x Gen 2
    CPU
    Intel i7-1255U
    Memory
    16 GB
    Graphics card(s)
    Intel Iris Xe Graphics
    Sound Card
    Realtek® ALC3306-CG codec
    Monitor(s) Displays
    13.3-inch IPS Display
    Screen Resolution
    WQXGA (2560 x 1600)
    Hard Drives
    2 TB 4 x 4 NVMe SSD
    PSU
    USB-C / Thunderbolt 4 Power / Charging
    Mouse
    Buttonless Glass Precision Touchpad
    Keyboard
    Backlit, spill resistant keyboard
    Internet Speed
    1Gb Up / 1Gb Down
    Browser
    Edge
    Antivirus
    Windows Defender
    Other Info
    WiFi 6e / Bluetooth 5.1 / Facial Recognition / Fingerprint Sensor / ToF (Time of Flight) Human Presence Sensor
Done testing already. There must be something that you and I are doing differently because it worked perfectly for me.

Here is how I tested:

I created a new VM in Hyper-V. I DID NOT give that machine a TPM so that it would fail and complain that Windows 11 could not be installed on that system.

I used my Windows ISO image that I previously upgraded to include all the July 26 updates. Just as expected, it complained that Windows could not be installed.

I then ran option #4 in my program and updated the image so that it would inject the bypasses into the boot.wim file. This took maybe only 2 or 3 minutes at the most.

I now attached that updated ISO image to the VM and booted. This time, it goes right past the point where it would complain and allows me to install Windows just fine.

Are you 100% sure that you used the new image that was updated?

Also, are you sure that your Windows image uses an install.wim file and NOT an install.esd in the \sources folder? In order to properly update images, we need an install.wim rather than an install.esd. Although, in this case it may still work with an install.esd since we are only updating the boot.wim and not the install.wim.

One more thing: If you still have the original Windows image, mount it and check the properties of the \sources\boot.wim file. Compare that with the image after you used option #4. The boot.wim should have a different size. If they are exactly the same, then something went wrong and the boot.wim was not updated.
I used the updated image with install.wim
I will repeat the process again and check the size of boot.wim of original and bypassed image.
Ok.
I used Win11 _22H2_ENGLISH_x64v2 image to bypass using option 4.
1. Size of this image is 57,05,260 kb and size of boot.wim in sources folder is 4,70,891 kb before injecting bypass.
2. Size of image after bypass is 57,05,244 kb and size of boot.wim is 4,70,891 kb.
3 . Both the images were mounted on virtual drive to check the sizes.
4. No difference in size of boot.wim found .
 
Last edited:

My Computer

System One

  • OS
    Window 11 v24H2 Build 26085.1
    Computer type
    PC/Desktop
    Manufacturer/Model
    ASSEMMBLED
    CPU
    Intel Pentium CPU G620@ 2.60 GHz
    Motherboard
    DAICHI
    Memory
    6 GB
    Graphics Card(s)
    Onboard
    Sound Card
    Onboard
    Monitor(s) Displays
    LG
    Screen Resolution
    1366x768
    Hard Drives
    Toshiba HDD 1 TB
    Keyboard
    Mechanical
    Mouse
    Mechanical
    Internet Speed
    700 kb/s
    Browser
    Microsoft EDGE, CHROME
    Antivirus
    Microsoft Defender
Injecting registry entries into boot.wim to image named Win11v2, by option 4, I added this image to folder ISO Images created by WIM TOOLS 22.2.2.250. I ran config_UFD to set this edited image to boot first on restart of my pc. Having reached the well known error message"This pc can't run windows 11" , I tried shift+F10 to open command prompt. Running notepad, I located bypass registry file which we have used up till now. I right clicked it to merge and registry entries successfully added. I clicked back arrow and again clicked Install Now button.
This time Eula opened to proceed further for installation.
All editions were displayed as usual we have seen.
I have checked the os build number , again using this tool from desktop, it is 1702 of v22H2.
Please see the images of this image file.
So it means shift+F10 worked again which was discontinued from os build 1702.
But option 4 has to be applied from windows desktop before booting flash drive prepared by WIM TOOLS.

Thank you very much @hsehestedt .
 

Attachments

  • IMG_20230809_181305.jpg
    IMG_20230809_181305.jpg
    671.7 KB · Views: 3
  • IMG_20230809_181641.jpg
    IMG_20230809_181641.jpg
    610.1 KB · Views: 3
  • IMG_20230809_181811.jpg
    IMG_20230809_181811.jpg
    486 KB · Views: 3
  • RegUpdates.reg
    261 bytes · Views: 4
Last edited:

My Computer

System One

  • OS
    Window 11 v24H2 Build 26085.1
    Computer type
    PC/Desktop
    Manufacturer/Model
    ASSEMMBLED
    CPU
    Intel Pentium CPU G620@ 2.60 GHz
    Motherboard
    DAICHI
    Memory
    6 GB
    Graphics Card(s)
    Onboard
    Sound Card
    Onboard
    Monitor(s) Displays
    LG
    Screen Resolution
    1366x768
    Hard Drives
    Toshiba HDD 1 TB
    Keyboard
    Mechanical
    Mouse
    Mechanical
    Internet Speed
    700 kb/s
    Browser
    Microsoft EDGE, CHROME
    Antivirus
    Microsoft Defender

Latest Support Threads

Back
Top Bottom